Table of contents: Removal and installation ↓ Disassembly and assembly ↓
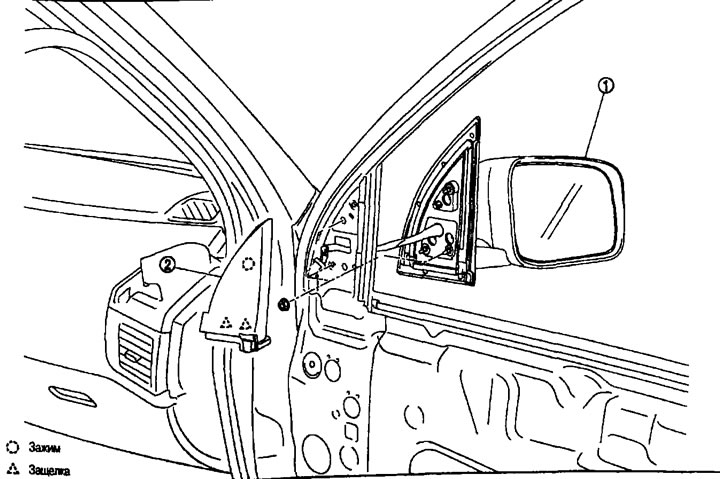
Removal 1. Door mirror assembly; 2. Door mirror corner cover.
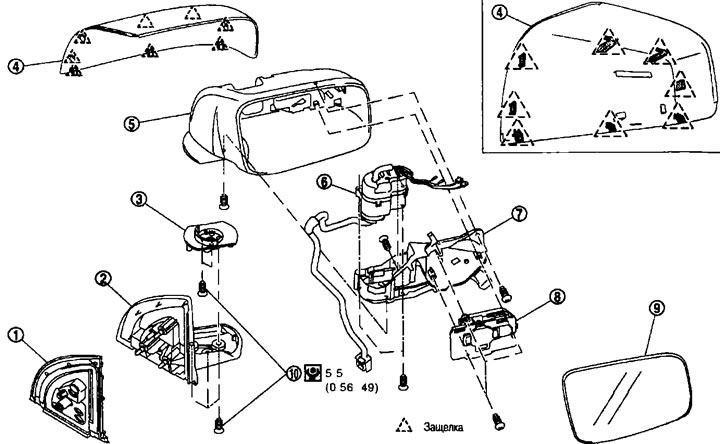
Disassembly 1. Stuffing; 2. Foundation; 3. Base plate; 4. Door mirror cover; 5. Body; 6. Power supply; 7. Bracket; 8. Drive; 9. Mirror glass; 10. TORX bolt.
Removal and installation
Caution: Do not damage the door mirror housing.
Removal
1. Remove the front door trim. See chapter "Interior and exterior body equipment".
2. Remove the door mirror corner cover.
3. Disconnect the connector from the door mirror.
4. Loosen the door mirror mounting nuts and remove the door mirror assembly.
Installation
Installation is carried out in the reverse order of removal.
Disassembly and assembly
Disassembly
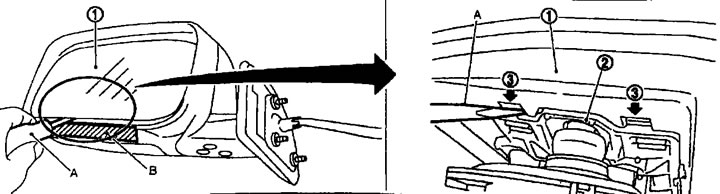
1. Place the mirror housing with the glass facing up.
2. Apply a strip of protective tape (B) to the mirror housing.
3. Insert a small flat-blade screwdriver (A) into the gap between the mirror glass (1) and the drive (2) as shown in the figure, press the two latches (3) and separate the lower half of the mirror glass.
Note: When pressing the latches, try to grab not 1, but 2 latches at once. To make the job easier, insert a screwdriver into the gap and press while rotating it.
4. Disconnect the two terminals from the mirror heating element.
5. Slightly lift the mirror glass at the bottom, disengage the two upper latches and separate the mirror glass from the drive.
Note: Do not allow lubricant to come into contact with the sealant in the center of the mirror or on the back of the mirror glass.
6. Disengage the latches and separate the cover from the mirror assembly.
7. Remove the screws and separate the drive from the mirror assembly.
8. Remove the padding from the base.
9. Unscrew the TORX bolts and separate the base from the mirror assembly.
10. Remove the TORX bolts and separate the base plate from the mirror assembly.
11. Remove the screws and separate the bracket assembly from the housing.
12. Remove the screws and separate the power supply from the bracket.
Assembly
Installation is performed in the reverse order of removal.
Note: After installation, perform a visual inspection to ensure the latches are securely engaged.