


Table of contents: Display on the line monitor ↓ Parking with predicted trajectory…↓ Rear view camera setup ↓
- After moving the gearshift lever or the automatic transmission selector lever to position R, the monitor will show the situation around the rear of the vehicle.
- This system helps avoid collisions with obstacles when reversing. It does not detect small objects below the rear bumper and may not detect objects that are too close to the bumper or on the supporting surface.
Display on the line monitor
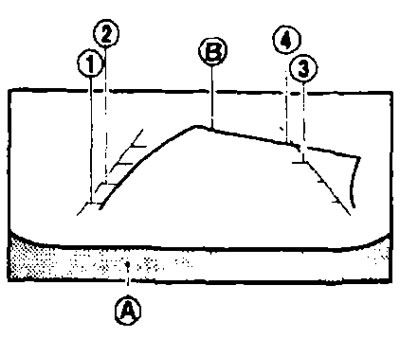
- The lines on the display indicate the width of the vehicle's movement corridor and the distance from the obstacle to the vehicle's bumper (A).
- The lines indicate the following distance from the obstacle to the car's bumper:
(1) 0.5 m red line;
(2) 1m yellow line;
(3) 2 m green line;
(4) 3 m green line.
- After turning the steering wheel and setting the automatic transmission selector lever to position R, additional predicted trajectory lines (B) will be shown on the monitor.
Parking with predicted trajectory lines
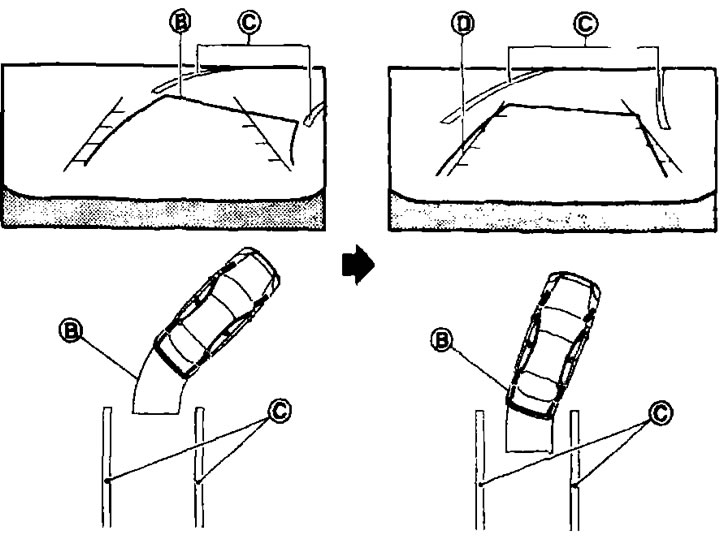
1. Before you start parking, visually check that the space behind the car is free.
2. The rear view will be shown on the monitor as shown in the figure when you move the gear shift lever (cars with manual transmission) or selector lever (cars with automatic transmission or CVT) to position R. The predicted trajectory lines (B) will appear on the monitor if you turn the steering wheel to the right or left.
3. Reverse into the parking space (C), using the predicted path lines as a guide.
4. Steer the steering wheel so that the vehicle width lines (D) are parallel to the parking space boundaries (C), using the predicted trajectory lines as a guide.
5. After parking is completed.
- Vehicles with manual transmission: Leave the gearshift lever in position R and apply the parking brake.
- Vehicles with automatic transmission or reference point (CVT): Set the selector lever to the P position and tighten the parking brake.
(Source is available on the resource NISSANBOOK.ru)
Rear view camera setup
To adjust the brightness (Brightness) tint, Color or Contrast of the image Press the SETTING button while the rear view camera monitor is on, select the corresponding button on the screen and adjust it using the multi-function switch.