


Table of contents: Removal and installation ↓ Installation ↓ Joint "Exhaust manifold. Front…↓ Joint "Front exhaust pipe. Main…↓ Post-installation check ↓
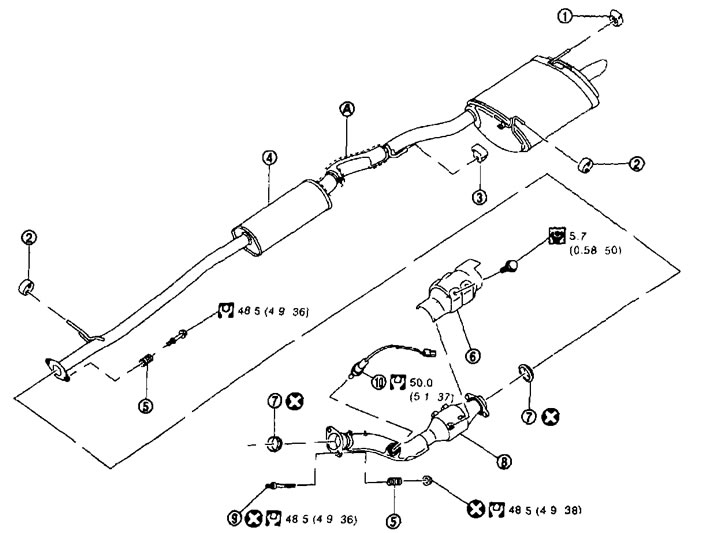
Car repair 1. Rubber cushion; 2. Rubber cushion; 3. Rubber cushion; 4. Main muffler; 5. Spring; 6. Heat shield; 7. O-ring gasket; 8. Front exhaust pipe; 9. Hairpin; 10. Heated oxygen sensor 2; A. Heat shield (on 4WD models)
Removal and installation
Removal
Disconnect all components by removing the fasteners.
Remove the heated oxygen sensor 2 as follows:
- Unscrew the heated oxygen sensor-2 (1) using a wrench (special tool KV10114400) (A)
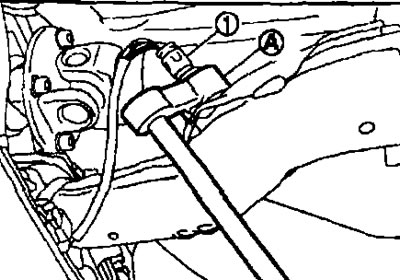
Caution: Do not damage the heated oxygen sensor-2.
Installation
Installation is carried out in the reverse order of removal, taking into account the following:
(The article was copied from here NISSANBOOK.ru)
Attention:
- Always replace exhaust pipe gaskets with new ones when reassembling.
- Discard the heated oxygen sensor-2 if it is dropped on a hard surface, such as a concrete floor. Replace it with a new one.
- Before installing a new heated oxygen sensor 2, clean the threads in the exhaust system using a heated oxygen sensor thread cleaner (suitable special tool) and apply anti-seize compound.
- Do not overtighten the heated oxygen sensor 2, otherwise the sensor may be damaged, which will cause the "MI" indicator to illuminate.
- If the heat shield is severely deformed, repair or replace. If deposits, such as dirt, have accumulated on the heat shield, remove them.
- When installing the heat shield, do not leave large gaps between the shield and the exhaust pipe sections.
- Remove deposits from the sealing surfaces of the joints. Connect them securely to prevent exhaust leakage.
- If the rubber pads are difficult to install, soak them in a mild detergent.
- Tighten the mounting nuts and bolts by hand. Check that the components do not interfere with each other, then tighten to the specified torque.
- When installing the rubber cushions, do not twist or stretch them up/down or right/left.
Joint "Exhaust manifold. Front exhaust pipe."
1. Firmly insert the O-ring (2) from the exhaust manifold (1) side in the direction shown in the figure.
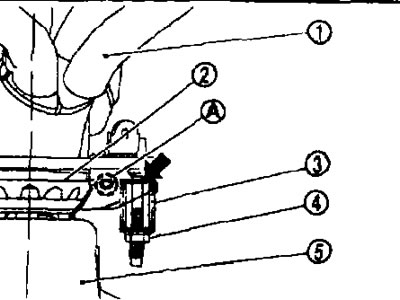
3. Spring; 4. Fastening nut; 5. Front exhaust pipe.
Caution: Do not damage the surface of the O-ring during installation.
2. Tighten the fastening nut by applying the spring.
Make sure that the fastening nut does not touch the flange section (
 ) and tighten it.
Attention:
- Before installing the mounting nuts, tighten the studs on the exhaust manifold flange side to the required torque.
- Make sure that the springs are seated correctly on the flange and do not touch area (A).
Joint "Front exhaust pipe. Main muffler."
1. Firmly insert the O-ring (2) from the front exhaust pipe (1) side in the direction shown in the figure on the next page.
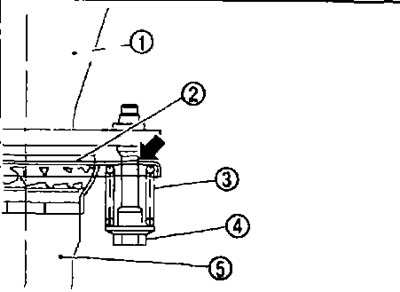
3. Spring; 4. Mounting bolt; 5. Main muffler.
Caution: Do not damage the surface of the O-ring during installation.
2. Tighten the mounting bolt by applying the spring.
- Make sure that the mounting bolt does not touch the flange section (
 ) and tighten it.
Post-installation check
- Make sure the gap between the rear exhaust pipe and the rear bumper is uniform.
- Start the engine and check for exhaust leaks at the exhaust pipe joints and any extraneous noise.
- After installation, make sure there is no excessive mechanical stress on the mounting brackets and rubber cushions. If these components are not installed correctly, excessive noise or vibration may be transmitted to the body.