


Table of contents: Removal ↓ Removal and installation ↓ Disassembly and assembly ↓ Sun protection blind ↓ Removal and installation ↓ Hatch switch ↓ Removal and installation ↓
Removal
See the picture above.
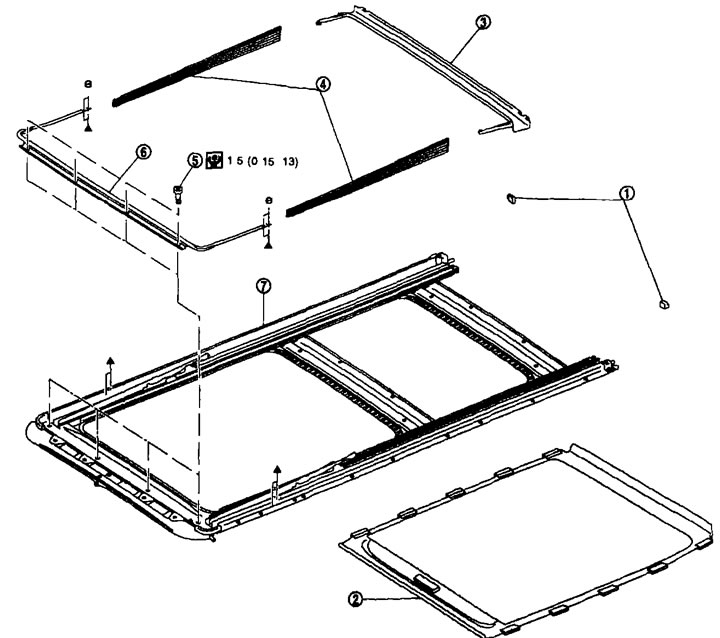
Disassembly 1. Sunshade limiter (left/right); 2. Sunshade; 3. Rear gutter; 4. Side cover (left/right); 5. TORX bolt; 6. Deflector; 7. Hatch frame.
Removal and installation
Removal
- Work with a partner.
- Before removing, close the glass cover completely and do not operate the sunroof motor after removal.
- When removing the sunroof, cover the seats and trim with rags to avoid damaging them.
1 Remove the ceiling. See the section above "Interior equipment".
2. Remove the glass cover. See above.
3. Disconnect the drain hoses.
4. Remove the sunroof motor assembly. See above.
5. Remove the handrail bracket.
6. Remove the front sunroof brackets (left/right).
7. Remove the central sunroof brackets (left/right).
8. Remove the rear sunroof brackets (left/right).
9. Remove the nuts from the front end and side guide, then remove the sunroof assembly from the roof panel.
10. Remove the sunroof assembly through the rear door opening, being careful not to damage the seats or trim.
Installation
After installing the hatch assembly and glass cover, check for water leakage and make sure there are no abnormalities.
1. Hand tighten the mounting bolts on the rear sunroof brackets (right/left).
2. Insert the sunroof assembly through the rear door opening and insert the rear end of the guide into the sunroof brackets.
3. Hand tighten the mounting nuts at the front end of the hatch assembly.
4. Hand tighten the mounting bolts on the front center and rear sunroof brackets (right/left).
5. Tighten the fastening elements diagonally, excluding the fastening of the hatch bracket along the perimeter of the hatch opening.
6. Tighten the mounting nuts at the front end and on the side guide.
7. Tighten the hatch bracket bolts from the body side, then from the guide side.
8. Install the sunroof motor assembly. See above.
9. Connect the drain hoses.
10. Install the glass cover. See above.
- After installation, adjust the fit. See above.
11. Install the ceiling. See the section above "Interior equipment".
Disassembly and assembly
Disassembly
1. Remove the sunshade limiter (left/right) from the rear end of the hatch frame.
2. Remove the sunshade from the rear of the sunroof frame.
3. Disconnect the rear drain from the rear end of the sunroof frame.
4. Remove the side cover (left/right) from the rear end of the hatch frame.
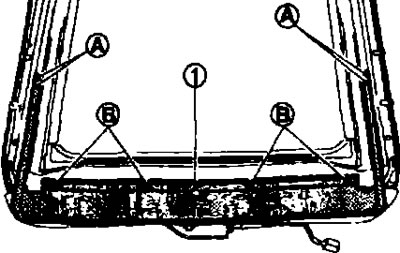
5. Unscrew the nuts (A) and TORX bolts (B) and remove the deflector (1).
Assembly
Assembly is performed in the reverse order of disassembly.
Sun protection blind
See the picture above.
Removal and installation
Removal
1. Remove the ceiling. See the section above "Interior equipment".
2. Remove the sunroof assembly. See above.
3. Remove the sunshade limiter (left/right) from the rear end of the hatch frame.
4. Remove the sunshade from the rear end of the sunroof frame.
Installation
Installation is carried out in the reverse order of removal.
Hatch switch
See the chapter "Driver-controlled instruments".
Removal and installation
Removal
Remove the sunroof switch.
Installation
Installation is carried out in the reverse order of removal.