


Table of contents: Door assembly ↓ Removal and installation ↓ Adjustment ↓ Door latch hinge ↓ Removal and installation ↓ Door hinge ↓ Removal and installation ↓ Door limiter rod ↓ Removal and installation ↓
Door assembly
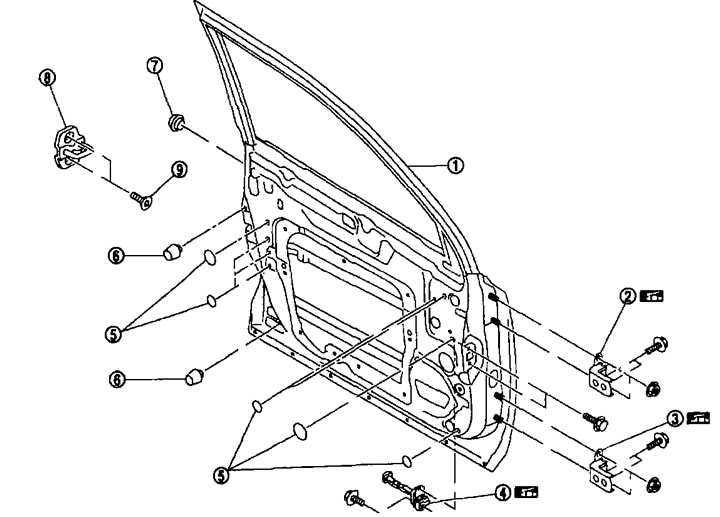
Removal. 1. Front door panel; 2. Door hinge (upper); 3. Door hinge (lower); 4. Door limiter rod; 5. Compaction; 6. Rubber door shock absorber; 7. Rubber bushing; 8. Door latch hinge; 9. TORX bolt.

Adjustment. 1. Front wing; 2. Front door; 3. Rear side door; 4. Side panel of the body outside; 5. Front door hinge; 6. Rear side door hinge (upper); 7. Rear side door hinge (lower); 8. Door latch hinge; 9. TORX bolt.
Removal and installation
Attention:
- Work with a partner, as the door is heavy.
- When removing and installing the front door assembly, support the door with a jack and place a rag underneath to avoid damaging the door and body.
Removal
1. Unscrew the limiter rod mounting bolts from the body side.
2. Remove the rubber grommet of the front door electrical wiring and remove the electrical wiring from the vehicle.
3. Disconnect the front door electrical connector.
4. Unscrew the hinge mounting nuts from the door side and remove the door assembly.
Installation
Installation is carried out in the reverse order of removal.
Attention:
- After installation, check how the front door closes/opens.
- Check if there is enough grease on the rotating part of the joint. Apply body grease if necessary.
- When removing and installing the front door assembly, perform fit adjustment. See below.
- After installation, apply paint (to match the body color) on the fastening nuts of the hinges.
(Material borrowed from the website: «nissanbook.ru»)
Adjustment
Adjusting the gap and surface height
| Plot | Clearance (mm) | Height (mm) | |
| Front wing - front door | A-A | 3,4-5,4 | from -1.0 to 1.0 |
| Front door rear side door | B-B | 3,5-5,5 | from -1.0 to 1.0 |
| Front door rear side door | G-G | 3,0-6,0 | from -1.0 to 1.0 |
1. Check the gap and surface height between the front door and each component visually and by touch. (They must correspond to the standard sizes indicated in the table).
2. If any dimensions are different from the standard, adjust them as follows.
3. Remove the front fender. See above.
4. Loosen the hinge mounting nuts on the door side.
5. Adjust the height of the front door surface to the standard size.
6. Tighten the hinge mounting nuts on the door side by hand.
7. Loosen the mounting nuts of the hinges on the vehicle body side.
8. Adjust to standard dimensions by raising or lowering the rear end of the front door
9. After adjustment, tighten the bolts and nuts to the required torque.
10. Install the front fender. See above.
Caution: After installation, check the fit of the front fender. See above.
Adjusting the door latch hinge
Adjust the hinge so that it is parallel to the direction of engagement of the door latch.
Door latch hinge
See the picture above.
Removal and installation
Removal
Remove the TORX bolts and the door latch hinge.
Installation
Installation is carried out in the reverse order of removal.
Attention:
- After installation, check how the front door closes/opens.
- When removing and installing the door latch hinge, adjust the fit. See above.
Door hinge
See the picture above.
Removal and installation
Removal
1. Remove the front door assembly. See above.
2. Unscrew the door hinge mounting bolts and remove the hinges.
Installation
Installation is carried out in the reverse order of removal.
Attention:
- After installation, check how the front door closes/opens.
- Check if there is enough grease on the rotating part of the joint. Apply body grease if necessary.
- When removing and installing the front door assembly, adjust the fit. See above.
- After installation, apply paint (to match the body color) on the fastening nuts of the hinges.
Door limiter rod
See the picture above.
Removal and installation
Removal
1. Fully lower the front door window.
2. Remove the front door trim. See the section above "Interior equipment".
3. Remove the speaker from the front door.
4. Screw in the limiter rod mounting bolts from the body side.
5. Unscrew the mounting bolts of the limiter rod from the door side.
6. Remove the door limiter rod from the hole in the door panel.
Installation
Installation is carried out in the reverse order of removal.
Attention: After installation, check how the front door closes/opens.