


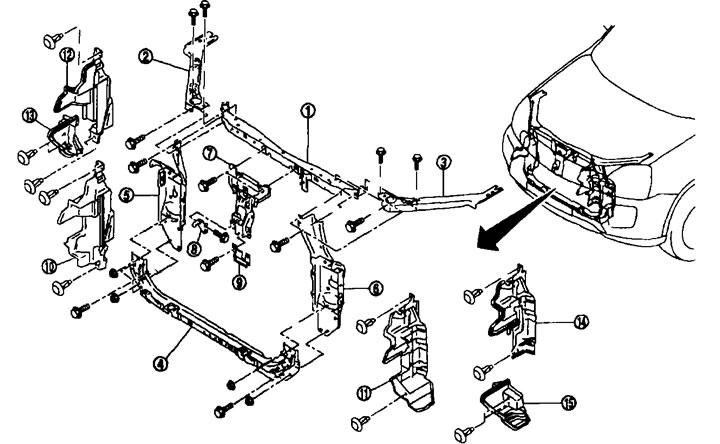
Radiator core support. 1. Radiator core support, upper center; 2. Radiator core support, upper right; 3. Radiator core support, upper left; 4. Radiator core support, lower; 5. Radiator core support, side right; 6. Radiator core support, left side; 7. Bonnet lid lock support post assembly; 8. Front bumper cornice central bracket; 9. Sensor bracket; 10. Air duct, right; 11. Left air duct; 12. Air duct, upper right (on models with M9R engine); 13. Air duct, lower right (on models with M9R engine); 14. Air duct, upper left (on models with M9R engine); 15. Lower left air duct (on models with M9R engine).
Removal and installation
Removal
1. Remove the front bumper cornice and energy absorber. See the section below "Exterior body equipment".
2. Remove the bumper stiffener. See the section below "Exterior body equipment".
3. Disconnect the connector from the fluid reservoir.
4. Remove the front combination light.
5. Remove the washer reservoir.
6. Disconnect the hood lock control cable clamps and remove the hood lock assembly. See above.
7. Remove the retaining clips and remove the air duct (left/right).
8. Remove the horn.
9. Remove the smart key buzzer (on models with smart key system). See below.
(The material is based on data from the portal: nissanbook.ru)
10. Remove the electrical wiring clips from the hood latch pillar.
11. Unscrew the mounting bolts of the hood lock stand and remove the stand.
12. Remove the front impact sensor.
13. Securely insert the hood support rod into the hole in the engine mount bracket.
Caution: Make sure the hood is securely latched.
14. Unscrew the mounting bolts of the upper radiator core support (right/left) and remove the support.
15. Unscrew the mounting bolts of the upper central support of the radiator core and remove the support.
16. Remove the wiring clips from the radiator core side support (left).
17. Remove the lower radiator core support assembly mounting bolts.
18. Remove the lower radiator core support assembly while having a partner hold the radiator and condenser assembly to prevent them from falling.
Attention: Carry out work with a partner, as the components are heavy.
19. Place wooden blocks (B) under the radiator and condenser and tie them with rope (A) to prevent them from falling.
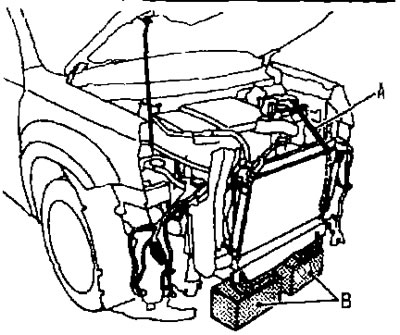
Attention: Carry out work with a partner, as the components are heavy.
20. Unscrew the fastening nuts of the side support of the radiator core (right/left) and remove the support from the lower radiator core support.
Installation
Installation is carried out in the reverse order of removal.