


Table of contents: Hood cover assembly ↓ Removal and installation ↓ Adjustment ↓ Bonnet hinge ↓ Removal and installation ↓ Bonnet support rod ↓ Removal and installation ↓ Bonnet Lock Control Cable ↓ Removal and installation ↓ Examination ↓
Hood cover assembly
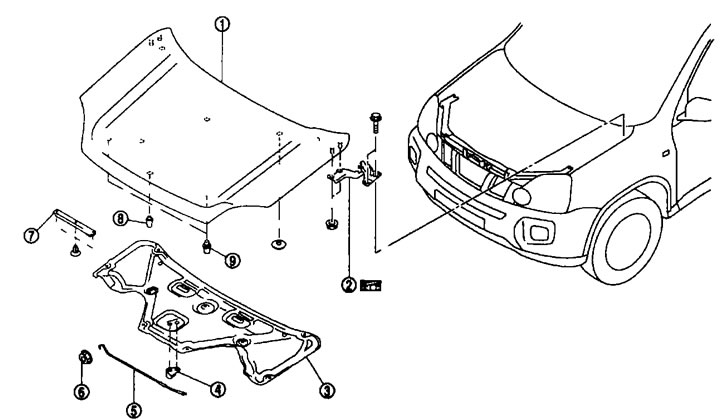
Removal. 1. Hood cover assembly; 2. Bonnet hinge; 3. Hood insulator; 4. Clamp; 5. Bonnet support rod; 6. Rubber bushing; 7. Sealing the radiator core; 8. Rubber shock absorber, central; 9. Rubber shock absorber, side.
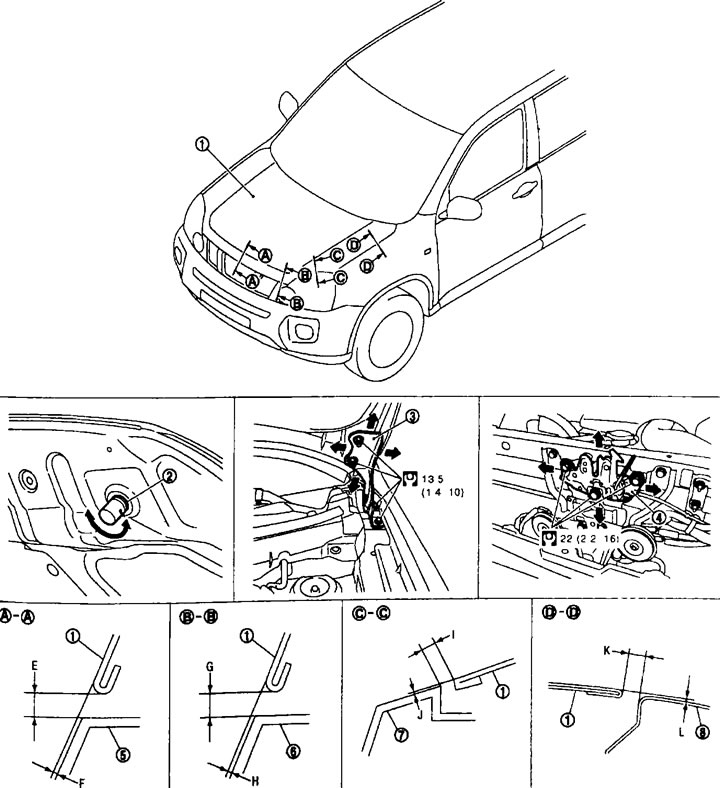
Adjustment. 1. Hood cover assembly; 2. Rubber shock absorber, side; 3. Bonnet hinge; 4. Hood lid lock assembly; 5. Radiator grille; 6. Front bumper; 7. Front combination light; 8. Front wing.
Removal and installation
Removal
1. Support the hood latch assembly with a suitable material so that it does not fall.
Caution: When removing the hood pillar, failure to secure the hood in the open position with the support rod may result in injury.
2. Unscrew the fastening nuts of the hinges on the hood and remove the hood cover assembly.
Attention. Carry out work with a partner, because the hood is heavy.
3. After removing the hood cover assembly, remove the following components:
- hood insulator,
- clamp,
- bonnet support rod,
- rubber bushing,
- radiator core seal,
- rubber shock absorber central,
- rubber side shock absorber.
Installation
Installation is carried out in the reverse order of removal.
Attention:
- Carry out the work with a partner, as the hood is heavy.
- Before installing the hood hinges, apply anti-corrosion lubricant to the mating surface of the car body.
- After installation, adjust the fit of the hood cover. See below.
Adjustment
| Plot | Standard (mm) | |||
| Hood cover radiator grille | A A | E | Gap | 4,0-8,0 |
| F | Height | from -0.4 to 4.0 | ||
| Hood Cover - Front Bumper | B B | G | Gap | 4,0-8,0 |
| H | Height | from -0.4 to 4.0 | ||
| Bonnet cover front combination lamp | With With | I | Gap | 1,8-6,2 |
| J | Height | from -1.3 to 2.7 | ||
| Hood cover front fender | D D | K | Gap | 2,6-4,6 |
| L | Height | from -1.0 to 1.0 | ||
1. Check the clearance and surface height between the hood cover and each component visually and by touch (They must correspond to the standard sizes indicated in the table).
2. Remove the radiator grille. See the section below "Exterior body equipment".
3. If any dimensions are different from the standard, adjust them as follows.
4. Remove the hood lock and adjust the height by rotating the side rubber shock absorber so that the hood is 1-1.5 mm lower than the wing.
5. Tighten the hood lock by hand and engage it with the latch. Make sure there is no play in the hood lock and latch and adjust the clearance and height relative to the latch loop to the standard.
6. Adjust the dimensions "A" and "B" shown in the figure to the values shown below by releasing the bonnet under its own weight from a height of approx. 200 mm or by lightly pressing with a force of approx. 29 N (3 kg).
7. After adjustment, tighten the lock mounting bolts to the required torque.
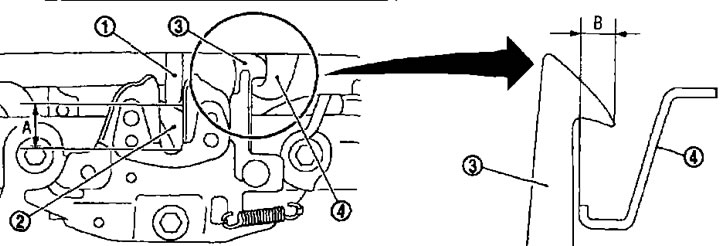
1. Hood latch loop.
2. Primary latch.
3. Secondary latch loop.
4. Secondary latch.
A. 20.0 mm.
W. 6.8 mm.
Bonnet hinge
See the picture above.
Removal and installation
Removal
1. Remove the hood cover assembly. See above.
2. Remove the front fender. See below.
3. Loosen the hinge mounting bolts on the hood and remove the hinges.
Installation
Installation is carried out in the reverse order of removal.
Attention:
- Before installing the hood hinges, apply anti-corrosion lubricant to the mating surface of the vehicle body.
- After installation, apply paint (to match the body color) on the heads of the fastening bolts and nuts of the hinges.
- After installation, adjust the fit of the hood cover. See above.
Bonnet support rod
See the picture above.
Removal and installation
Removal
1. Support the hood latch assembly with a suitable material so that it does not fall.
Caution: When removing the hood pillar, failure to secure the hood in the open position with the support rod may result in injury.
2. Remove the hood support rod from the rubber bushing.
Installation
Installation is carried out in the reverse order of removal.
Bonnet Lock Control Cable
Removal and installation
Removal
1. Loosen the hood lock opener mounting bolts and remove the opener.
2. Remove the radiator grille. See the section below "Exterior body equipment".
3. Remove the wing guard. See section below "Exterior body equipment".
4. Unscrew the hood lock mounting bolts and remove the lock.
5. Disconnect the cable from the hood latch and remove the cable clips from the hood support edge.
6. Remove the rubber bushing from the engine compartment bulkhead and pull the hood lock cable towards the vehicle interior.
Caution: When pulling the cable, do not tear or scratch the outer surface of the cable from the edge of the through hole in the body.
Installation
Installation is performed in the reverse order of removal.
Attention:
- Do not bend the cable excessively, maintaining a bending radius of 100 mm or more.
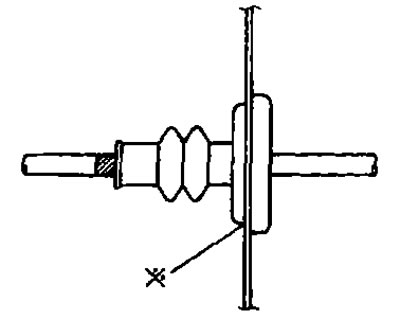
- Make sure that the cable has not moved relative to the rubber bushing and apply sealant to the area of the rubber bushing marked with an asterisk.
- Make sure the cable is securely engaged with the lock.
- After installation, adjust the fit of the hood cover. See above.
- After installation, check the hood latch cable. See below.
Examination
Note: If the hood latch cable is bent or deformed, replace it.
1. Make sure the secondary latch of the hood lock is securely engaged with the secondary latch hinge (6.8mm as shown in the picture) under the hood's own weight.
2. Pull the bonnet release lever slightly to ensure that the front edge of the bonnet has risen approximately 20mm. Also ensure that the bonnet release returns to its original position.
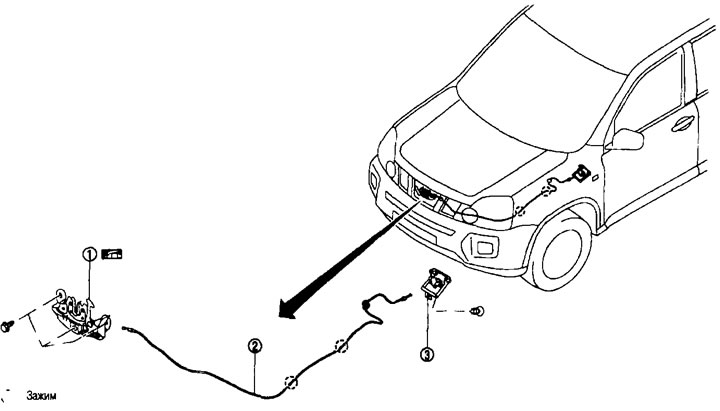
Bonnet lock control cable. 1. Hood lid lock assembly; 2. Bonnet lock control cable; 3. Hood lock opener.
3. Make sure that the hood opening force using the hood opener is 49 N (5.0 kg) or less.
4. Set so that the static closing force of the bonnet is 94-490 N·m (9.6-50.0 kg·m).
Note:
- Apply force vertically to the right and left sides of the hood latch.
- Do not press on both sides at the same time.
5 Make sure there is enough grease on the bonnet lock. Apply grease if necessary.