


2. The check begins with a visual inspection of the wire insulation with the engine running. Drive the car into a dark, well-ventilated area, start the engine and check for sparks on the wires. Sparks are a sign of insulation breakdown. Try not to touch moving components in the engine compartment. Make the necessary notes on replacing defective wires, then let the engine cool down and proceed to check the condition of the distributor cap and rotor.
3. Check the spark plug wires one by one to avoid violating the order of their connection during assembly. Usually, there is a corresponding marking on the insulation of branded wires. If there is none, apply it yourself using tape and a marker.
4. Disconnect the high voltage wire from the spark plug (it is best to use a special tool). Never pull on the wire itself, only on its tip.
5. Inspect the inside walls of the tip. Corrosion usually appears as a brittle, crusty white deposit.
6. Pull the tip back onto the spark plug stem, making sure it fits tightly. If necessary, remove the tip again and bend the terminals inside the rubber boot accordingly.
7. Wipe the entire length of the wire with a clean cloth, completely removing traces of dirt and grease from the surface of the insulation. Inspect the wire insulation for cracks, burn marks, and other damage. Try not to bend the wire at sharp angles to avoid damaging the integrity of the conductor cores inside the insulation.
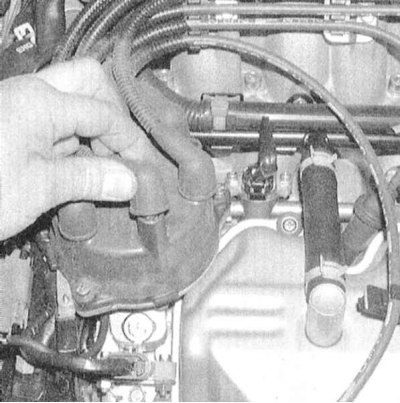
8. Disconnect the wire from the distributor - again, pull only the tip, not the wire. Check the tip for signs of corrosion, assess the tightness of its fit on the terminal. Reconnect the wire to the distributor.
9. Proceeding in a similar manner, check the condition of all remaining spark plug wires one by one. Make sure that they are securely connected to the spark plugs and distributor terminals.
10. If it is necessary to replace the high-voltage wires, make sure that the replacement wires correspond in size to the parameters of your car engine. In the company's branded stores of automobile accessories and service centers, you can always buy ready-to-use sets of high-voltage wires, cut to length and equipped with tips. Remove and replace the wires one by one to avoid disruption of the ignition sequence.
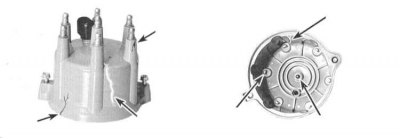
11. After unscrewing the fastening screws, remove the distributor cap and carefully inspect it both outside and inside for cracks, carbon tracks, traces of burnout, loose contact connections and other damage.
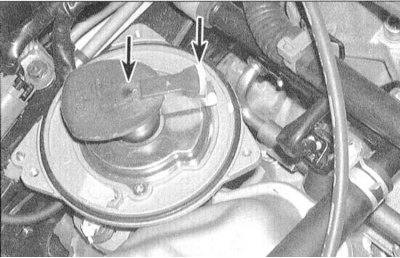
12. Pull the rotor up and off the distributor shaft and inspect it for cracks and carbon tracks. Replace any defective components.
13. It is good practice to replace the distributor cap and rotor, regardless of their condition, whenever new high-voltage wires are installed. When using old components, carefully clean the contact surfaces of their terminals and measure the resistance of the wires and the cap (see Specifications to this Chapter).
(The full article is available on the resource: Nissanbook.ru)
14. When installing a new distributor cap, transfer the high-voltage wires from the old one to it, connecting them strictly in the same order - try not to disconnect all the wires at the same time, transfer them one by one.
Note: The firing order is shown in the Specifications at the beginning of this Chapter. On most models, the protective projection (lining) of the No.1 spark plug wire connection terminal on the distributor cap is marked accordingly.