2. Prepare fresh transmission fluid of the correct grade (see Specifications at the beginning of the Chapter).
3. Other necessary tools and supplies for the upcoming procedure include: props to secure the vehicle in a raised position, a suitable size hex wrench with a long collar, a drain container with a volume of at least 7.5 liters and a supply of rags and / or old newspapers.
4. Fluid must be drained after being preheated to normal operating temperature during a short trip. Hot ATF has a higher fluidity and better flushes out sludge and other deposits.
Attention! The operating temperature of the ATF can reach 180°C! Be careful, wear rubber gloves.
5. After driving for a short time and warming up the ATF to normal operating temperature, park the vehicle on a level, hard paved area, jack it up and support it on jack stands so that the transmission case drain plug is easily accessible.
6. Place a drain container and all necessary equipment under the transmission housing. Try not to touch the heated components of the power unit and the exhaust system located under the bottom of the car.

7. After placing the receiving container properly, remove the drain plug. Do not forget that at the first moment ATF will begin to flow out with a relative pressure, which, as the liquid level decreases, will gradually decrease - be prepared to correct the position of the drain tank accordingly in time. When the flow of fluid has completely stopped, wipe the drain plug, screw it into place and tighten it firmly.

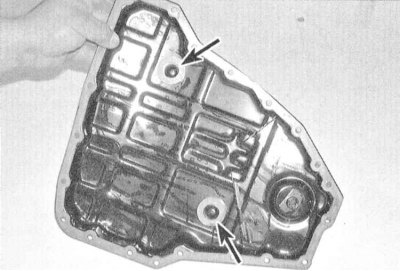
8. Turn out forward bolts of fastening of the pallet of a crankcase of transmission, then loosen back and, prying off the pallet a screw-driver, let out the rests of ATF from crankcase АТ. When the liquid stops flowing, finally remove the remaining bolts and lower the pan to the ground. Turn out fixing bolts and remove the filter, having lowered assembly downwards. Be careful, some liquid will inevitably remain inside the filter.
9. Replace the removed filter with a new one.
10. Thoroughly clean the mating surfaces of the transmission case and the mounting flange of its pan, completely removing traces of the old gasket material and sealant from them, wipe the inner surfaces of the pan. Remembering the installation positions of the components, remove the protective magnets from the pallet, wash them in solvent and dry with compressed air (don't forget to wear safety glasses). Don't forget to install the magnets in their original places in the pan, having previously replaced the gaskets.
11. After replacing the gasket, install the pallet in its regular place and secure it with bolts, screwing them into their previous positions and first tightening by hand. In several steps, 1/4 turn per approach, tighten the fasteners with the required force - do not overdo it!
12. Without starting the engine, remove the dipstick from the transmission case and fill in the required amount of fresh fluid of the required grade through the hole in the guide tube (see specs). Use a funnel to minimize ATF loss. Pour liquid in small portions, periodically checking its level on the dipstick (see Section Automatic transmission ATF level check). Pause, allowing the poured liquid to drain to the bottom of the pan.
Note. In the Specifications at the beginning of this chapter, the volume of ATF is given taking into account the rotation converter. The above procedure does not drain all of the fluid present in the transmission, so do not put more ATF into the crankcase than was drained from it. Keep an eye on the fluid level (see Section Checking the Condition of the Cooling System Components).
13. Start the engine, then slowly move the selector lever through all positions from "R" before "L", then return it to its original ("R"), then apply the parking brake.
14. With the engine running at idle, check the ATF level in the transmission, if necessary, make the appropriate adjustment by bringing the fluid level to the COOL mark on the dipstick blade.