


Table of contents: Checking the coolant level ↓ Emptying and filling ↓ Removal ↓ Washing and cleaning ↓ Installation ↓
Note: To avoid scalding, certain precautions should be taken when loosening the radiator cap on a hot engine. The correct way is to turn off the engine and let it cool down. Wrap the radiator cap with a rag, turn it counterclockwise first to the first stop and release the pressure in the system. Then completely remove the cap from the radiator.
Checking the coolant level
1. On a cold engine, check the coolant level in the expansion tank of the cooling system. The level should be between the MIN and MAX marks on the tank wall.
2. If the fluid level is at or below the MIN mark, add coolant to bring the level up to the MAX mark. Remove the radiator cap and make sure the radiator is filled with coolant. Add if necessary.
3. Start the engine and check for coolant leaks. If necessary, pressure test the radiator to determine its suitability for further use and to identify micro-sources of leaks.
Emptying and filling
1. Remove the radiator cap.
2. In the vehicle interior, move the heater control levers to the HOT (Hot) position.
3. Place a receiving container under the radiator drain plug. Unscrew the drain plug.
4. Remove the cylinder block drain plug located under the exhaust manifold at the rear of the engine. On 3.0L models, loosen the air bleed plug located near the water outlet on the intake manifold.
5. Once the water has drained, screw the radiator drain plug back in. Do not tighten it too tightly.
6. Apply sealant to the cylinder block drain plug and screw it into place, tightening it securely.
7. Fill the system with fresh coolant, which is the correct mixture of water and antifreeze (with anti-corrosion additives) (cm. size and adjustment tables at the end of the Guide).
8. On 3.0L models, tighten the air bleed plug.
9. With the radiator cap removed, start the engine and carefully add coolant as air pockets come out.
10. Screw on the radiator cap and wait until the engine warms up to normal operating temperature, accompanied by the thermostat opening. Check the engine for water leaks.
11. Turn off the engine and after it has cooled down, check the coolant level again.
12. Add fluid to the expansion tank, bringing its level to the MAX mark. Check the correct installation and tightening of the radiator and expansion tank caps.
Late-model 4.2 L models equipped with fuel injection (EFI)
The procedure is practically no different from that described above for early models.
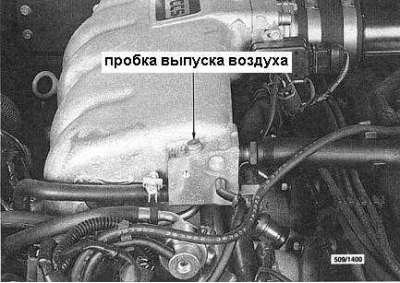
The only exception is the presence of an air bleed plug on the engine (as on 3.0L models), which is located here in front of the air tract discharge chamber (see accompanying illustration). Therefore, on 4.2L EFI engines, all additional procedures that apply to 3.0L models must be performed.
Removal
1. Drain the coolant from the radiator.
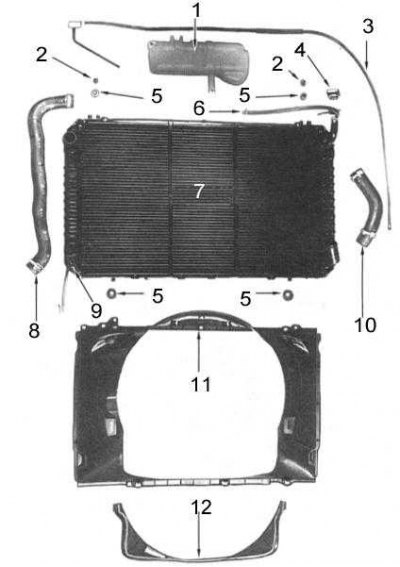
1 - expansion tank; 2 - washers; 3 - expansion tank overflow hose; 4 - radiator cap; 5 - rubber cushions; 6 - ventilation hose; 7 - radiator; 8 - upper hose; 9 - drain plug; 10 - lower hose; 11 - upper casing; 12 - lower casing
2. Disconnect the upper hose and the overflow hose of the expansion tank from the radiator (the radiator with associated components is shown in the accompanying illustration).
3. On models equipped with a radiator temperature switch, disconnect the wiring from the sensor.
4. On 4.2L models, disconnect the lower and vent hoses from the radiator.
5. On 3.0L models, disconnect the lower radiator hose from the transfer tube.
6. On AT models, disconnect the oil cooler hoses from the radiator. Plug the ends of the hoses to prevent dirt from getting into the oil cooler and to minimize transmission fluid loss.
7. Remove the bolts securing the upper radiator shroud.
8. Release the fasteners securing the upper radiator shroud to the lower one and remove the upper shroud from the vehicle.
9. Remove the lower radiator shroud.
10. Loosen the radiator mounting bolts located at the top of the radiator and remove the radiator from the car.
Note. When removing a used radiator from a vehicle, do not leave it empty for a long time. You should immerse the radiator in a bath of clean water, or simply pour water into it. Otherwise, the engine may overheat when it is started up, due to a disruption in the circulation in the cooling system due to the blockage of the internal channels of the radiator with dried deposits.
(Source is available on the resource: NISSANBOOK.ru)
Washing and cleaning
1. Remove the radiator from the vehicle.
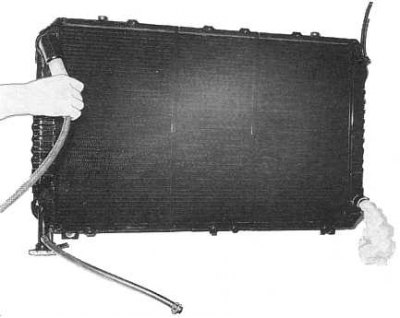
2. Connect a garden hose to the radiator inlet and back flush the radiator (see accompanying illustration). Continue flushing the radiator until clean water starts flowing out of it.
Note: If excessive pressure increase in the hose or weak water output indicate a severe obstruction of the internal radiator channels that cannot be eliminated by backwashing, the radiator should be delivered to a specialized workshop for restoration.
3. Install the radiator vertically (how is it installed on the car) and wash it from the outside on both sides with a jet of water under pressure. To avoid damaging the heat exchanger plates, try not to bring the hose nozzle closer than 40÷50 cm to the radiator. Continue washing until all dirt deposits are removed from the gaps between the heat exchanger plates.
Installation
1. Installation is carried out in reverse order.
2. Place the radiator assembly into the engine bay of the vehicle, ensuring that the two rubberized guide pins are correctly positioned on the cross member.
3. Place the radiator in its working position and tighten the mounting bolts securely.
4. On models with automatic transmission, remove the plugs from the oil cooler hoses and connect the latter to the fittings of the side radiator tanks. Securely tighten the hose clamps.
5. Where required, connect the electrical wiring to the temperature-sensitive switch sensor.
6. Connect the hoses to the radiator, making sure that the mounting clamps are installed correctly.
7. Fill the cooling system with coolant. Start the engine and check for water leaks.
8. On models with automatic transmission, check the transmission fluid level and also check the transmission for signs of leaks.