


Removing
1. Empty the cooling system.
2. Disconnect the negative cable from the battery.
3. Remove the upper radiator hose.
4. Give screws of fastening of the top casing of a radiator, release clamps (squeezing them) fastening the upper casing to the lower one and remove the upper casing from the engine compartment of the car.
5. Loosen the alternator adjusting bolt and remove the drive belt (belts) from the water pump pulley.
6. Give nuts of fastening of coupling of coupling of the fan and a pulley to a flange of the water pump, remove washers.
7. Separate the fan, assembly of its coupling and a pulley from the water pump and remove components from the car.
8. On 3.0L models:
- Remove the timing belt;
- Loosen the water pump mounting bolts, noting the length and location of each.
9. On models 4.2 l, give the bolts of the water pump to the cover of the gas distribution chain and remove the pump from the cover (4.2L models water pump components are shown in the accompanying illustration).
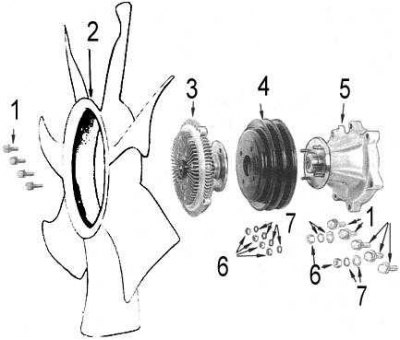
1 - bolts; 2 - fan; 3 - clutch assembly; 4 - pulley; 5 - water pump; 6 - nuts; 7 - washers
10. Check the pump housing and rotor for signs of corrosion, cracks or other defects.
11. Check the play of the bearing in the pump housing, evaluate the level of noise emitted by the bearing when the pump rotates.
12. Check up conditions of assembly of coupling, turning it manually. Rotation should occur without jerks and jamming points, with slight resistance. The unit is non-repairable and, in case of failure, must be replaced.
Note. Due to the design features of the water pump, repairing it seems impractical. The compilers of this manual recommend that in case of failure, replace the pump assembly.
Installation
1. Installation is carried out in the reverse order.
2. Make sure that the mating surfaces of the water pump and engine are clean - no traces of old sealant should remain on them.
3. Apply a cushion of sealant with a cross section of Ø 2÷3 mm to the mating surface of the pump. Make sure the sealant is applied to the inside of the bolt holes.
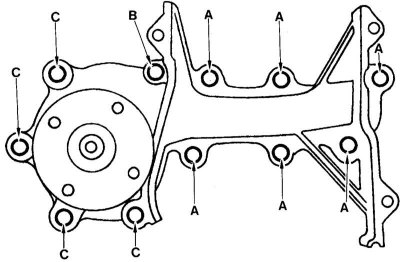
4. On 3.0L models:
- Install the pump on the cylinder block and tighten its mounting bolts in the order and with the force shown in the accompanying illustration, where: A = 16 ÷ 21 Nm, B = 7 ÷ 8 Nm, C = 30 ÷ 40 Nm.
- Reinstall the timing belt.
5. On 4.2 l models, install the water pump on the timing chain cover and tighten the bolts of its fastening with the required force (see tables of sizes and adjustments at the end of the guide).
6. Install the drive pulley, clutch assembly and fan to the pump. Tighten the fixing nuts to the required torque.
7. Install drive belt (belts) and adjust the force (their) tension.
8. Install the upper radiator shroud and tighten the shroud screws securely.
9. Connect the negative cable to the battery.
10. Reinstall the upper radiator hose and fill the system with the required amount of the correct grade of coolant (see tables of sizes and adjustments at the end of the guide).
11. Start the engine and check for leaks.