


Note: You will need a thermometer to perform the test described below.
Removal
1. Disconnect the negative cable from the battery.
2. Drain the cooling system.
3. Disconnect the radiator hose from the thermostat housing.
4. On 4.2L models, disconnect the bypass hose from the thermostat housing (the thermostat components for the 4.2L models are shown in the accompanying illustration).
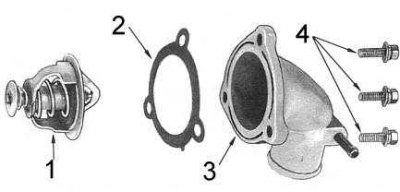
1 - thermostat; 2 - gasket; 3 - casing; 4 - bolts
(The publication is reprinted from this resource: nissanbook.ru)
5. Remove the bolts securing the thermostat housing to the engine.
6. Remove the casing and take the thermostat out of the engine.
Checking the correct functioning
Note: A visual inspection is usually sufficient to determine whether it is functioning properly. For example, a thermostat removed from a cold engine with the valve fully open is undoubtedly faulty and must be replaced.
1. Make sure that when cold, the thermostat valve is closed and securely pressed by the spring.
2. Tie the thermostat to a wire and lower it into a vessel with cold water along with a reliable thermometer. Make sure that neither the thermostat nor the thermometer touch the walls or bottom of the vessel (see accompanying illustration).
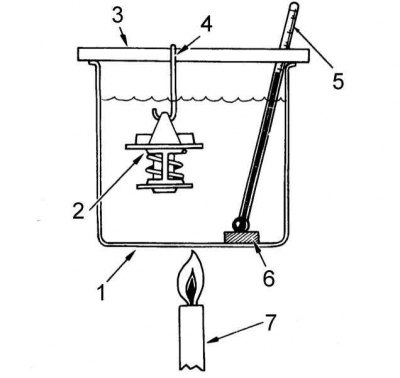
1 - a vessel filled with water; 2 - thermostat; 3 - transversely laid plank; 4 - wire; 5 - thermometer; 6 - wooden spacer; 7 - heat source
3. Begin to slowly heat the water in the vessel, monitoring the thermometer readings. Record the reading at the moment the thermostat valve begins to open.
4. Continue heating the water until the valve is fully open, measure the height of the valve plate above the seat. Compare the results of temperature and valve opening height measurements with the standard requirements (see size and adjustment tables at the end of the Manual). If they go beyond the permissible limits, replace the thermostat.
Installation
Installation is carried out in reverse order.
1. Make sure that all sealing surfaces are absolutely clean, without any traces of liquid sealant.
2. Apply a sealant pad with a cross-section of Ø 2÷3 mm to the sealing surface of the thermostat casing.
3. Make sure that the sealant is placed on the inside of the bolt holes.
4. Install the thermostat housing onto the engine.
Note: Special gaskets are available for installation under the thermostat housing. The authors of this Manual recommend using such a gasket without fail if the condition of the mating surface of the housing leaves much to be desired in order to avoid leaks.
5. Fill the cooling system with coolant and check for leaks.