Attention! Do not open the radiator cap and do not remove the thermostat until the engine has completely cooled down! See also the warning at the beginning of the Section Antifreeze - general information.
Examination
1. Before finally establishing your opinion about the failure of the thermostat, check the coolant level in the system, the condition and tension of the drive belt (see chapter Settings and ongoing maintenance), as well as the correct functioning of the temperature meter.
2. One of the possible reasons for the engine warming up too slowly (according to meter readings) is the thermostat sticking in the open position. Replace the thermostat with a new one.
3. If the engine overheats, feel the upper radiator hose with your hand. If the hose is not hot, the thermostat may be stuck closed, cutting off coolant circulation through the radiator. Replace thermostat.
Attention! Never operate the vehicle with the thermostat removed! This may break the feedback of the onboard processor, which will lead to increased toxicity of exhaust gases and an excessive increase in fuel consumption.
4. If the upper hose is hot, this means that the coolant is circulating through the radiator properly, i.e. thermostat is open. Refer to the materials of the Section devoted to the diagnosis of malfunctions of the cooling system.
5. For a more detailed check, the thermostat must be removed from the engine. If the thermostat remains open at room temperature, it must be replaced.
6. Tie a piece of string to the thermostat assembly (the valve must be in the closed position) and lower the latter into a heat-resistant container with cold water, place a thermometer there.
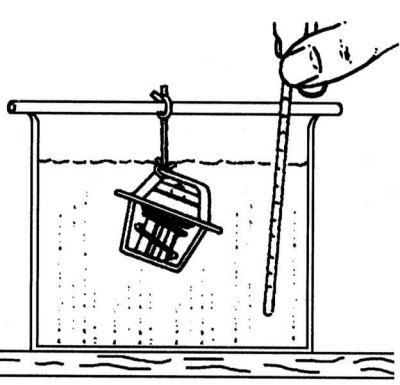
7. Place the container on the stove and start observing the behavior of the valve while monitoring the thermometer.
Attention! Neither the thermometer nor the thermostat should touch the walls of the container!
8. Record the thermometer reading at the start of opening and full opening of the valve. Compare the measurement results with the requirements of the Specifications.
Note. The thermostat housing is usually stamped with the valve's full opening temperature rating. Data on the temperature of the start of opening and the magnitude of the opening of the valve can also be indicated.
9. Replace the malfunctioning assembly.
Replacement
1. Disconnect the negative cable from the battery.
Attention! If the stereo system installed in the car is equipped with a security code, before disconnecting the battery, make sure that you have the correct combination to activate the audio system!
2. Drain the coolant from the radiator and engine block (see chapter Settings and ongoing maintenance). If the mixture has been changed recently, save it for future use.
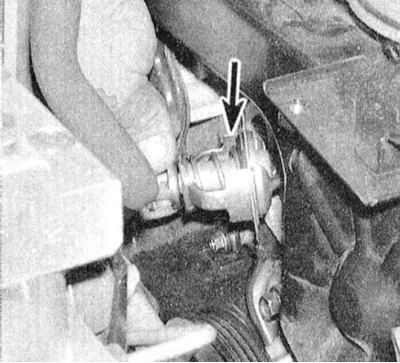
3. On SOHC engines, disconnect the upper radiator hose from the water outlet on the intake manifold and from the radiator, then release the intermediate clamp on the front timing cover and remove the hose. Disconnect the bypass hose from the thermostat cover.
4. On DOHC engines, remove drive belts and idler bracket. Also remove the lower radiator hose and unscrew the water pump drain plug from the block wall facing forward on the vehicle.
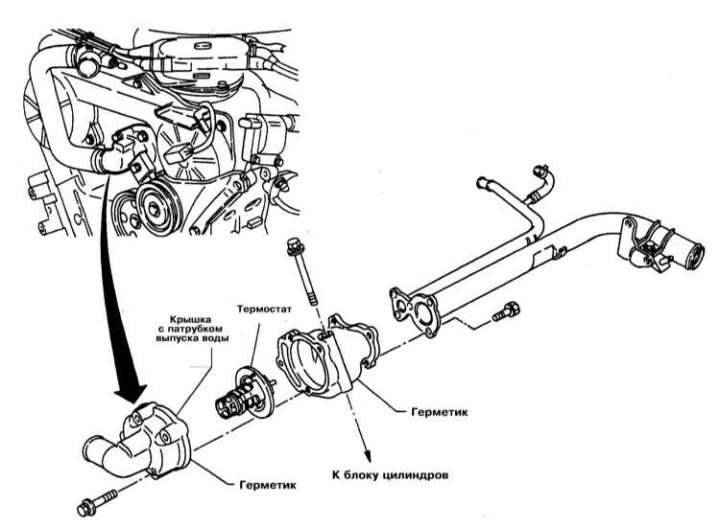
5. Remove the thermostat cover - try to remember its installation position. Prepare to collect spilled liquid.
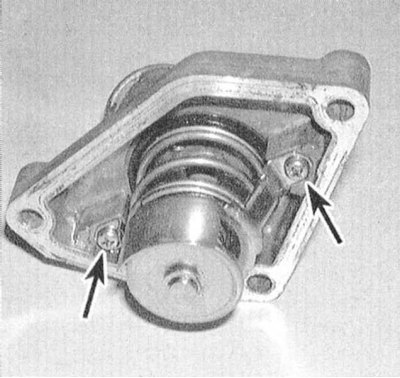
6. Remove the thermostat - remember its installation position.
7. Thoroughly clean the sealing surfaces of the cover and thermostat casing with a scraper, then wipe them with a rag soaked in solvent.
8. Apply a pad of RTV sealant around the cover mating surface. Turn the thermostat so that the bleed valve plunger is at its highest point, install it in its regular place in the cover / casing and within five minutes after applying the sealant, bolt the cover to the casing.
9. Further installation is carried out in the reverse order to the dismantling of the components. Make sure all fasteners are tightened to the correct torque and hoses are properly connected.
10. After allowing the sealant to harden for about half an hour, fill the cooling system and release air plugs from it (see chapter Settings and ongoing maintenance). Start the engine and check for leaks and the thermostat is functioning properly.