


Attention! The air conditioning system is constantly under high pressure. Never disconnect refrigeration lines or remove any system components without first discharging the system. The discharge of the air conditioning system must be carried out by an experienced specialist in a car service workshop. Always wear safety goggles when disconnecting refrigerant lines!
When replacing air conditioning system components, a certain amount of replacement refrigerant oil will be required to fill the volume of the new assembly. Use only oil suitable for use in R-134a systems (read the label on the container carefully).
Removing
1. The receiver-drier acts as a refrigerant accumulator, and also serves to remove moisture from the system. When replacing major components of the air conditioning system (compressor, condenser, evaporator), and if air enters the refrigeration path, the battery/dryer assembly must be replaced.
2. Discharge the air conditioning system in a specialized workshop. Disconnect the negative cable from the battery.
If the stereo system installed in the car is equipped with a security code, before disconnecting the battery, make sure that you have the correct combination to activate the audio system!
3. Disconnect the wiring from the compressor clutch cycle switch at the top of the receiver dryer assembly.
Note. When replacing the receiver-dryer, transfer the old sensor-switch to the new unit.
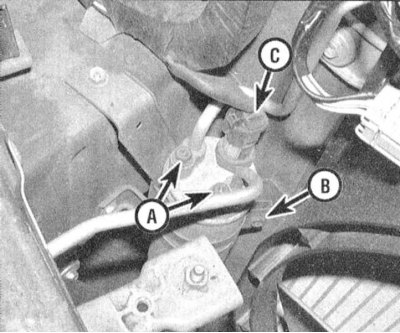
4. Disconnect the refrigeration lines from the receiver, plug the open ends of the pipes and fittings immediately to prevent dirt from entering the system.
5. Loosen the pinch bolt and release the receiver-dryer assembly from the mounting collar (support bracket).
Installation
1. Replacing the receiver-dryer assembly will require approximately 2 ounces (60 ml) refrigerant oil to be filled into the exchange unit.
2. Place the assembly in its proper place and lightly tighten the mounting collar's pinch bolt, leaving the assembly some degree of freedom needed when connecting the hydraulic lines.
3. Connect the inlet and outlet refrigeration lines to the assembly (Lubricate the new O-rings with clean refrigerant oil before mating the fittings). When you have finished connecting the lines, firmly tighten the clamping bolt of the mounting clamp.
4. Connect the negative cable to the battery.
5. Have the system charged and checked for leaks in a specialist workshop.