


Checking the drive belt
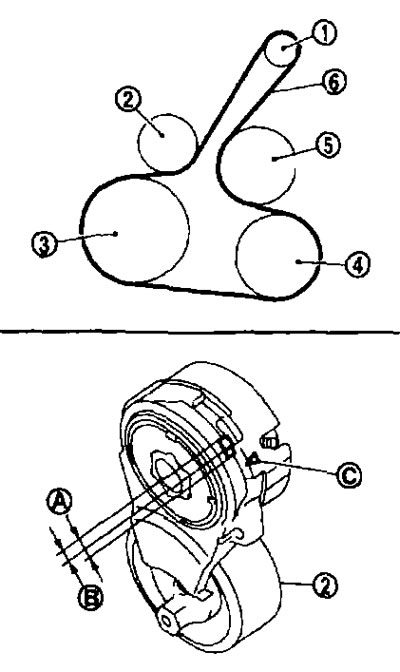
1. Generator; 2. Automatic drive belt tensioner; 3. Crankshaft pulley; 4. Air conditioning compressor (on models with air conditioning); Tension pulley (on models without air conditioning); 5. Water pump; 6. Drive belt; A. Range of possible operation; B. Range when installing a new drive belt; S. Pointer.
Attention:
- Perform the test with the engine off.
- Make sure the pointer (notches on a fixed part) on the automatic drive belt tensioner is within the operating range (A) in the figure.
Note:
- Check the position of the automatic tensioner indicator on a cold engine.
- When installing a new drive belt, the indicator (notches on a fixed part) must be within the range (B) in the figure.
- Perform a visual inspection of the entire belt to ensure there is no wear, damage or cracks.
- If the pointer (notches on a fixed part) is outside the acceptable operating range or the belt is damaged, replace the drive belt.
Tension adjustment
See below section "Technical data and specifications".
Source is available on the resource: nissanbook
Removal and installation
Removal
1. After securely fixing the automatic tensioner (1) to the hexagonal part (A) with a wrench, turn the wrench handle in the direction of the arrow (direction of tensioner loosening).
Caution: Do not place your hand in a position where it could be pinched if the locking tool accidentally slips off.
2. Insert a rod with a diameter of approximately 6 mm, such as a screwdriver, into the hole (B) of the retaining lug and fix the automatic tensioner.
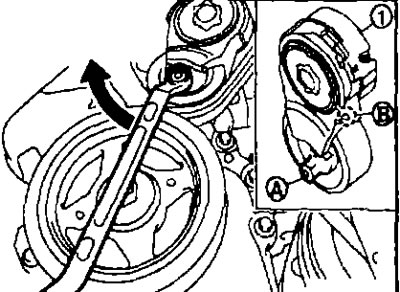
- After removing the incoming belt, secure the tensioner pulley lever.
3. Remove the drive belt.
Installation
1. Put on the drive belt.
- Make sure the belt is fully seated on the pulleys.
- Make sure that no engine oil, working fluids or engine coolant have leaked onto the drive belt or into the pulley grooves.
2. Release the tensioner and tighten the belt.
3. Turn the crankshaft pulley clockwise several times and equalize the tension between all pulleys.
4. Make sure that the belt tension is according to the indicator (notches on the fixed part) is within the acceptable operating range. See above.