


Examination
Oil level
Note: Before starting the engine, check the oil level with the vehicle level. If you have already started the engine, turn it off and wait 10 minutes before checking.
1. Remove the dipstick and wipe it clean.
2. Insert the dipstick and check that the oil level is within the range (A) shown in the figure.
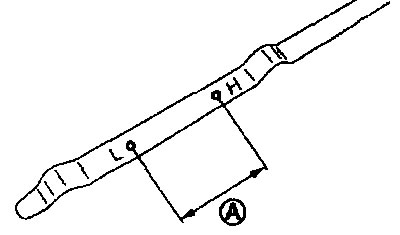
3. If it is outside this range, bring it up to normal.
Oil contamination
- Check the oil for white cloudiness or significant contamination.
- If the oil becomes cloudy and white, it is very likely that engine coolant has entered it. Find the cause and fix it.
Oil leak
Check for oil leaks around the following areas:
- oil pan (upper and lower);
- oil pan drain plug;
- low oil pressure warning light switch;
- oil filter;
- oil radiator;
- cover and solenoid valve of the intake valve timing mechanism;
- front cover;
- contact surface between the cylinder head and the valve cover;
- contact surface between the cylinder block and the lower cylinder block;
- contact surface between the cylinder block and the cylinder head;
- crankshaft seals (front and back).
Checking oil pressure
Attention:
- Avoid burning yourself with hot engine oil.
- Check the oil pressure in the "P" position (on models with CVT) or in a neutral position (on models with manual transmission), securely engaging the parking brake.
1. Check the oil level. See above.
2. Using an impact wrench, remove the engine protection from the bottom side.
3. Disconnect the connector from the low oil pressure indicator lamp switch (1) and unscrew the switch using a long head (suitable special tool).
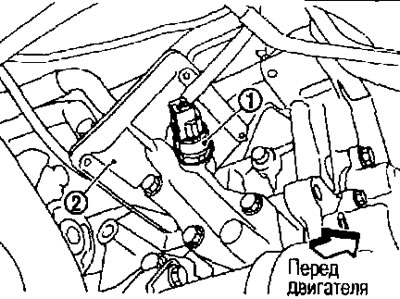
2. Oil radiator.
Caution: Do not drop or hit the low oil pressure indicator switch.
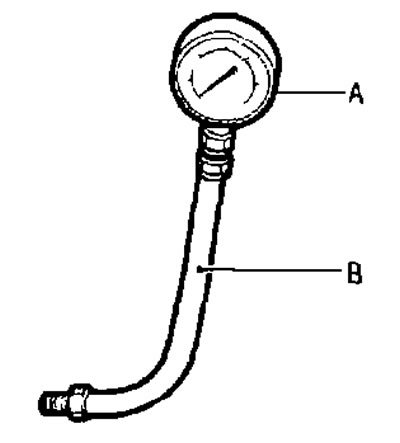
4. Connect the oil pressure gauge (special tool: ST25051001) (A) and hose special tool: ST25052000 (B).
5. Start the engine and warm it up to normal operating temperature.
6. Check the oil pressure with the engine running without load.
Note: When the engine oil temperature is low, the oil pressure increases.
Engine oil pressure: See below. "Technical data and specifications".
- If the pressure is significantly different from the norm, check for oil leaks in the engine oil channel and oil pump.
7. After completing the check, screw the low oil pressure indicator switch back into place as follows:
- Remove the old sealant from the switch and from the mounting hole on the motor.
- Apply sealant and tighten the switch to the required torque.
- Use brand name sealant or equivalent.
Tightening torque: See below.
- After warming up the engine, check for oil leaks while the engine is running.
Drain
Attention:
- Avoid burning yourself with hot engine oil.
- Prolonged and frequent contact with used motor oil can cause skin cancer. Try to avoid contact with used oil on your skin. If oil does come into contact with your skin, wash your hands with soap or detergent as soon as possible.
1. Warm up the engine and check for oil leaks from engine components. See above.
2. Turn off the engine and wait 10 minutes.
3. Loosen the filler cap.
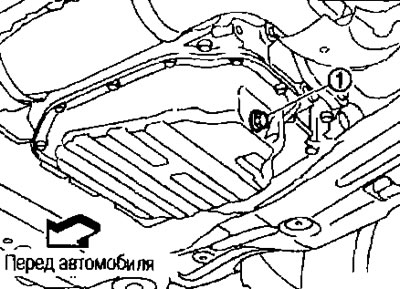
4. Remove the plug (1) from the drain hole and drain the engine oil.
Refueling
1. Screw the plug into the drain hole, installing a new washer. See chapter "Mechanical part of the engine".
Caution: Clean the drain plug and screw it in using a new washer.
Tightening torque. See chapter "Mechanical part of the engine".
2. Fill with fresh engine oil. For oil specifications and viscosity, see the Maintenance chapter.
Oil filling capacity. See below. "Technical data and specifications".
Attention:
- Filling capacity varies with oil temperature and drain duration. Use these specifications as a guide only.
- To accurately determine the amount of oil in the engine, use the oil dipstick.
3. Warm up the engine and check for oil leaks around the drain plug and oil filter.
4. Turn off the engine and wait 10 minutes.
5. Check the oil level. See above.