


Table of contents: Removal and installation ↓ Installation ↓ Disassembly and assembly ↓ Checking after disassembly. ↓
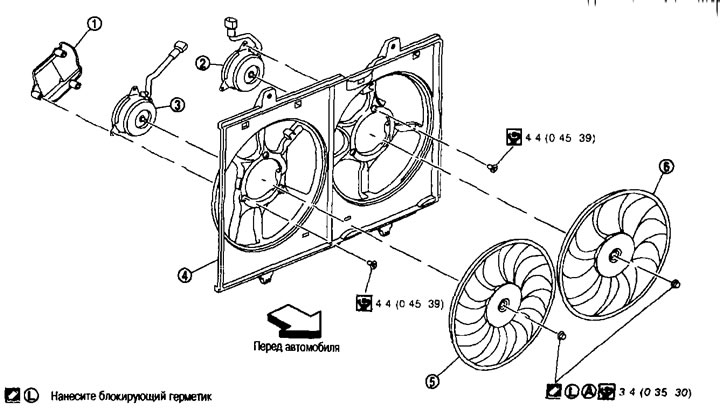
Cooling fan 1. Fan motor cover; 2. Fan motor (left); 3. Fan motor (right); 4. Fan shroud; 5. Cooling fan (right); 6. Cooling fan (left); A. Apply to the fan motor shaft.
Removal and installation
Removal
1. Remove the engine protection from the bottom.
2. Drain the engine coolant from the radiator. See above.
Caution: Perform this operation when the engine is cold.
3. Remove the air duct (intake). See chapter. "Mechanical part of the engine".
4. Disconnect the connectors from the fan motors and move the wiring to the side.
5. Disconnect the hose (upper) from the radiator and the hose from the reservoir. See above.
6. Remove the mounting brackets (right and left) and the rubber cushion (upper) and tilt the radiator forward. See above.
7. Remove the radiator cooling fan assembly.
Caution: When removing, do not damage or scratch the radiator core.
Installation
Installation is carried out in the reverse order of removal, taking into account the following.
Caution: When replacing, use only genuine fan shroud mounting bolts and observe tightening torque (to avoid damage to the radiator).
Note: The cooling fans are controlled by the ECM. For more information, see chapter "Engine management system".
Disassembly and assembly
Disassembly
1. Loosen the mounting nuts and remove the cooling fans (right and left).
2. Remove the fan motors (right and left).
Assembly
Assembly is carried out in the reverse order of disassembly, taking into account the following.
Note: The cooling fans on the right and left are different. Do not confuse their installation locations.
Install them as follows:
Right side: 11 blades
Left side: 9 blades
- Apply locking compound to the fan motor shaft.
Checking after disassembly.
Cooling fan
- Check for cracks or bent blades.
- If any abnormalities are found, replace the cooling fan.