


Table of contents: Removal and installation ↓ Installation ↓ Check after removal ↓ Post-installation check ↓
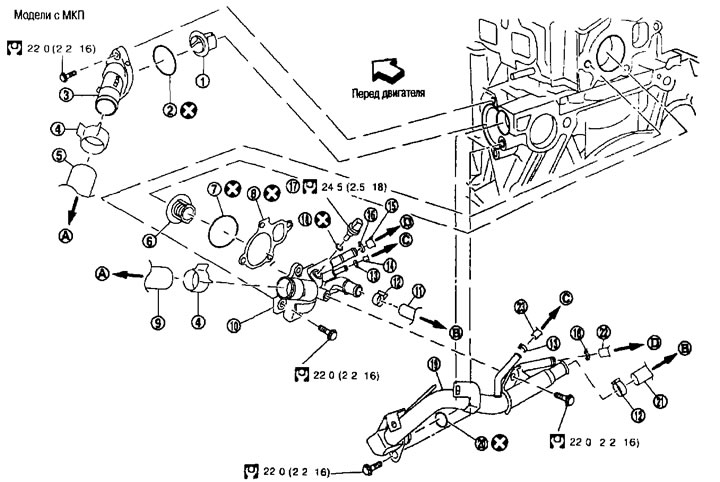
Models with manual transmission 1. Thermostat; 2. O-ring seal; 3. Inlet pipe; 4. Clamp; 5. Radiator hose (lower); 6. Water distribution valve; 7. O-ring seal; 8. Gasket; 9. Radiator hose (upper); 10. Water distribution valve body (outlet pipe); 11. Heater hose; 12. Clamp; 13. Clamp; 14. Water hose; 15. Water hose; 16. Clamp; 17. Engine coolant temperature sensor; 18. Washer; 19. Heater tube; 20. O-ring seal; 21. Heater hose; 22. Water hose; 23. Water hose; A. To the radiator; B. To the heater; C. To the electric throttle actuator; D. To the oil radiator.
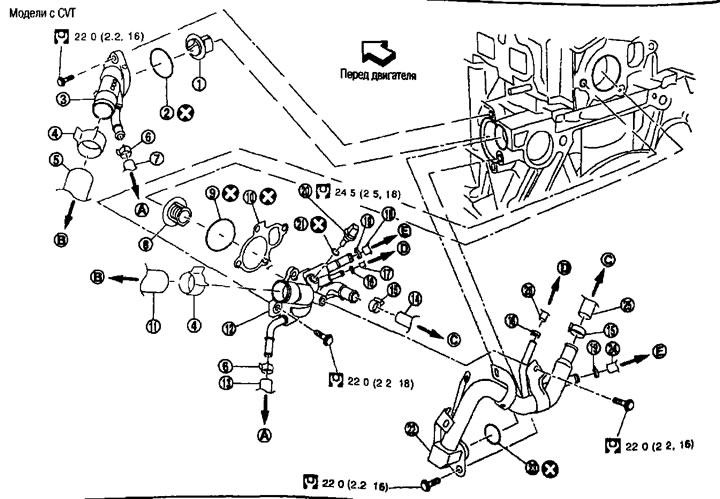
Models with CVT 1. Thermostat; 2. O-ring seal; 3. Inlet pipe; 4. Clamp; 5. Radiator hose (lower); 6. Clamp; 7. Water hose; 8. Water distribution valve; 9. O-ring seal; 10. Gasket; 11. Radiator hose (upper); 12. Water distribution valve body (outlet pipe); 13. Water hose; 14. Heater hose; 15. Clamp; 16. Clamp; 17. Water hose; 18. Water hose; 19. Clamp; 20. Engine coolant temperature sensor; 21. Washer; 22. Heater tube; 23. O-ring seal; 24. Water hose; 25. Heater hose; 26. Water hose; A. To the CVT fluid radiator; B. To the radiator; S. To the heater; D. To the electric throttle actuator; E. To the oil radiator.
Removal and installation
Removal
1. Remove the battery. See chapter "Electrical equipment".
2. Disconnect the electrical wiring connectors in the engine compartment on the TCM and ECM side and move the wiring to the side.
3. Remove the battery tray.
4. Remove the air duct and air cleaner housing assembly. See Chapter "Mechanical part of the engine".
5. Drain the engine coolant. See above.
Caution: Perform this operation when the engine is cold.
6. Disconnect the lower radiator hose from the inlet side. See above.
7. Disconnect the water hose from the inlet side (on models with CVT).
8. Remove the inlet manifold and thermostat.
9. Remove the water distribution valve as follows:
a. Disconnect the upper radiator hose from the water distribution valve housing side (outlet pipe).
b. Disconnect the connector from the engine coolant temperature sensor.
c. Remove the CVT fluid dipstick and CVT fluid filler pipe. See Chapter "Continuously variable automatic transmission (CVT)".
d. Disconnect the water hoses.
e. Disconnect the connectors from the heated oxygen sensors and remove the wiring clamps from the heater tube.
f. Disconnect the heater pipe and hose.
g. After removing the water distribution valve body (outlet pipe) remove the water distribution valve.
Installation
Installation is carried out in the reverse order of removal, taking into account the following.
Thermostat and water distribution valve
- Install the thermostat and water distribution valve so that their flange parts are securely fixed around the entire perimeter inside the rubber ring. (The figure shows a thermostat as an example).
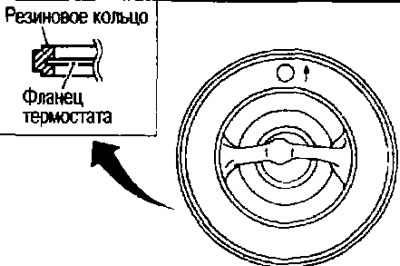
Note: The same procedure applies when installing the water distribution valve.
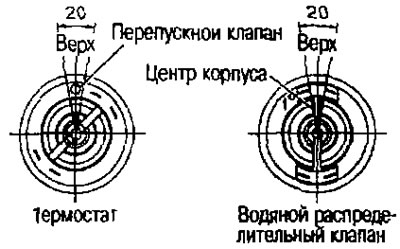
- Install the thermostat with the bypass valve facing upwards. (The position deviation may be about ±20°, as shown in the figure).
- Install the water distribution valve with the arrow and the central part of the body facing upward. (The position deviation may be about ±20°, as shown in the figure).
Installing the heater tube
- First apply neutral detergent to the O-ring, then quickly insert the tube into the cylinder block.
Check after removal
- Tie a string (A) so that it is secured to the working parts of the thermostat (1) and the water distribution valve. Completely immerse them in a container (B) with water. Heat by shaking (The figure shows a thermostat as an example).
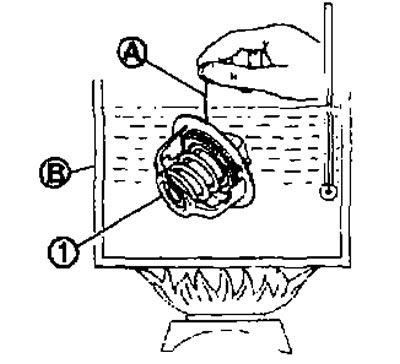
- The valve opening temperature is the temperature at which the valve opens and falls off the thread.
- Continue heating. Check the lift height when fully opened.
Note: The standard temperature of the lifting height when the water distribution valve is fully opened is a reference value.
- After checking the lift height at full opening, reduce the water temperature and check the valve closing temperature.
Standard
Thermostat. See below. "Technical data and specifications".
Water distribution valve. See below. "Technical data and specifications".
- If the measured values are not normal, replace the thermostat or water distribution valve, or both.
Post-installation check
- Check for coolant leaks by applying pressure using an adapter (suitable special tool) and the pump (suitable special tool). See above.
- Start the engine and warm it up. Conduct a visual inspection to ensure there are no coolant leaks.