


Table of contents: Removal ↓ Installation ↓ Disassembly ↓ Assembly ↓ Post-installation check ↓ Checking after disassembly ↓ Checking the insulator and rubber…↓
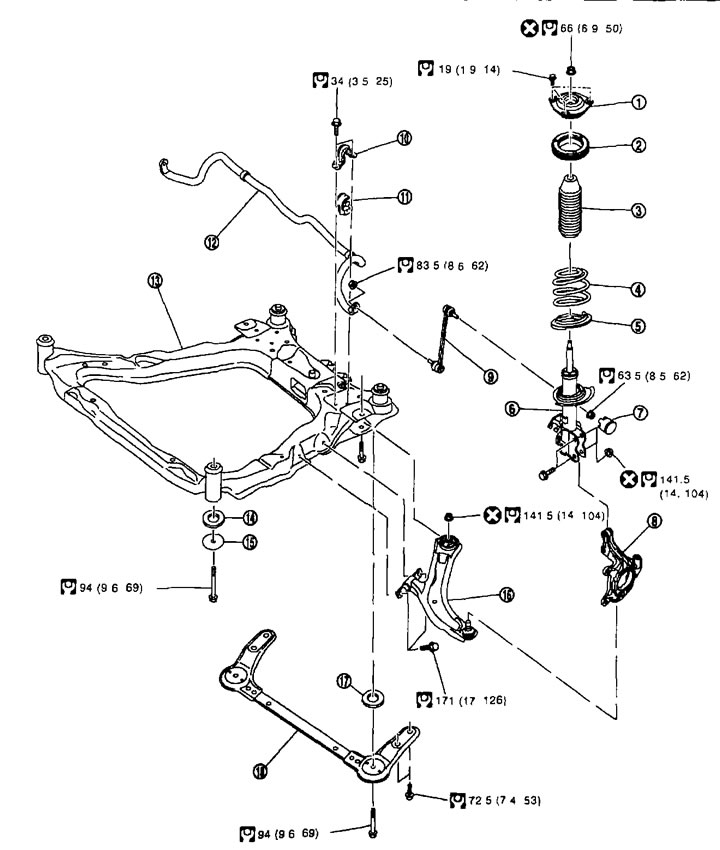
Spring and rack. 1. Strut mount insulator; 2. Bearing of the rack mount; 3. Bumper; 4. Spring; 5. Lower rubber socket; 6. Rack; 7. Plug; 8. Steering knuckle; 9. Stabilizer connecting rod; 10. Stabilizer bracket; 11. Stabilizer bushing; 12. Stabilizer bar; 13. Front suspension beam; 14. Bump stop cushion*; 15. Bump stop insulator; 16. Transverse arm; 17. Bump stop limiter; 18. Front suspension beam strut.
* For Israel, Turkey, Ukraine, Estonia, Russia.
Removal
1. Remove the wheels from the vehicle.
2. Remove the locking plate. See chapter "Brake system".
3. Remove the plug and unscrew the fastening nut from the upper side of the stabilizer connecting rod, separate the stabilizer connecting rod from the strut assembly.
4. Separate the steering knuckle from the strut assembly.
5. Loosen the mounting bolts of the strut mount insulator and remove the strut assembly.
Installation
Installation is carried out in the reverse order of removal, taking into account the following:
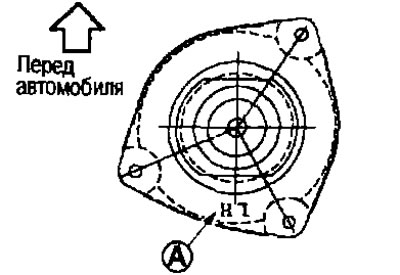
- Make sure the marking (A) on the strut mount insulator faces the front of the vehicle as shown in the illustration.
- Perform final tightening of all bolts and nuts in an unloaded state with the vehicle wheels on the ground.
Disassembly
Caution: After removing the components from the strut assembly, be careful not to damage the piston rod on the strut.
1. Install the nozzle (A) (special tool: ST35652000) on the rack and clamp it in a vice.
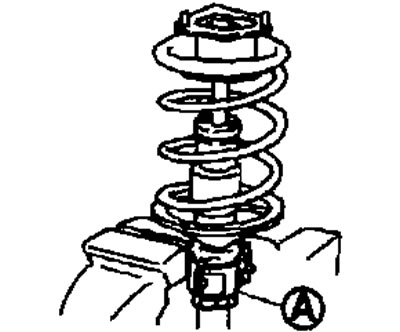
Caution: To avoid damaging the stand when installing the attachment, wrap the stand with a napkin.
2. Using the device (A) (suitable special tool) compress the spring between the strut mount bearing and the lower rubber seat (not the strut) until the spring is released along with the tool.
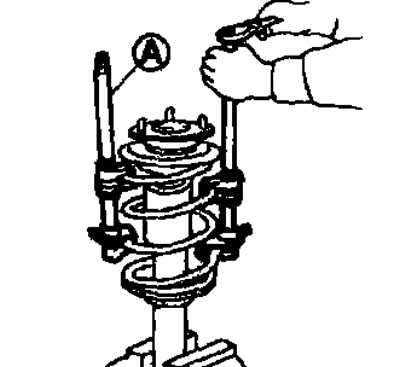
Caution: Make sure the compression tool is securely hooked onto the spring. Compress the spring.
3. After making sure that the spring together with the device does not touch the strut mounting bearing and the lower rubber seat (on the strut), unscrew the piston rod lock nut, fixing the end of the piston rod so that it does not turn.
4. Remove the strut mounting insulator, strut mounting bearing and bump stop from the strut.
5. After removing the spring with the device, gradually release the device.
Caution: Loosen the device after making sure that the attachment does not move.
6. Remove the lower rubber socket from the stand.
7. Remove the attachment (special tool ST35652000) from the counter.
Assembly
1. Install the attachment (special tool: ST35652000) onto the stand and secure it in a vice.
Caution: To avoid damaging the stand when installing the attachment, wrap the stand with a napkin.
2. Install the lower rubber socket.
3. Install the bump stop onto the strut mount insulator.
4. Compress the spring using the tool (suitable special tool) and install it on the stand.
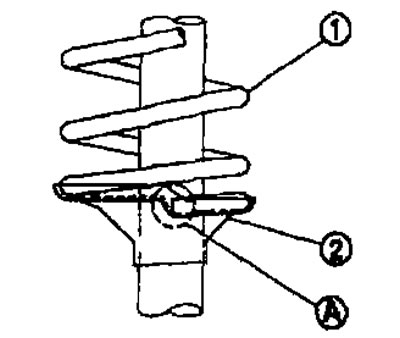
Attention:
- Install the spring with the tube side (1) facing down. Align the lower end (A) with the lower rubber seat (2).
- Make sure the compression tool is securely engaged with the spring. Compress the spring.
- Install the spring so that the paint marks on it align at 1.75 and 2.75 turns from the bottom of the spring.
5. Install the strut mount bearing and strut mount insulator with the bump stop onto the strut. The installation position of the strut mount insulator is shown in the figure.
6. Fix the end of the piston rod so that it does not turn, then tighten the piston rod lock nut to the required torque.
Caution: Do not reuse the piston rod lock nut.
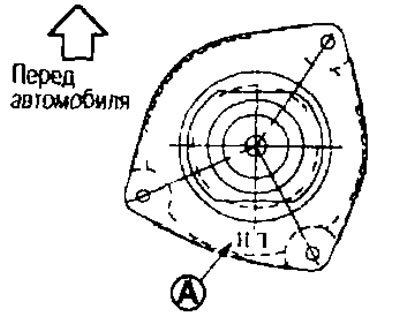
A. Marking
7. Gradually release the spring compressor and remove it.
Caution: Loosen the device after making sure that the attachment does not move.
8. Remove the attachment from the stand.
Post-installation check
1. Check the front wheel alignment angles. See above.
2. Perform the neutral position adjustment of the steering angle sensor. See chapter "Brake system".
Checking after disassembly
Rack
Check the following components and replace if necessary:
- is there any deformation, cracks or damage on the rack;
- is there any damage, uneven wear or distortion on the piston rod;
- is there any oil leaking?.
Checking the insulator and rubber parts
Check for cracks in the strut mount insulator and wear on the rubber parts. Replace if necessary.
Spring
Check for cracks, wear and damage. Replace if necessary.