


Table of contents: Stopping the car ↓ Wheel chocks ↓ Preparing the spare wheel and tools ↓ Removal a damaged wheel ↓ Wheel installation ↓ Storing the removed wheel and tools ↓
When replacing a damaged wheel, follow the instructions below.
Stopping the car
1. Observing safety precautions, turn off the roadway onto the side of the road.
2. Turn on the hazard warning lights.
3. Stop the car on a level horizontal surface.
4. Apply the parking brake.
5. On a vehicle with a manual transmission, engage reverse gear. If the vehicle is equipped with an automatic transmission or CVT, move the selector lever to position P.
6. Turn off the engine.
7. Open the hood.
- To warn other road users of danger.
- To make your vehicle more visible to roadside assistance crews.
8. As a precaution, all passengers must exit the vehicle and be in a safe place at a sufficient distance from the roadway and the vehicle.
Wheel chocks
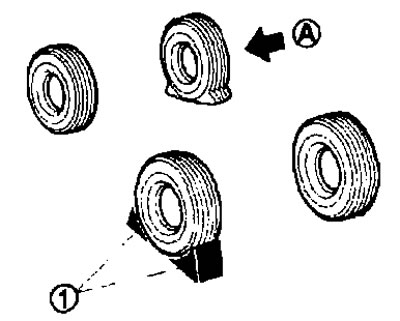
Place suitable wheel chocks (1) at the front and rear under the wheel (A) that is diagonally opposite the damaged wheel to prevent the vehicle from moving while jacking up.
Preparing the spare wheel and tools
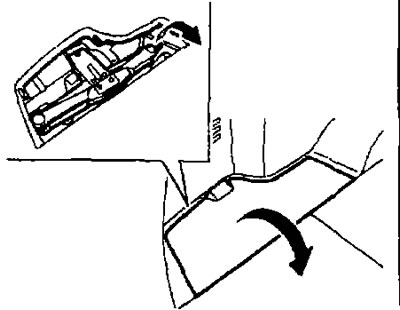
Remove the spare tire, jack and tools from the luggage compartment.
Spare wheel storage location
(version A).
The spare wheel is stored under the floor panels and in the luggage compartment storage bins.
1. Remove the floor panels and glove box.
2. Remove the fasteners (1) by turning them counterclockwise.
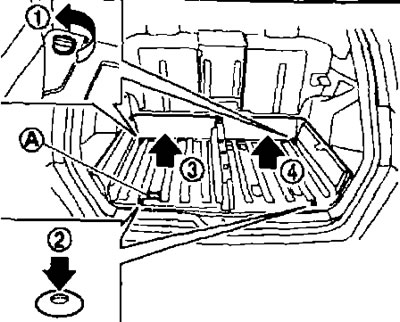
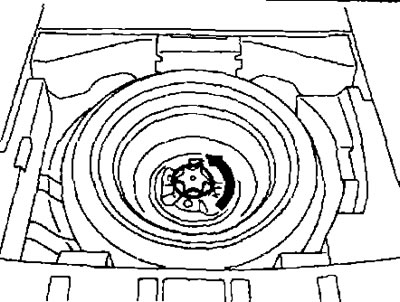
3. Remove the clamps (2) following the instructions on the plate (A).
4. First remove the glove box (3) and then the box (4) Remove the spacer (if any).
Spare wheel storage location
(version B).
- Remove the luggage compartment floor panels.
- If there are spacers, remove them before removing the spare tire.
Removal a damaged wheel
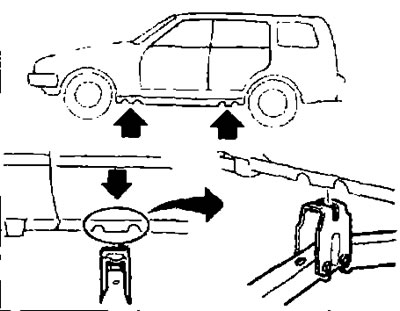
Location of jack supports.
(The material is based on data from the portal: NISSANBOOK.RU)
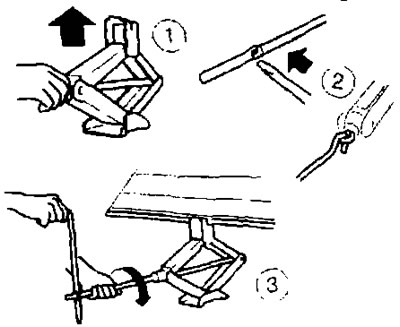
1. Place the jack under the special support in the body sill, as shown in the figure. The upper head of the jack should be located exactly under the specified support.
2. Align the middle part of the jack head with the protrusion on the support point of the body, as shown in the figure.
3. The edge of the threshold must enter the groove of the jack head, as shown in the figure.
4. Loosen all wheel nuts by turning them counterclockwise one or two turns with a wheel wrench.
- Do not completely loosen the wheel nuts while the wheel is on the road.
5. To raise the vehicle, rotate the jack handle clockwise as shown in the figure.
6. Carefully lift the vehicle until the wheel is completely off the road surface.
7. Loosen the wheel nuts and remove the wheel with the damaged tire.
Wheel installation
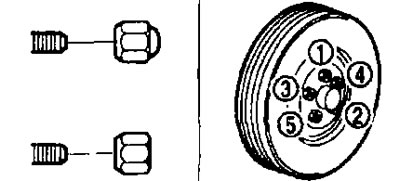
1. Clean the mating surfaces of the wheel and hub from dirt.
2. Carefully install the wheel and tighten the wheel nuts by hand. Make sure that the wheel nuts are not tilted.
3. Using a wheel wrench, tighten the wheel nuts evenly and alternately in the order shown in the figure ((1) - (5)).
4. Slowly lower the vehicle until the wheel touches the road surface.
5. Using a wheel wrench, finally tighten the wheel nuts in the sequence shown in the figure.
6. Lower the vehicle completely.
At the earliest opportunity, tighten the wheel nuts to the required torque using a torque wrench.
 108 N·m (11 kgf·m).
Storing the removed wheel and tools
Securely fasten the damaged wheel, jack and tools in the places specially designed for them.