


Caution: Do not allow coolant to come into contact with skin or painted surfaces. Do not store antifreeze in open containers.
The cooling system should be drained, flushed and refilled periodically to prevent corrosion that can cause engine damage.
Drain
- Apply the parking brake and block the wheels.
Caution: If the vehicle has been driven, allow the engine to cool before beginning this work.
- After the engine has cooled down completely, remove the radiator cap (1).
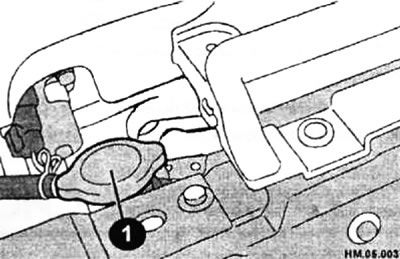
- Place a large container under the radiator drain hole to catch the coolant. The radiator drain hole is located on the lower left side of the radiator.
- On the lower engine cover, remove the protective cap from the coolant drain hole.
- Unscrew the drain plug (2) at the bottom of the radiator.
Caution: Be careful not to allow coolant to come into contact with drive belts.

- When completely draining the coolant for engine removal or repair, unscrew the drain plugs located on the right, left and front of the engine. First, move a drain pan underneath them to collect the leaking liquid.
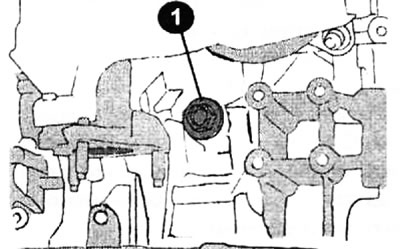
Plug (1) on the left side of the cylinder block
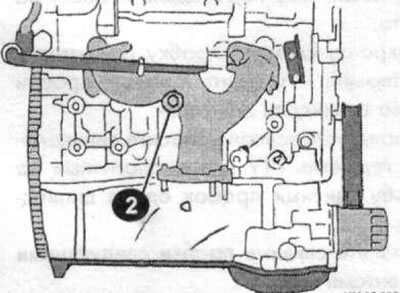
Plug (2) on the right side of the cylinder block
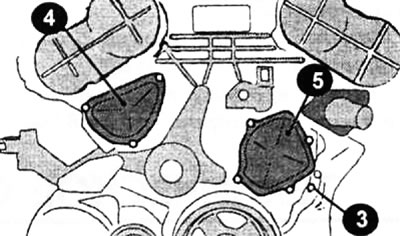
Plug (3) on the front of the cylinder block 4 — chain tensioner cover; 5 - water pump cover.
- Drain the coolant.
- Once the fluid has been drained, check the condition of the radiator and heater hoses and clamps.
- Replace damaged clamps and hoses.
- Once the fluid has been completely drained, flush the radiator with clean water from a hose until clear water comes out of the drain holes. Water washes away dirt and foreign matter, but does not remove rust from the cooling system.
- These deposits can be removed chemically. Follow the instructions for the cleaner. If the radiator is heavily corroded, damaged, or leaking, it should be removed and taken to a workshop for repair or replaced.
- The heater radiator must be backwashed each time the cooling system is flushed. To do this, disconnect the heater return hose from the thermostat housing or from the engine. Attach the garden hose connector to the heater hose and secure it with a clamp. This will allow you to securely connect your garden hose.
- Connect the garden hose to the connection you installed on the heater hose.
- Disconnect the heater inlet hose and hang it so that it acts as a drain.
- Turn the water on and off several times to create a stream in the heater core, then turn the water on full pressure and let it flow inside the heater for 5 minutes,
- Turn off the water and disconnect the garden hose. Remove the heater return hose connector and reconnect the hoses to the engine as they were originally connected.
- Remove the hose from the coolant expansion tank. Drain the liquid from the tank, rinse it with clean water, and then reconnect the hose.
- Close the radiator drain plug. Install and tighten the engine block drain plugs,
- Before installation, apply RTV silicone sealant or similar to the threads of the cylinder block drain plugs.
- Tighten the drain plugs to the following torques:
radiator drain plug: 0.78-1.56 Nm;
left cylinder block drain plug: 59-65 Nm;
right cylinder block drain plug: 24.5-29.4 N·m,
drain plug at the front of the cylinder block: 7.8-1 1.8 Nm.
Filling
- Install the expansion tank (if it was filmed).
- Set the heater temperature control to the maximum position.
- Slowly add coolant until the radiator is completely full.
Caution: If the coolant is replaced as part of maintenance, first fill the cooling system with water. Warm up the engine until the radiator fan comes on. Increase the speed, then cool the engine, drain the water and fill the system with coolant.
- With the radiator cap still on, start the engine and warm it up until the thermostat opens - fluid will begin to flow through the radiator and the top hose will become hot.
- Turn off the engine and let it cool. Add coolant if necessary, bringing the level up to the top of the radiator filler neck.
- Press on the top radiator hose to force the air out of it, then add fluid. Close the radiator cap.
- Fill the expansion tank with coolant up to the MIN mark.
- Start the engine, warm it up to normal temperature and check for any leaks.
- Check for the sound of leaking coolant when accelerating the engine from idle to 3000 rpm. The heater temperature control should be between the "COOL" and "WARM" positions. The sound can be heard near the heater. If the sound is heard, bleed the cooling system as described below until the coolant level stops dropping.
- Use only NISSAN antifreeze or equivalent coolant diluted with distilled water.
Cooling system capacity (the coolant level is at the MAX mark of the expansion tank) is approximately 9.2 liters.
Expansion tank capacity (at the MAX mark level): 0.8 l.
Bleeding the cooling system
If, after adding coolant, you hear an unusual noise, especially gurgling in the heater radiator, then the cooling system must be bled.
- Remove the radiator cap.
- Press the air valve on the lid and lock it in the open position by inserting a bent wire. In this case, the coolant can flow into the expansion tank regardless of the system pressure.
- Close the radiator cap and warm up the engine to operating temperature.
- Increase engine speed to 2500 rpm for 10 seconds and then reduce to idle. Repeat the process 3 times,
- Stop and let the engine cool.
- Check the coolant level in the radiator and expansion tank, top up if necessary.
- Remove the radiator cap and pull out the wire.
- Start the engine and let it run at variable speed (from idle to 4000 rpm). Simultaneously move the heater control through various positions from "COOL" to "WARM." If noise occurs, repeat the bleeding process.
- It may be necessary to remove air from the cooling system through the ventilation pipe.
- To do this, place a transparent hose on the ventilation pipe and immerse the other end of the hose in the coolant in the expansion tank.
- Block the valve on the radiator cap with wire.
- Set the temperature control to "COOL." This will allow coolant to flow through the hose.
(The material is taken from a web resource: www.NISSANBOOK.ru)