Spare wheel
Small spare tire (for some vehicle variants)

Small spare wheel marking for temporary use only
The small size spare tire is fitted with a tire that is smaller than the size of a regular full size tire. It is intended for emergency use only. The small spare tire can only be used for a short period of time. Its use for long trips over long distances is prohibited. If you need to install a small spare tire on your vehicle, follow the instructions and restrictions below. Failure to follow these instructions may result in an accident or vehicle damage.
Attention. Continued driving with a small spare tire fitted can cause the tire to fail, resulting in loss of control of the vehicle and serious accidents resulting in injury or death.
Attention.
- Small spare wheels should only be used when absolutely necessary. As soon as possible, replace the small wheel with a regular one.
- Drive carefully and do not exceed 80 km/h.
- Avoid driving a small wheel over uneven road surfaces. Also, do not use an automatic car wash.
- Avoid sharp turns and emergency braking.
- Do not overload the vehicle beyond the maximum permitted weight. Observe the load capacity limit of the small spare wheel. The value of the permissible load on a small wheel is molded on its sidewall.
- Snow chains must not be fitted to the small spare wheel. Failure to do so may result in vehicle damage and chain loss.
- It is forbidden to install a small wheel on cars of other models, since it is designed specifically for your car.
- It is forbidden to install more than one small wheel at the same time on the car.
- It is forbidden to tow a trailer.
- Like any other spare tire, the small tire should be checked regularly to maintain the recommended tire pressure of 3.0 kg/cm2 (300 kPa).
Full size spare tire (for some vehicle variants)
The vehicle can use a standard spare tire (the same size as the other wheels).
Replacing a damaged wheel
When replacing a damaged wheel, follow the instructions below.
Stopping the car
Attention.
- Apply the parking brake fully.
- Make sure the shift lever is in neutral (vehicles with manual transmission).
- Make sure the selector lever is in the automatic (AKP) or stepless (CVT) gearbox set to position «R» («Parking»).
- Do not change the wheel on a slope, on snowy or slippery ground: it is dangerous.
- Do not change a wheel when there is an oncoming traffic lane in the immediate vicinity. Call the technical assistance vehicle.
1. Observing safety measures, turn off the carriageway to the side of the road.
2. Turn on the hazard warning lights.
3. Stop the car on a flat horizontal platform.
4. Apply the parking brake.
5. Move the shift lever to the position «R» («Reverse») on vehicles with manual transmission. On vehicles with automatic (AKP) or stepless (CVT) transmission, set the selector lever to the position «R» («Parking»).
6. Stop the engine.
7. Open the hood and set the warning triangle (in the presence of):
- to warn other road users of the danger;
- to make your vehicle more visible to the roadside assistance team.
8. For safety reasons, all passengers must get out of the car and stay in a safe place at a sufficient distance from the carriageway and the car.
Replacing a damaged wheel (for vehicles equipped with a spare wheel)
Attention. In order to avoid spontaneous starting of the car from its place and possible injury to people, check the reliability of blocking the wheels of the car with wheel chocks.
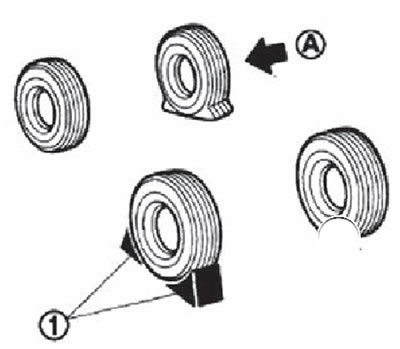
Place wheel chocks (1) front and rear under the wheel, which is located diagonally from the damaged wheel (A), to prevent the vehicle from moving while it is being jacked up.
Preparing the spare wheel and tools
Spare wheel, jack and necessary tools are in the luggage compartment.
1. Open the tailgate.
2. Remove both side and middle floor panels (1).
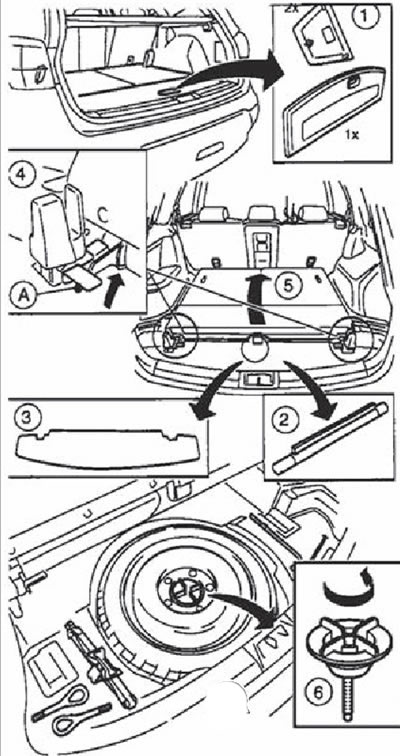
3. Remove the screen (2) luggage compartment (for some vehicle variants) and flooring (3).
4. Lower the head restraints and fold down the third row seats.
5. Release the seat from the latches (A), by simultaneously pulling up the levers on both sides (4).
6. Raise the seat (5) and release the levers.
7. Remove the supplied tool kit, jack and spare wheel.
Dismantling the decorative cap (for some vehicle variants)
Attention.
- Never remove the decorative caps by hand, as this may cause serious injury.
- Be careful when removing the decorative cap. The hub cap may suddenly come off the wheel and injure you.
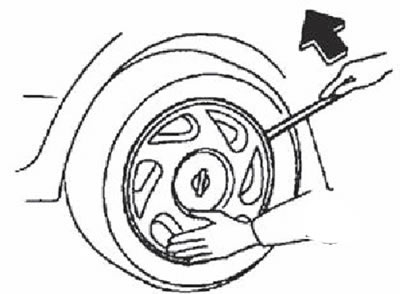
Using a suitable tool, remove the decorative cap as shown in the illustration.
Removing a damaged wheel
Attention.
- Before using the jack, read the warnings on the sticker on the jack body.
- It is forbidden to be under the car if it rests only on the domsrat. Use additional support stands.
- Do not use jacks designed for other vehicles.
- Use only the jack supplied with your vehicle. The jack is designed to lift only your vehicle when changing a damaged tire.
- Do not use your jack to lift other vehicles.
- Install the jack only in specially designed for this purpose on the car body. It is forbidden to install the jack at other points on the body or suspension.
- Do not raise the vehicle higher than necessary to change a wheel.
- It is forbidden to place wooden bars, stones, etc. under the jack or under its support head.
- Do not start or leave the engine running while the vehicle is jacked up: the vehicle may move unexpectedly.
- Do not allow passengers to remain in a vehicle that is jacked up.
- Completely free the car from the transported luggage and goods.
- Place wheel chocks under the wheel that is diagonal to the wheel to be removed.
Attention. The jack must rest on a flat, hard surface.

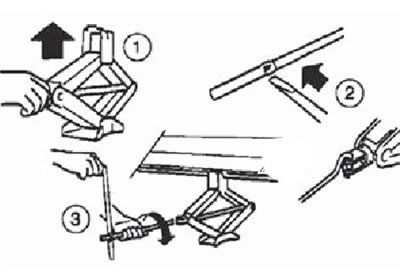
Jack support locations
1. Place the jack under the special support in the body sill, as shown in the figure. The top head of the jack must be exactly under the specified support.
2. Align the middle part of the jack head with the protrusion at the anchor point of the body as shown.
3. The edge of the threshold should fit into the groove of the head of the jack, as shown in the figure.
4. Loosen all wheel nuts by unscrewing them with a wheel wrench one or two turns counterclockwise.
Attention. Do not completely loosen the wheel nuts while the wheel is resting on the road.
Note.
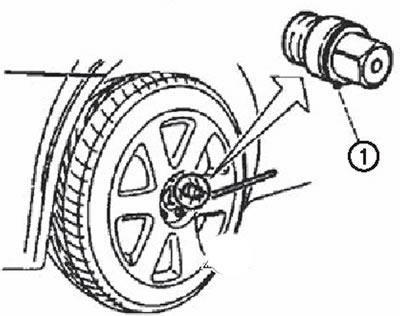
- Wheels equipped with «secret» wheel nuts (for some vehicle variants):
- If the wheel is equipped «secret» nuts, install a special nozzle on the nut (1) and loosen it as described above.
- «Secret» Nuts can only be loosened with a special socket. If you want to order a duplicate special head, you will need to tell your dealer the part number.
- Write down the special head code number and keep this record in a safe place, not in the car. If you lose the special head for «secret» nuts, contact an Authorized Nissan Dealer, who will manufacture the head according to its code number.
- Keep the special wheel nut socket in the car. Otherwise, it will be impossible to remove the wheels at the right time.
5. To raise the vehicle, turn the jack handle clockwise as shown.
6. Raise the vehicle carefully until the wheels are completely off the road surface.
7. Turn away wheel nuts and remove a wheel with the damaged tire.
Attention. The wheel has a lot of weight. Be careful not to drop the wheel on your feet, use work gloves to avoid injury to your hands.
Wheel installation
Attention.
- The small wheel is only for temporary use when replacing a damaged wheel.
- Do not use wheel nuts that are not designed for your vehicle. Incorrect wheel nuts or loose nuts may cause the wheel nuts to loosen and cause the wheel to come off while driving. This may cause an accident.
- Do not lubricate the threads of the wheel nuts or studs as this may cause the wheel nuts to loosen.
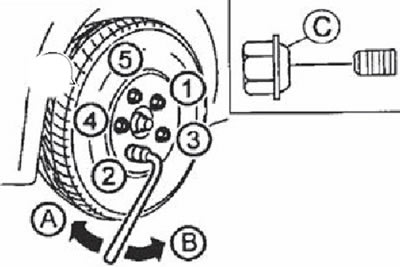
A. Tightening. B. Thinning. C. Conical surface.
1. Clean the adjoining surfaces of the wheel and hub from dirt.
2. Fit the wheel carefully and tighten the wheel nuts by hand. Check that the wheel nuts are not skewed.
Note. Wheels equipped with «secret» wheel nuts (for some vehicle variants): Fit the wheel nuts one by one and tighten the wheel nuts by hand.
3. Using a wheel wrench, tighten the wheel nuts evenly and alternately in the order shown in the figure (1-5).
4. Slowly lower the vehicle until the wheel touches the road surface.
5. Then use the wheel wrench to finally tighten the wheel nuts in the sequence shown in the figure.
6. Lower the car completely.
7. Replace the decorative cap (for some vehicle variants). To properly install the decorative cap, first align the logo «Nissan» (on the center cover) with holes for nuts, that is, perpendicular to the hole for the nipple.
Note.
- At the first opportunity, tighten the wheel nuts to the required torque using a torque wrench.
- Wheel nuts tightening torque - 113 Nm (12 kgf·m).
Attention. The wheel nuts must be tightened after the vehicle has been driven for 1 (00) km (as well as after replacing a faulty wheel and in other similar cases).
Wheel nuts must always be tightened to the correct torque. It is recommended to check the tightening torque and, if necessary, retighten the wheel nuts at every oil change. Adjust the air pressure in the spare tire to the recommended value for cold tires. Tires are considered cold if the car has stood still for at least three hours or after a long parking period has traveled no more than 1.6 km. The recommended cold tire pressure is given on a label affixed to the B-pillar in the driver's door opening.
Stowing the removed wheel and tool
Attention. After changing a wheel, make sure that the removed wheel, jack and tools are properly stowed and securely fastened. In the event of a traffic accident or sudden braking of the vehicle, objects that are not properly secured can be dangerous to the occupants.
1. Place the instruments in their places.
2. Reinstall the third row of seats until the seat latches are secure on both sides.
3. Set the backrest of the third row seats to an upright position (1).
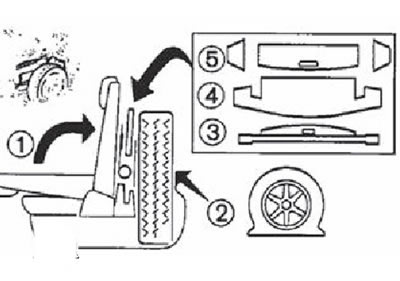
4. Stow the wheel with the damaged tire in the trunk (2).
5. Place the remaining items in the order shown: luggage compartment screen (3) - floor mat (4) - middle and side floor panels (5).
«Secret» wheel nuts (for some vehicle variants)
turning away «secret» wheel nuts
1. Insert special key head (1) V «secret» nut.
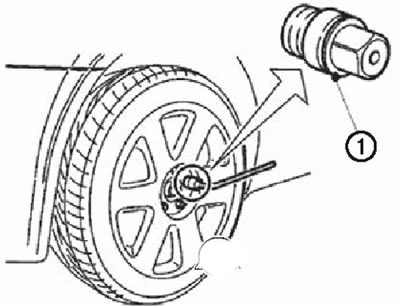
2. To turn away «secret» nut, turn the wheel wrench counterclockwise.
Attention.
- Do not use power nutrunners for loosening or tightening «secret» wheel nuts.
- When installing the wheel, tighten «secret» wheel nut with the same torque as conventional wheel nuts.
Note.
- Each special nut head has an individual code. «Secret» Your vehicle's wheel nuts cannot be loosened with a socket that has a different code. If you lose the special head for «secret» nuts, contact an Authorized Nissan Dealer, who will make duplicates / from the head by its code number.
- Write down the special head code number.
- When you go to a Nissan Authorized Dealer for servicing, make sure the special head for «secret» wheel nuts is in the vehicle. Otherwise, it will not be possible to remove the wheels and it will be impossible to carry out maintenance on the vehicle.