


Car engine lubrication system Nissan Qashqai 1 (J10)

Precautionary measures
See similar section chapter 6a .
See similar section chapter 6a .

Engine oil
Checking the engine oil level Note. Check the oil level on horizontally mounted vehicles before starting the engine. If the engine has already been started, stop it and...
Checking the engine oil level Note. Check the oil level on horizontally mounted vehicles before starting the engine. If the engine has already been started, stop it and...

Removal and installation of the oil filter (gasoline engines)
Take off 1. Remove the engine protection tray. 2. Using a special key (KV10115801) remove the oil filter. HR16DE engine Engine MR20DE: 1. Lower oil pan. A. Oil filter...
Take off 1. Remove the engine protection tray. 2. Using a special key (KV10115801) remove the oil filter. HR16DE engine Engine MR20DE: 1. Lower oil pan. A. Oil filter...
Checks after installing the oil filter
Gasoline engines 1. Check the oil level. 2. Start the engine and check for oil leaks. 3. Stop the engine and wait 10 minutes. 4. Check the oil level and correct it....
Gasoline engines 1. Check the oil level. 2. Start the engine and check for oil leaks. 3. Stop the engine and wait 10 minutes. 4. Check the oil level and correct it....

Removal and installation of the oil filter (diesel engines)
Removing 1. With a special key (KV113C0010 (Mot.1329)) remove the oil filter. Attention. Be careful not to get burned (oil may be hot). Before removing the filter,...
Removing 1. With a special key (KV113C0010 (Mot.1329)) remove the oil filter. Attention. Be careful not to get burned (oil may be hot). Before removing the filter,...

1.6L Gasoline Engine Oil Pan (HR16DE) — Device
1. Rear oil seal. 2. O-ring of circular cross-section. 3. Upper part of the oil pan. 4. Chain tensioner. 5. Oil pump drive chain. 6. Crankshaft sprocket. 7. Oil pump...
1. Rear oil seal. 2. O-ring of circular cross-section. 3. Upper part of the oil pan. 4. Chain tensioner. 5. Oil pump drive chain. 6. Crankshaft sprocket. 7. Oil pump...

1.6L Gasoline Engine Oil Pan (HR16DE) — Removal
1. Drain engine oil. 2. Remove the lower part of the oil pan: Loosen the mounting bolts in the reverse order to that shown in the figure. Note. The arrow points to the...
1. Drain engine oil. 2. Remove the lower part of the oil pan: Loosen the mounting bolts in the reverse order to that shown in the figure. Note. The arrow points to the...
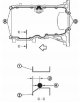
1.6L Gasoline Engine Oil Pan (HR16DE) — Installation
1. Install the upper part of the oil pan: Use a scraper to remove the old sealant from the contact surfaces of the upper part of the oil pan and cylinder block, as well...
1. Install the upper part of the oil pan: Use a scraper to remove the old sealant from the contact surfaces of the upper part of the oil pan and cylinder block, as well...
1.6L Gasoline Engine Oil Pan (HR16DE) — Post-Installation Inspection
1. Check and, if necessary, adjust the engine oil level. 2. Start the engine and check for oil leaks. 3. Stop the engine and wait ten minutes. 4. Check the engine oil...
1. Check and, if necessary, adjust the engine oil level. 2. Start the engine and check for oil leaks. 3. Stop the engine and wait ten minutes. 4. Check the engine oil...

2.0L Gasoline Engine Oil Pan (MR20DE) — Device
1. Oil dipstick. 2. Oil dipstick guide. 3. Rear oil seal. 4. O-ring. 5. O-ring. 6. Upper oil pan. 7. Balancing block drive chain. 8. Crankshaft sprocket. 9. Asterisk of...
1. Oil dipstick. 2. Oil dipstick guide. 3. Rear oil seal. 4. O-ring. 5. O-ring. 6. Upper oil pan. 7. Balancing block drive chain. 8. Crankshaft sprocket. 9. Asterisk of...

Removal and installation of the lower oil pan of the gasoline engine 2.0 l (MR20DE)
Removing 1. Remove the engine protection tray. 2. Drain engine oil. 3. Remove the lower oil pan: Loosen the mounting bolts in the reverse order to that shown in the...
Removing 1. Remove the engine protection tray. 2. Drain engine oil. 3. Remove the lower oil pan: Loosen the mounting bolts in the reverse order to that shown in the...

Removal and installation of the top oil pallet of the petrol engine of 2,0 l (MR20DE)
Removing 1. Remove the lower oil pan. 2. Remove the oil cooler and oil filter. Note. For correct installation, apply alignment marks to the oil cooler and upper oil pan...
Removing 1. Remove the lower oil pan. 2. Remove the oil cooler and oil filter. Note. For correct installation, apply alignment marks to the oil cooler and upper oil pan...

Diesel engine oil pan 1.5 l (K9K) — device
1. Gasket. 2. Oil pan. 3. O-ring of circular cross-section. 4. Drain plug. 5. Oil level sensor. 6. Clutch housing. 7. Crankshaft position sensor. Note. : replace the...
1. Gasket. 2. Oil pan. 3. O-ring of circular cross-section. 4. Drain plug. 5. Oil level sensor. 6. Clutch housing. 7. Crankshaft position sensor. Note. : replace the...

Diesel engine oil pan 1.5 l (K9K) — removal
Attention. To avoid burns, do not drain engine oil from a hot engine. 1. Remove the engine protection tray. 2. Remove the right front wheel. 3. Remove the right side...
Attention. To avoid burns, do not drain engine oil from a hot engine. 1. Remove the engine protection tray. 2. Remove the right front wheel. 3. Remove the right side...

Diesel engine oil pan 1.5 l (K9K) — installation
Installation is carried out in the reverse order of removal, taking into account the following: 1. Apply sealant as shown. Note. Use genuine Nissan sealant or...
Installation is carried out in the reverse order of removal, taking into account the following: 1. Apply sealant as shown. Note. Use genuine Nissan sealant or...

Oil pump — device
1. Oil pump drive chain. 2. Crankshaft sprocket (oil pump drive chains). 3. Oil pump. Note. : replace the part with a new one after each removal.
1. Oil pump drive chain. 2. Crankshaft sprocket (oil pump drive chains). 3. Oil pump. Note. : replace the part with a new one after each removal.
Oil pump — removal and installation
Removing 1. Remove the following parts: Battery ground cable. Protective pallet of the engine. Right front wheel. 2. Remove the right side mudguard. 3. Remove the...
Removing 1. Remove the following parts: Battery ground cable. Protective pallet of the engine. Right front wheel. 2. Remove the right side mudguard. 3. Remove the...

2.0L diesel engine oil pan (M9R) with oil pickup
1. Oil deflector. 2. Upper part of the oil pan. 3. O-ring. 4. Oil intake. 5. Drain plug. 6. Gasket. 7. The bottom of the oil pan. Note. : replace the part with a new one...
1. Oil deflector. 2. Upper part of the oil pan. 3. O-ring. 4. Oil intake. 5. Drain plug. 6. Gasket. 7. The bottom of the oil pan. Note. : replace the part with a new one...

Removal and installation of the lower part of the oil pan of the diesel engine 2.0 l (M9R)
Removing 1. Remove the engine protection tray. 2. Drain engine oil. Attention. This step should complete. on a cold engine. 3. Remove the lower part of the oil pan:...
Removing 1. Remove the engine protection tray. 2. Drain engine oil. Attention. This step should complete. on a cold engine. 3. Remove the lower part of the oil pan:...

Removal and installation of the upper part of the oil pan of the diesel engine 2.0 l (M9R)
Removing 1. Remove the lower oil pan and oil pickup. 2. Remove the rear oil seal retainer. 3. Remove the upper part of the oil pan: Loosen the mounting bolts in the...
Removing 1. Remove the lower oil pan and oil pickup. 2. Remove the rear oil seal retainer. 3. Remove the upper part of the oil pan: Loosen the mounting bolts in the...

Oil separator — device
1. Oil separator insulator. 2. Oil separator. 3. Gasket. 4. Gasket. 5. Crankcase ventilation hose. 6. Collar. A. Bolt tightening is done in two stages. B. To the duct.
1. Oil separator insulator. 2. Oil separator. 3. Gasket. 4. Gasket. 5. Crankcase ventilation hose. 6. Collar. A. Bolt tightening is done in two stages. B. To the duct.

Oil separator — removal and installation
1. Remove the engine cover and fuel injector cover. 2. Remove the crankcase ventilation hose. 3. Disconnect the No. 1 fuel injector connector. 4. To turn away bolts of...
1. Remove the engine cover and fuel injector cover. 2. Remove the crankcase ventilation hose. 3. Disconnect the No. 1 fuel injector connector. 4. To turn away bolts of...
Service data and specification of the HR16DE engine
Filling volumes of engine oil (approximate) Engine oil pressure
Filling volumes of engine oil (approximate) Engine oil pressure
Service data and specification of the MR20DE engine
Lubrication system capacity (approximate) Engine oil pressure
Lubrication system capacity (approximate) Engine oil pressure
Service data and specification of the K9K engine
Filling volumes of engine oil (approximate) Engine oil pressure
Filling volumes of engine oil (approximate) Engine oil pressure
Service data and specification of the M9R engine
Lubrication system capacity (approximate) Engine oil pressure
Lubrication system capacity (approximate) Engine oil pressure

This section is available on: russian, bulgarian, belarusian, ukrainian, serbian, croatian, romanian, polish, slovak, hungarian
Similar information for other Nissan models
➜ Power unit: Lubrication system Nissan Almera 1 (1995-2000)
➜ Power unit: Engine lubrication system Nissan Note 1 (2004-2013)
Link in different formats to this section
TEXTHTMLBB Code
- General information
- Faults en route
- Daily checks
- User manual
- Maintenance
- Power unit
- Petrol engines 1.6L (HR16)
- Petrol engines 2.0L (MR20)
- Diesel engines 1.5L (K9K)
- Diesel engines 2.0L (M9R)
- Cooling system
- Engine lubrication system
- Engine power system
- Engine management system
- Intake and exhaust system
- Engine electrical equipment
- Transmission
- Clutch
- Car gearbox
- Transfer case and shafts
- Chassis
- Car suspension
- Brake system
- Steering
- Body
- Exterior (external elements)
- Interior (internal elements)
- Safety system
- Heating and air conditioning
- Electrical equipment
- Wiring harnesses
NissanBook.ru © 2018–2024 · Mobile version · Articles about Nissan · Sitemap: EN BG BY UA RS HR RO PL SK HU · Feedback · Site search · Bookmark
Almera 1 (N15) · Maxima 4 (A32) · Terrano 1 (petrol) · Patrol 4 (Y60, petrol) · Example 1 (P10, petrol) · Qashqai 1 (J10) · Serena 2 (C24) · Sunny 7 (B13) · Note 1 · Micra 3 (petrol) ·
Almera 1 (N15) · Maxima 4 (A32) · Terrano 1 (petrol) · Patrol 4 (Y60, petrol) · Example 1 (P10, petrol) · Qashqai 1 (J10) · Serena 2 (C24) · Sunny 7 (B13) · Note 1 · Micra 3 (petrol) ·