


Removal
1. Remove the lower oil pan.
2. Remove the oil radiator and oil filter.
Note: To ensure proper installation during assembly, apply alignment marks to the oil cooler and upper oil pan.
3. Remove the front engine cover, drive chains and related parts.
4. Remove the oil dipstick from the guide.
5. If necessary, remove the engine oil level sensor.
Caution: Do not drop or subject the engine oil level sensor to impact.
6. Remove the upper oil pan:
Loosen the mounting bolts in the reverse order to that shown in the figure.
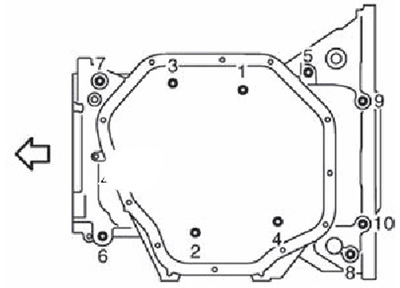
The arrow points towards the front of the engine
Insert a screwdriver into the places indicated by black arrows in the figure and, using it as a lever, separate the upper oil pan and the cylinder block.

The arrow points towards the front of the engine
Note: In some places, the sealant is applied to meet specific operational needs and does not need to be removed, so the sealant should only be cut at the points shown in the figure.
Insert a special knife for sealant (KV10111100) between the upper oil pan and the cylinder block and, moving it with a hammer, cut the layer of sealant.
Caution: Be careful not to damage the contact surfaces.
7. Remove the sealing ring between the cylinder block and the upper oil pan.
Installation
1. Using a scraper (A), remove old sealant from the mating surfaces of the upper oil pan and cylinder block, as well as from the bolt holes and threads.
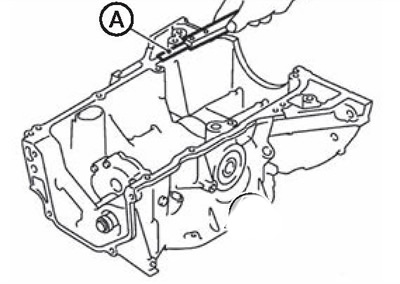
Caution: Be careful not to scratch or damage the contact surfaces when removing old sealant.
2. Using a special gun, apply a continuous bead of sealant (C) as shown in the figure
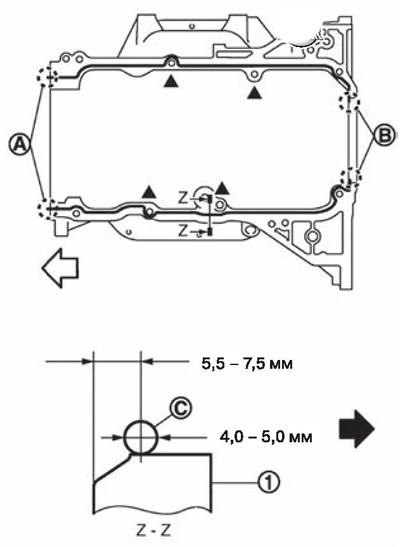
1. Upper part of the oil pan.
A. 2 mm protrusion outward.
B. 2 mm protrusion towards the rear oil seal.
The white arrow points towards the front of the engine.
The black arrow points outward.
Note: Use original sealant or equivalent.
Attention.
- Apply sealant to the outside of the bolt holes at the locations marked "A".
- Installation must be completed within five minutes of sealant application.
3. Install the sealing ring on the cylinder block side, making sure it is installed correctly.
4. Tighten the bolts in the sequence shown in the figure.
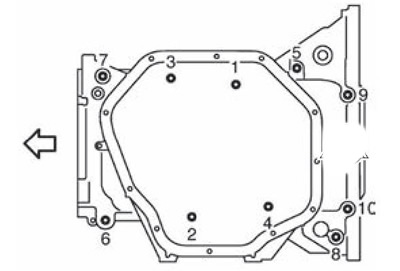
The arrow points towards the front of the engine
5. Install the rear oil seal:
Attention.
- The rear oil seal must be installed within five minutes of installing the upper oil pan.
- Always replace the rear engine oil seal with a new one.
- Do not touch the edges of the seal.
Use a scraper to remove any protruding sealant from the rear oil seal mounting surfaces on the upper oil pan and cylinder block.
Apply engine oil to the outer surfaces of the rear oil seal.
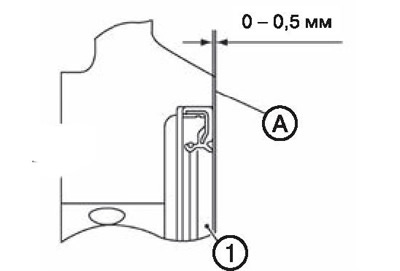
Press in the rear oil seal using a suitable mandrel (A) with an outside diameter of 115 mm and an inside diameter of 90 mm.
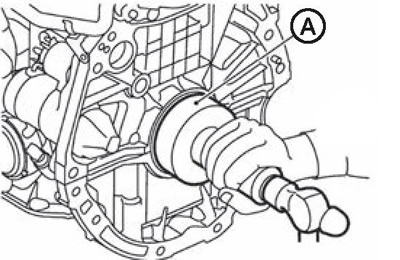
Note: Press the seal to the depth indicated in the figures.
Post-installation check
1. Check and, if necessary, adjust the engine oil level.
2. Start the engine and check for oil leaks.
3. Stop the engine and wait ten minutes.
4. Check the engine oil level again.