


Table of contents: Removal ↓ Installation ↓
Clutch slave cylinder assembly components
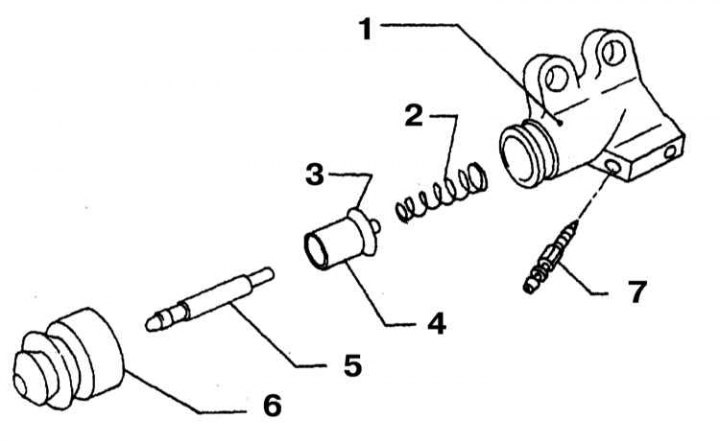
1 - Body; 2 - Piston spring; 3 - Piston cover; 4 - Piston; 5 - Push rod; 6 - Dust cover; 7 - Bleed valve (6÷10 Nm)
Removal
1. The components of the clutch slave cylinder assembly are shown in the illustration.
2. Disconnect the negative cable from the battery.
Warning! If the car stereo system is equipped with a security code, make sure you have the correct combination to activate the audio system before disconnecting the battery!
3. If necessary, remove the battery to ensure access (see Chapter Engine electrical equipment).
4. Loosen the hollow bolt of the union connector connecting to the slave cylinder of the hydraulic line. Unscrew the bolts securing the cylinder assembly.
5. Disconnect the hydraulic line. Prepare a container and a supply of dry rags to collect any spilled liquid.
6. Remove the slave cylinder assembly from the manual transmission housing.
Installation
1. Connect the hydraulic line to the cylinder (don't forget to replace the sealing washers of the nipple connector). Tighten the hollow connector bolt by hand.
2. Install the assembly in its regular place on the clutch dome and tighten the mounting bolts to the required force. Make sure the pusher is seated correctly in the clutch release lever pocket. Tighten the fasteners to the required force.
3. Tighten the hollow bolt of the hydraulic line union connector to the required torque.
4. Fill the cylinder with the required amount of DOT 3 brake fluid.
5. Bleed the hydraulic system (see section Bleeding air from the hydraulic circuit of the clutch release drive).
6. If removed, reinstall the battery. Connect the negative cable to the battery.
(For more information, see the website: NissanBook.ru)