


Table of contents: Removal ↓ Installation ↓ Disassembly ↓ Cleaning and checking the condition ↓ Assembly ↓
Removal
Location of the slave cylinder and associated components on 3.0L models
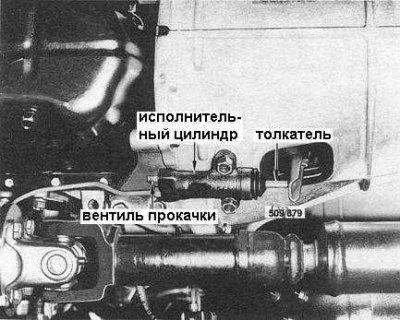
1. Jack up the front of the car and place it on supports.
2. Disconnect the hydraulic pipe from the slave cylinder.
3. Loosen the mounting bolts and remove the slave cylinder. On 4.2L models, also remove the heat shield.
Installation
Installation is carried out in reverse order.
1. On 4.2L models, ensure that the heat shield is positioned correctly.
2. Tighten all fasteners to the required torque.
3. Finally, bleed the hydraulic system.
Disassembly
1. After removing the slave cylinder from the vehicle, remove the rubber boot and pusher from its end.
2. Remove the piston, spring and spring seat from the cylinder (the internal components of the 4.2L slave cylinder are shown in the accompanying illustration). If problems occur, tap the cylinder with a wooden block or apply low-pressure air to the hole where the hydraulic tube is connected. Carefully remove the cuff from the piston.
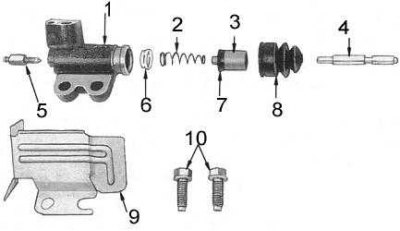
1 - cylinder; 2 - spring; 3 - piston; 4 - pusher; 5 - bleed valve; 6 - saddle; 7 - cuff; 8 - case; 9 - bolts; 10 - heat shield
3. Unscrew the bleed valve from the slave cylinder.
Cleaning and checking the condition
1. Wash the slave cylinder components with methyl alcohol.
Caution! Never use gasoline or mineral spirits for this purpose.
Source is available on the resource: www.NISSANBOOK.ru
2. Inspect the cylinder bore for signs of wear, scratches, scoring and corrosion. Replace if necessary.
3. Also check the condition of the piston, replace the defective one.
4. Check the piston seal and rubber protective cover for signs of material aging and other defects; replace if necessary.
5. Check the pushrod for signs of wear, bending, or other damage. Replace if necessary.
6. Check the patency and general condition of the bleed valve. If necessary, clean the valve or replace it.
7. Check the condition of the piston spring. If signs of deformation, weakening of the developed force, as well as cracks and other defects are detected, replace it.
Assembly
1. Lubricate with special grease (for rubber components) piston seal and cylinder mirror. Place the seal on the piston.
2. Insert the spring seat, spring and piston into the cylinder. Make sure that the lips of the cuff do not turn out during installation.
3. Install the pusher and rubber boot onto the end of the slave cylinder.
4. Screw in the bleed valve, but do not tighten it yet.
5. Install the slave cylinder on the vehicle.