


Table of contents: Removal ↓ Installation ↓ Disassembly ↓ Cleaning and checking the condition ↓ Assembly ↓
Removal
Clutch Master Cylinder Location on 4.2L Models
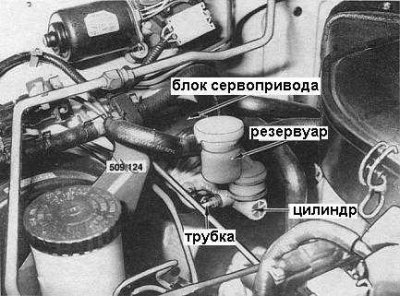
1. Cover the right front mudguard with protective covers.
2. Disconnect the hydraulic pipe from the master cylinder. Plug the end of the pipe and the hole in the cylinder to prevent dirt from entering the hydraulic system and to minimize fluid loss.
3. On 3.0L models, disconnect the master cylinder push rod from the clutch pedal.
4. Loosen the mounting nuts and remove the master cylinder from the vehicle. Try to avoid any hydraulic fluid coming into contact with the painted surfaces of the vehicle body.
Caution: If hydraulic fluid gets on the paintwork, rinse it off immediately with plenty of water, then allow the surface to dry naturally - do not wipe it with a rag.
Installation
Installation is carried out in reverse order.
1. Tighten the fastening nuts to the required torque.
2. Bleed the hydraulic system.
Disassembly
1. After removing the master cylinder, drain the hydraulic fluid from its reservoir.
2. Loosen the clamp and separate the reservoir from the master cylinder.
3. Separate the rubber boot from the end of the master cylinder.
4. Remove the retaining ring from the end of the cylinder, then (in accordance with the configuration) remove the pusher, washer and rubber boot.
5. Remove the piston and spring assembly from the cylinder (see accompanying illustration for 4.2L models master cylinder components).
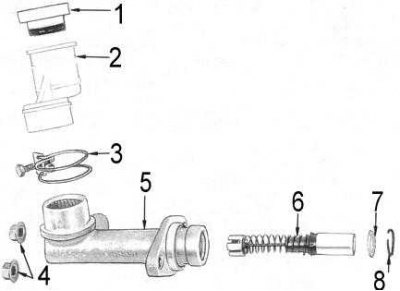
1 - lid; 2 - reservoir; 3 - clamp; 4 - nuts; 5 - cylinder; 6 - piston; 7 - washer; 8 - retaining ring
Cleaning and checking the condition
1. Clean all master cylinder components with methyl alcohol.
Caution! Never use gasoline or mineral spirits for this purpose.
2. Check the cylinder mirror for signs of wear and corrosion; replace if necessary.
Caution! Honing of the clutch master cylinder is not allowed. If significant defects of the mirror are detected, the cylinder assembly should be replaced.
3. Check the piston assembly for signs of wear, scratches, scoring and corrosion. Pay particular attention to the condition of the piston seals. Replace if necessary.
4. If equipped, check the tappet and washer for signs of wear or damage. Replace any defective components.
5. Check the hydraulic fluid reservoir for cracks and other damage. Replace if necessary.
6. Check the condition of the tank mounting clamp. Replace if necessary.
Assembly
Note: Where possible, be sure to use special repair kits that include new seals and a piston. Using such branded kits will significantly extend the service life of the unit.
1. Lubricate with special grease (for rubber components) piston cuff, cylinder mirror and, if equipped, rubber boot.
2. Install the piston and spring assembly into the cylinder. On 4.2L models, install the washer and new snap ring.
3. On 3.0L models, check that the tappet has a rubber boot, then install and secure the tappet and washer with a new snap ring. Pull the boot onto the cylinder body.
4. Install the reservoir on the master cylinder and secure it securely with a clamp.
The source is published on the portal [NISSANBOOK.RU]
5. Fill the reservoir with fresh hydraulic fluid, then pump the piston manually until fluid appears in the hole for installing the hydraulic tube on the cylinder body.
6. Install the master cylinder on the vehicle.