


Note: Before you start, please read the Note at the beginning Chapters 23 regarding the dangers of asbestos dust.
1. Place the car on a level surface, apply the handbrake and select reverse gear first (manual transmission) or "R" (automatic transmission). Block the front wheels. Loosen the wheel nuts, jack up the rear of the car, and secure it on stands. Remove the wheel, and release the handbrake completely.
2. Unscrew the bolt from the handbrake cable mount to the caliper, and disconnect the cable from the lever.
3. To minimize fluid loss, either remove the master cylinder reservoir cap and use a flexible hose to drain the brake fluid.
4. Clean the area around the joint and unscrew the flexible hose joint box bolt. Remove the two sealing gaskets.
5. Loosen both caliper guide pin bolts (use a thin double-ended wrench), unscrew the rear guide pin bolt, and rotate the caliper body upward. Remove the brake pads, linings, and anti-rattle springs.
6. Remove the front guide pin bolts and detach the caliper body from the rig hanger. Remove the guide pins, if necessary, by screwing them into the bolts. Remove the rubber dust cap from each guide pin and the rubber bushings that are used on the front guide pin on some models. Remove the bolt from the rig hanger from the knuckle connector plate.
7. Clean the components to remove all dust.
8. Using long round nose pliers inserted into the notches on the piston, unscrew the piston counterclockwise. Remove it from the caliper body and from the dust seal.
9. Remove the retaining ring "A" (Figure 9.24). Then remove the first gasket, relief gasket, second gasket, ball bearing and mounting nut. Remove the cylinder with a lever, locking the mounting nut.
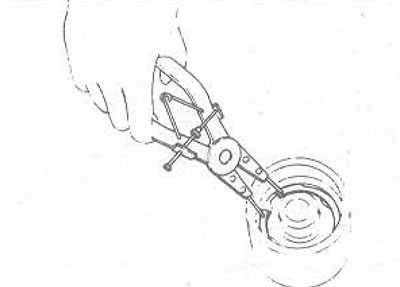
Figure 9.24. Removing retaining ring "A" from the piston
10. From the inside diameter of the caliper cylinder, using pliers, remove the retaining ring "B" using a suitable length of tubing to compress the spring cover. Then remove the retaining ring, spring cover, spring and spring seat.
11. Use pliers to remove the retaining ring "C", then disconnect the plate, pusher and plunger. Use a lever to remove the seal with the O-ring.
12. Using a blunt tool such as a knitting needle, remove the piston seal from the caliper.
13. Disconnect the return spring from the handbrake lever, then use a lever to remove the lever and cam assembly from the caliper body. The short rod and pusher must be removed first.
14. Clamp the cam in a soft material, loosen the lock nut, and remove the spring washers, return spring, lever, and dust cap from the cam.
15. Clean all components thoroughly using only methylated spirits or clean brake fluid. Never use mineral solvents such as gasoline or paraffin, which attack the rubber components of the brake system.
16. Remove all insulation, gaskets, dust caps and other rubber components. They should be replaced as a matter of course every time disassembly is performed. Do not try to save money by reusing these components.
17. Examine all components of the caliper assembly for signs of wear or damage. In particular, the bore diameter of the cylinder and piston should match and show no signs of scratches, corrosion or wear. If there is uncertainty about the condition of a caliper part, it should be replaced, and replacement should only be carried out in a pair - cylinder/piston.
18. The manufacturer declares; that minor scratches, rust, etc. can be polished to the diameter of the cylinder bore using fine-grained sandpaper, but the piston cannot be polished, only replaced. The piston surface is coated with metal and cannot be polished with corundum or similar abrasives.
19. Check the condition of the caliper housing and suspension. Check the guide pins. Use compressed air to clean.
20. When assembling, ensure that all parts are clean and dry.
21. Place the new dust cap on the cam and position the lever correctly on the cam washers, then install the return spring, spring washer and nut. Tighten the nut securely, but do not over tighten it. Apply a silicone grease - or RVS (Paly Butyl Cuprysil) high temperature brake lubricant. Check that the assembly is installed correctly and that the lever rotates. Install the upper return spring.
22. Soak the new piston seal with clean brake fluid and use only your fingers when seating it in the cylinder bore diameter.
23. Slide the new O-ring onto the pushrod and plunger. Assemble the plunger and pushrod and seat them on the caliper body. Position the plate so that the pushrod matches the concave depression in the caliper body, then secure the assembly with the snap ring in place "C". See Figures 9.25 and 9.26.
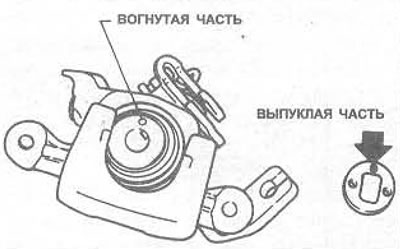
Figure 9.25. Correct alignment of the locking plate with the caliper body
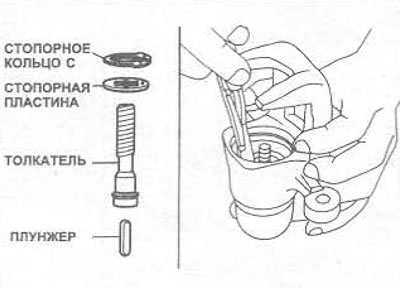
Figure 9.26. Installing the lock plate and push rod parts into the caliper body
[See the original on the resource: Nissanbook.ru]
24. Install the spring seat, spring and spring cover, then clamp the spring cover using a suitable length of tube (Figure 9.27), until the retaining ring "B" is in place to secure the assembly. Check the retaining ring to make sure it fits completely in the groove.
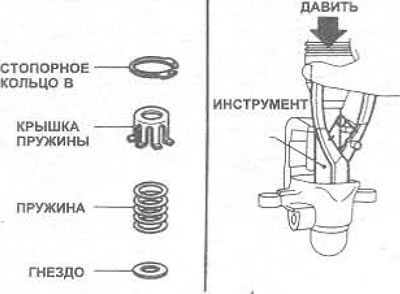
Figure 9.27. Installing the spring seat, spring and spring cover into the caliper body
25. Install the new seal, spring and spring cover using only your fingers (Figure 9.28). Lubricate the sealing lips and the seat of the mounting nut in the piston. Install the retaining ring "A".
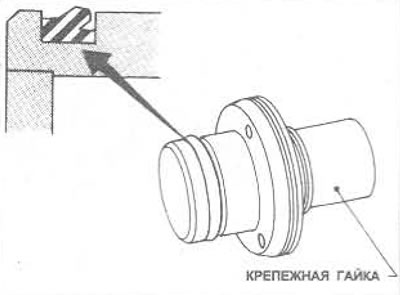
Figure 9.28. Correct installation of the cuff on the fastening nut
26. Apply rubber lubricant to the inner and outer lip of the new dust seal and seat it on the piston. Lubricate the piston and caliper bore with clean brake fluid, then install the piston assembly and screw it in clockwise until it stops. Place the dust seal on the caliper body.
27. Install the caliper mounting hanger to the stub axle mounting plate and tighten the mounting bolts to the torque specified in the Specifications. Install a new rubber dust boot over each guide pin (don't forget to fit the new rubber bushing to the front guide pin where it is used) and lubricate with organosilicon compound - or RVS (Paly Butyl Cuprysil) high temperature lubricant. Install the brake pads as described above.
28. Place the caliper body on the suspension and install the brake pads, install the guide pin bolts and tighten them to the torque wrench marks specified in the Specifications.
29. Make sure the flexible hose is installed correctly and is not twisted. Use new sealing gaskets and tighten all connections with bolts to the tightening torque specified in Specifications.
30. If necessary, bleed the system to remove air from the system as described above. Check the fluid level in the master cylinder reservoir.
31. Connect the handbrake cable to the lever and bolt it to the caliper body, making sure the pins are positioned correctly. Tighten the handbrake to set the correct clearance between the shoes and the drum.
32. With another person pressing the brake pedal, check the caliper assembly for signs of leaks. Clean out any fluid leaks and install the wheel. Lower the vehicle to the ground and tighten the wheel nuts to the specified torque Specifications.
33. Repeat the complete procedure on the opposite caliper. Always replace both calipers together to ensure uniform braking.