


Table of contents: Removal and installation ↓ Installation ↓ Disassembly and assembly ↓ Checking and adjusting ↓ Adjustment after installation ↓
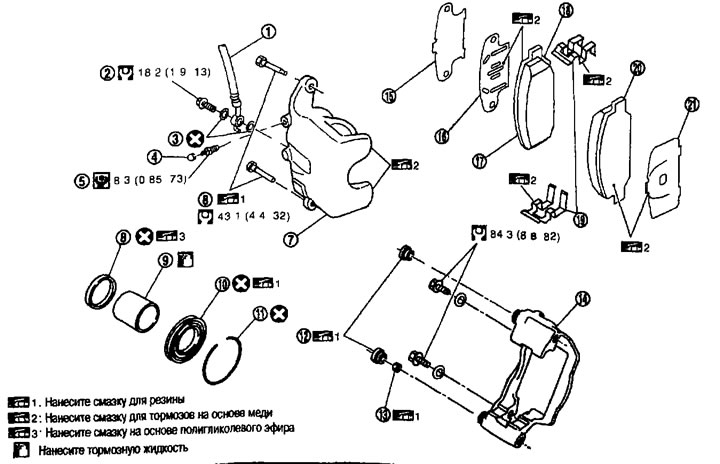
Brake caliper assembly. 1. Brake hose; 2. Connecting bolt; 3. Copper washer; 4. Cap; 5. Bleed nipple; 6. Guide pin bolt; 7. Cylinder body; 8. Piston seal; 9. Piston; 10. Piston dust cover; 11. Retaining ring; 12. Guide pin boot; 13. Bushing; 14. Caliper bracket; 15. Inner gasket cover; 16. Inner lining; 17. Inner shoe; 18. Brake pad wear sensor (only from the right side from the inside); 19. Shoe holder; 20. Outer shoe; 21. External gasket.
Removal and installation
Removal
Attention:
- To reduce the health hazards posed by dust particles or other materials, clean the caliper and brake pads with a vacuum cleaner. Do not use compressed air.
- Do not press the brake pedal, otherwise brake fluid may spill out when removing the brake hose.
1. Remove the wheels.
2. Secure the brake disc with wheel nuts.
3. Drain the brake fluid. See above.
Caution: Do not spill brake fluid on the brake disc.
4. Loosen the connecting bolt (1) and disconnect the brake hose (2) from the caliper assembly.
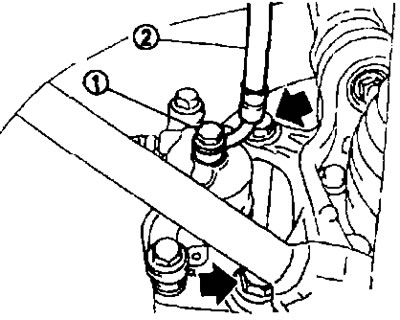
5. Loosen the caliper bracket mounting bolts and remove the brake caliper assembly.
Caution: Do not drop the brake pads and brake caliper assembly.
6. Remove the brake disc.
Attention:
- Before removing the brake disc, apply alignment marks to the wheel hub and wheel bearing assembly and the brake disc.
- Do not drop the brake disc.
Installation
Attention:
- To reduce the health hazards posed by dust particles or other materials, clean the caliper and brake pads with a vacuum cleaner. Do not use compressed air.
- Do not press the brake pedal, otherwise brake fluid may spill out when removing the brake hose.
1. Install the brake disc.
Caution: If you reuse the brake disc, align the marks made during removal.
2. Install the brake caliper assembly onto the vehicle and tighten the caliper bracket mounting bolts to the specified torque.
Caution: Before installing the caliper assembly, wipe off grease and moisture from all caliper assembly mounting surfaces, threads, bolts and washers.
3. Connect the brake hose to the brake caliper assembly and tighten the connecting bolts to the specified torque.
4. Fill with fresh brake fluid and bleed air. See above.
Attention:
- Do not reuse drained brake fluid.
- Do not spill brake fluid on the brake disc.
5. Check if the rear wheel brakes are sticking.
6. Install the wheels.
Disassembly and assembly
Disassembly
Note: When disassembling and assembling the cylinder body, do not remove the caliper bracket, brake pads, gasket cover gaskets and pad holders.
1. Remove the bolts from the guide pins and remove the cylinder body from the caliper bracket.
Caution: Do not drop the brake pads, linings, lining caps and pad retainers from the caliper bracket.
2. Remove the guide pins and dust boots from the caliper bracket.
3. Remove the bushings from the guide pins.
4. Place a wooden block as shown in the figure. Remove the pistons and piston dust boots by blowing air through the mounting hole under the connecting bolt.
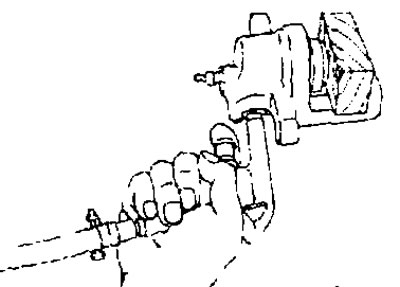
Caution: Do not pinch your fingers in the piston.
5. Using a flat-blade screwdriver, remove the piston seals from the cylinder body.
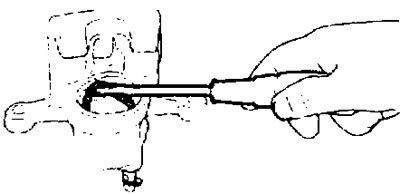
Caution: Do not scratch the inner walls of the cylinder.
Assembly
1. Apply rubber grease to the piston seals (1) and install them into the cylinder body.
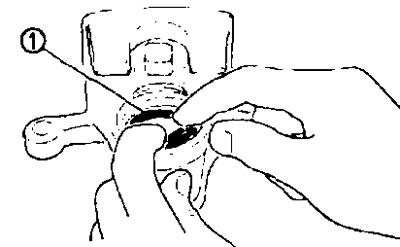
Caution: Do not reuse the piston seal.
2. Apply rubber grease to the piston dust boots (1). Place the dust boot on the end of the piston (2), then firmly insert the protrusion on the piston dust boot on the cylinder side into the groove on the cylinder body.
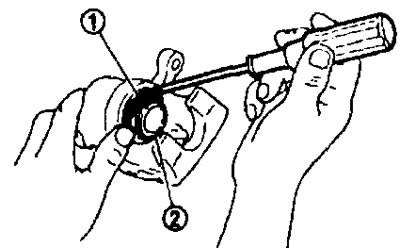
Caution: Do not reuse the piston dust boot.
3. Apply brake fluid to the piston (1). Press the piston into the cylinder body by hand and insert the protrusion on the piston dust boot (2) on the piston side into the groove on the piston.
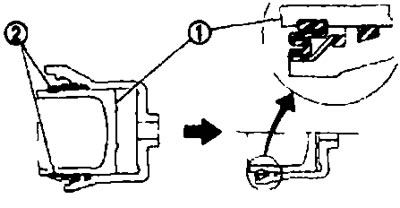
Caution: Press the piston in evenly. To avoid scratches on the inner cylinder walls, change the point of application of force.
4. Apply polyglycol ether based grease to the bushings and insert into the guide pins.
5. Apply rubber grease to the guide pins and dust boots and insert into the caliper bracket.
6. Install the cylinder body into the caliper bracket and tighten the guide pin bolts to the specified torque.
Checking and adjusting
Checking after disassembly
Cylinder body.
Check the inner cylinder walls for corrosion, wear, cracks or damage. Replace the cylinder body if necessary.
Caution: Use fresh brake fluid for cleaning. Do not use mineral oils, such as gasoline or kerosene.
Caliper bracket.
Check for corrosion, wear, cracks or damage. Replace the caliper bracket if necessary.
Piston.
Check for corrosion, wear, cracks or damage. Replace the piston if necessary.
Caution: The piston sliding surface is galvanized. Do not sand it with sandpaper.
Guide pin and guide pin boot.
Check the guide pins and guide pin boots for corrosion, wear, cracks or damage. Replace the component if necessary.
Adjustment after installation
Brake running-in procedure
Carry out the running-in of the friction surfaces of new brakes in accordance with the procedure below in case of boring or replacement of discs, after replacing brake pads, and also if after a short mileage the pedal begins to "fall through".
Attention. Monitor the speed of the car, because the brakes work properly only when the brake pads and discs are properly run in. Carry out this procedure only on safe roads, without interfering with traffic. Be extremely careful.
1. Drive your car on a straight, level road.
2. Adjust the pressure on the brake pedal so that the car stops within 3-5 seconds.
3. Allow the brake system to cool by driving the car without pressing the brake pedal.
4. Repeat steps 1-3 until the brake pads and discs have been run in.