


Table of contents: Removal and installation ↓ Installation ↓ Checking and adjusting ↓ Adjustment after installation ↓
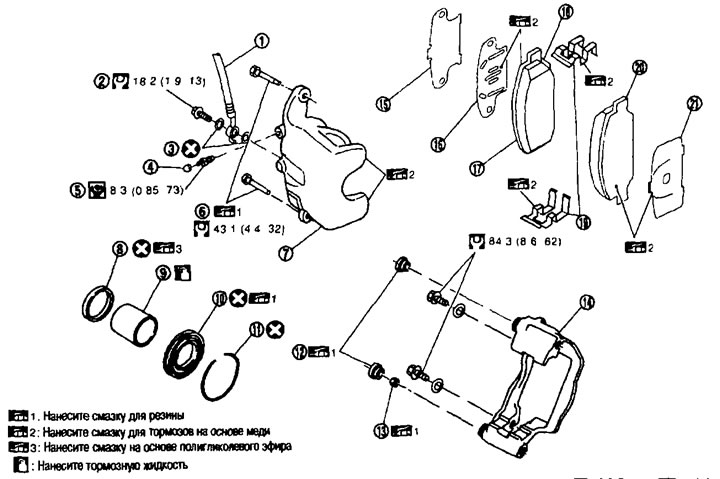
Brake pads 1. Brake hose; 2. Connecting bolt; 3. Copper washer; 4. Cap; 5. Bleed nipple; 6. Guide pin bolt; 7. Cylinder body; 8. Piston seal; 9. Piston; 10. Piston dust cover; 11. Retaining ring; 12. Guide pin boot; 13. Bushing; 14. Caliper bracket; 15. Inner gasket cover; 16. Inner lining; 17. Inner shoe; 18. Brake pad wear sensor (only from the right side from the inside); 19. Shoe holder; 20. Outer shoe; 21. External gasket.
Removal and installation
Removal
Attention:
- To reduce the health hazards posed by dust particles or other materials, clean the caliper and brake pads with a vacuum cleaner. Do not use compressed air.
- When removing the brake pads or cylinder body, do not press the brake pedal, otherwise the piston will pop out.
- Do not spill brake fluid on the brake disc.
1. Remove the wheels.
2. Remove the bolt from the lower guide pin.
3. Hang the cylinder body on the wire so as not to stretch the brake hose. Then remove the pads from the caliper bracket.
Attention:
- Do not deform the pad holder when removing it from the caliper bracket.
- Do not damage the piston dust boot.
- Do not drop brake pads, linings or lining covers.
Installation
Attention:
- To reduce the health hazards posed by dust particles or other materials, clean the caliper and brake pads with a vacuum cleaner. Do not use compressed air.
- When removing the brake pads or cylinder body, do not press the brake pedal, otherwise the piston will pop out.
- Do not spill brake fluid on the brake disc.
1. If the pad holders were removed, install them into the caliper bracket.
Attention:
- When installing the pad holder, insert it firmly so that it does not protrude beyond the caliper bracket.
- Do not deform the pad holders.
[Information copied from the portal NissanBook.ru]
2. Apply copper-based brake grease to the contact surfaces between the brake pads, linings and lining caps and install them on the brake pads.
Caution: When replacing brake pads, always replace the linings and lining caps as a set.
3. Insert the cylinder body and brake pads into the caliper bracket.
Caution: Do not damage the piston dust boot.
- When replacing the pads with new ones, monitor the brake fluid level in the reservoir, since when the piston is pressed, the brake fluid will return and raise the level in the master cylinder reservoir.
Note: To help you squeeze the piston, use a disc brake piston tool (special tool).
4. Screw the bolt into the lower guide pin and tighten to the required torque.
5. Press the brake pedal several times and check if the rear wheel brakes are sticking.
6. Install the wheels.
Checking and adjusting
Check after removal
If there are any signs of rust on the gaskets and gasket covers, replace them with new ones.
Adjustment after installation
Brake running-in procedure
Carry out the running-in of the friction surfaces of new brakes in accordance with the procedure below in case of boring or replacing the discs after replacing the brake pads, and also if the pedal begins to "fall through" after a short mileage.
Attention:
- Monitor the speed of the car, as the brakes only work properly when the brake pads and discs are properly broken in.
- Perform this procedure only on safe roads, without obstructing traffic. Be extremely careful.
1. Drive your car on a straight, level road.
2. Adjust the pressure on the brake pedal so that the car stops within 3-5 seconds.
3. Allow the brake system to cool by driving the vehicle without pressing the brake pedal.
4. Repeat steps 1-3 until the brake pads and discs have been run in.