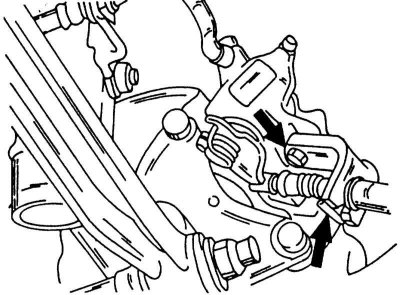
Loosen both bolts indicated by arrows to remove the handbrake cable attachment.
Replacement of brake pads
1. Raise the rear of the vehicle.
2. Remove wheels.
3. Remove the two bots shown in the illustration on the inside of the caliper to remove the handbrake cable mounts and retaining spring.
4. Remove the lower caliper guide pin from the caliper to free it on the mounting frame.
5. Tilt the entire caliper up as shown in the illustration below, and tie it with a piece of wire on the rear suspension so that it cannot fall.
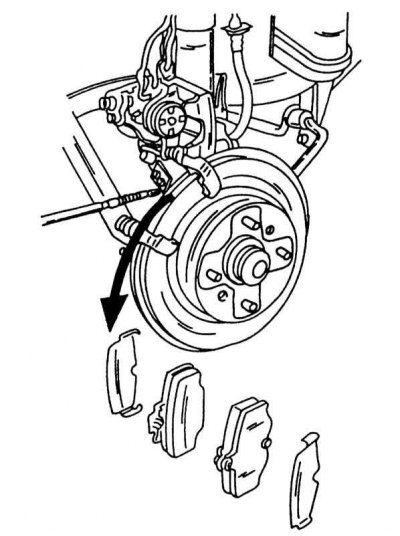
Removing the rear disc brake pads. Tie up the caliper with wire as shown.
6. Remove the inner and upper intermediate plates and both brake pads.
7. After removing the pads, do not press the brake pedal, as the piston will pop out.
8. Replace the brake pads if the thickness of the lining material has reached 2.0 mm. Never replace just one pad or swap pads from one side to the other. On illustrations shows where pad thickness is measured. The brake pad repair kit includes certain parts that must all be used in the installation.
9. Clean the calipers with brake fluid or alcohol. Never use gasoline for this.
10. Check that the piston gaskets are well sealed.
11. Check up a brake disk on presence of deep grooves which are caused by deterioration of brake pads. Measure the thickness of the brake disc with a micrometer as shown in illustrations. If the disc thickness is less than specified, the disc should be replaced. You can only replace one drive, but in most cases both drives need to be replaced.
12. Installation of brake pads is carried out in the reverse order of removal, taking into account the following points:
13. Using sharp pliers, turn the piston clockwise into the caliper as shown in the illustration below. At the same time, do not allow liquid to overflow from the compensation tank, i.e., you need to monitor the liquid in the tank. If the piston is deep in the cylinder, there is enough space for installing new pads.
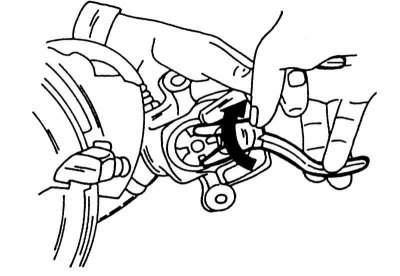
Before installing the brake pads, screw the piston into the hole using pliers.
14. Insert the inner shoe with intermediate plate, pull the caliper out and insert the outer brake shoe with intermediate plate.
15. Untie the caliper and lower it down without damaging the inserted brake pads.
16. Insert bolt (see illustration) and tighten with a force of 22 - 32 Nm.
17. After installation, press the brake pedal several times and check if air has entered the system. Otherwise, the system should be bled as described in Section Bleeding the brakes.
Brake caliper repair
Repairing a rear disc brake caliper is a little more difficult than a front one, as the adjustment mechanism is on the inside of the caliper. Since the caliper must also be disassembled almost completely to get to the cylinder gasket, no description of the repair is given. To completely remove the caliper, follow the steps described in the previous paragraph, but this time remove the top and bottom bolts that hold the caliper to the mounting frame. Loosen the brake pipe banjo and remove both copper washers. Washers must always be replaced.
The mounting frame can be removed. It contains guide pins and rubber cuffs that can be replaced. Tighten the bolts of the mounting frame with a force of 35-45 Nm.