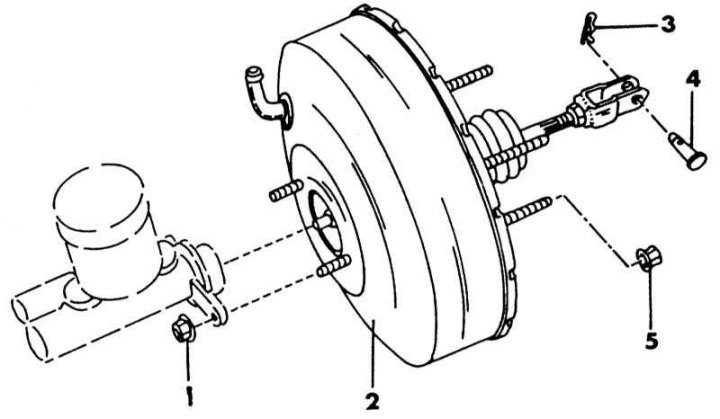
Brake booster in the case of an installed ABS system
1 - nut, 8-11 Nm; 2 - brake booster; 3 - cotter pin; 4 - cotter pin; 5 - nut, 13-16 Nm
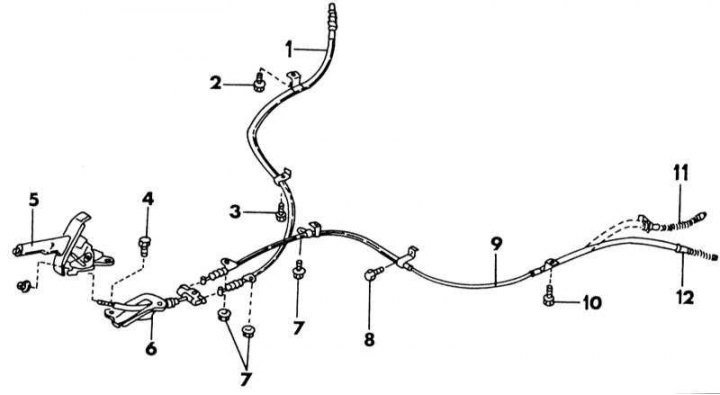
Location of handbrake cables
1 - rear cable; 2 - bolt, 3.5-4.5 N·m; 3 - bolt, 3.5-4.5 Nm; 4 - bolt, 8-11 Nm; 5 - hand brake lever; 6 - front cable; 7 - bolt, 3.5-4.5 Nm; 8 - bolt, 3.5-4.5 Nm; 9 - rear cable; 10 - bolt, 8-11 Nm; 11 - end of the cable, drum brakes; 12 - cable end, disc brakes
Replacing the front handbrake cable
On illustrations shows the location of both handbrake cables, as well as the attachment of the front cable to the handbrake lever. When replacing the cable, follow this illustration.
1. Raise the vehicle and place it on supports.
2. From the underside, remove the two nuts of both cables and unhook both cable ends from the balance arm.
3. Remove the switch console.
4. Disconnect the handbrake warning light cable plug.
5. Loosen the handbrake lever mounting bolts and unscrew the front cable holder.
6. Pull out the cable.
7. Installation is carried out in the reverse order of removal. Engage the handbrake lever and the cable bolts on the bottom with the specified torques.
8. Reinforce the cables according to illustrations. Lubricate all sliding elements of the handbrake cable well.
Replacing the rear handbrake cables
1. With drum brakes installed, unhook the handbrake cables from the brake shoes, as described when removing and installing the shoes in Section Rear brakes. Then remove according to illustrations.
2. With disc brakes installed, remove the mount and retainer plate on the rear caliper (see illustration) and then remove the cables according to illustration.
3. Installation is carried out in the reverse order. All tightening torques shown in the illustration must be adhered to. Not all bolts have the same tightening torque.