


Gasoline car engine Nissan Primera 1 (P10)

Gasoline Engine Specifications
Note. Separate characteristics are also given in the text of the Chapter and, if they are mandatory, are highlighted in bold. Carburetor engines 1.6 l Cylinder block...
Note. Separate characteristics are also given in the text of the Chapter and, if they are mandatory, are highlighted in bold. Carburetor engines 1.6 l Cylinder block...

Removal and installation of the engine
1. The engine is removed together with the gearbox down, i.e. the car must be raised accordingly so that there is enough space. To facilitate the work, either a crane or...
1. The engine is removed together with the gearbox down, i.e. the car must be raised accordingly so that there is enough space. To facilitate the work, either a crane or...

Engine disassembly
Top of exhaust manifold and adjacent parts on SR20DE engine 1 - injection valve; 2 - O-ring, always replace; 3 - O-ring, always replace; 4 - bolt, 3-4 Nm; 5 - rubber...
Top of exhaust manifold and adjacent parts on SR20DE engine 1 - injection valve; 2 - O-ring, always replace; 3 - O-ring, always replace; 4 - bolt, 3-4 Nm; 5 - rubber...
Engine Assembly
After disassembling the engine, all parts should be carefully cleaned and checked. The following chapters describe separately all necessary repairs. Assembly is carried...
After disassembling the engine, all parts should be carefully cleaned and checked. The following chapters describe separately all necessary repairs. Assembly is carried...
Removal and installation of a head of cylinders (injector)
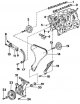
The following description describes the work that is required when the cylinder head and timing gear are installed. The description also includes the removal and...
The following description describes the work that is required when the cylinder head and timing gear are installed. The description also includes the removal and...

Removal and installation of a head of cylinders (carburetor)
Elements of the drive mechanism of the carburetor engine 1 - bolt, 9-12 Nm; 2 - chain guide; 3 - exhaust camshaft sprocket; 4 - intake camshaft sprocket; 5 - chain...
Elements of the drive mechanism of the carburetor engine 1 - bolt, 9-12 Nm; 2 - chain guide; 3 - exhaust camshaft sprocket; 4 - intake camshaft sprocket; 5 - chain...

Disassembly of the cylinder head and valves
Both engines described in this manual have a cylinder head with camshafts installed in it, however, their similarities end there. Therefore, the work is described...
Both engines described in this manual have a cylinder head with camshafts installed in it, however, their similarities end there. Therefore, the work is described...

Cylinder head overhaul
Valve drive mechanism (injection engine) 1. Check levers for wear. 2. Measure the diameter of the hydraulic elements and replace if it lies outside the range of 16.690 -...
Valve drive mechanism (injection engine) 1. Check levers for wear. 2. Measure the diameter of the hydraulic elements and replace if it lies outside the range of 16.690 -...

Checking the camshaft
1. On carburetor engines, this check also includes checking the valve lifters. Slight damage to cams or bearing journals can be smoothed out with a whetstone. Scratches...
1. On carburetor engines, this check also includes checking the valve lifters. Slight damage to cams or bearing journals can be smoothed out with a whetstone. Scratches...

Checking the cylinder head
1. The surface of the cylinder head should always be checked for deformation. If the cylinder head gasket burns out, it may be that the surface is deformed. 2. For...
1. The surface of the cylinder head should always be checked for deformation. If the cylinder head gasket burns out, it may be that the surface is deformed. 2. For...

Cylinder head assembly
1. If the valves, cylinder head, lever guides and/or valve seats have been replaced, determine the thickness of the new wear washers under the lever. For this job, a...
1. If the valves, cylinder head, lever guides and/or valve seats have been replaced, determine the thickness of the new wear washers under the lever. For this job, a...
Pistons and connecting rods — removal and installation
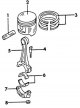
Piston parts 1 - piston pin; 2 - piston; 3 - piston rings; 4 - connecting rod bolt; 5 - connecting rod; 6 - connecting rod bearing shells; 7 - connecting rod bearing...
Piston parts 1 - piston pin; 2 - piston; 3 - piston rings; 4 - connecting rod bolt; 5 - connecting rod; 6 - connecting rod bearing shells; 7 - connecting rod bearing...

Checking pistons and connecting rods
1. Carefully check all details. If parts show signs of rust, scratches or wear, they should be replaced. Measure the vertical clearance of the piston rings in the piston...
1. Carefully check all details. If parts show signs of rust, scratches or wear, they should be replaced. Measure the vertical clearance of the piston rings in the piston...
Assembly of pistons and connecting rods
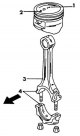
Heat the connecting rod eye to a temperature of 60-70°C (dip in hot water). Prepare a suitable rod that is inserted into the inside of the piston pin. Lubricate the...
Heat the connecting rod eye to a temperature of 60-70°C (dip in hot water). Prepare a suitable rod that is inserted into the inside of the piston pin. Lubricate the...

Crankshaft and crankshaft bearings — removal, inspection and installation
Injection engine crankshaft bearings 1 - adjusting half rings; 2 - upper liners of main bearings; 3 - crankshaft; 4 - lower liners of main bearings; 5 - covers of main...
Injection engine crankshaft bearings 1 - adjusting half rings; 2 - upper liners of main bearings; 3 - crankshaft; 4 - lower liners of main bearings; 5 - covers of main...

Cylinder block
When completely disassembling the cylinder block, thoroughly clean the cylinder block and remove all foreign bodies from the cavities and oil channels. Make sure that...
When completely disassembling the cylinder block, thoroughly clean the cylinder block and remove all foreign bodies from the cavities and oil channels. Make sure that...
Cylinder compression check
If it is assumed that the required pressure is not being created in the cylinder, it can be checked using a compression gauge. To check, unscrew the spark plugs, insert...
If it is assumed that the required pressure is not being created in the cylinder, it can be checked using a compression gauge. To check, unscrew the spark plugs, insert...
Engine lubrication system — general information
The engine is equipped with a circulation, forced lubrication system and is supplied with oil through an oil pump inserted into the camshaft drive cover. The principle...
The engine is equipped with a circulation, forced lubrication system and is supplied with oil through an oil pump inserted into the camshaft drive cover. The principle...

Removal and installation of the oil pan
Injection and carburetor engines have a different sump design. On a carbureted engine, a conventional oil pan is used, which has already been shown on illustrations . On...
Injection and carburetor engines have a different sump design. On a carbureted engine, a conventional oil pan is used, which has already been shown on illustrations . On...

Oil pump — removal and installation
Removal and installation of the pump 1. Removal and installation of the oil pump on the injection and carburetor engines is carried out in the same way. 2. Remove all...
Removal and installation of the pump 1. Removal and installation of the oil pump on the injection and carburetor engines is carried out in the same way. 2. Remove all...
Engine Oil Pressure Check
If a pressure gauge is available, the engine oil pressure can be checked if it is too low. This can be recognized, among other things, by the slow turning off of the oil...
If a pressure gauge is available, the engine oil pressure can be checked if it is too low. This can be recognized, among other things, by the slow turning off of the oil...
This section is available on: russian, bulgarian, belarusian, ukrainian, serbian, croatian, romanian, polish, slovak, hungarian
Similar information for other Nissan models
➜ Power unit: Engine repair Nissan Almera 1 (1995-2000)
➜ Power unit: Engines 4-cylinder Nissan Terrano 1 (1986-1995, petrol)
➜ Power unit: Engine repair 4.2 l Nissan Patrol 4 (1987-1997, petrol)
➜ Power unit: Petrol engines (2.0) Nissan Sunny 7 (1990-1998)
➜ Power unit: Engine repair HR Nissan Note 1 (2004-2013)
Link in different formats to this section
TEXTHTMLBB Code
- General information
- Introduction to the guide
- Maintenance
- Power unit
- Engine repair
- Cooling and heating
- Power and exhaust system
- Engine electrical equipment
- Transmission
- Mechanical gearbox
- Automatic gearbox
- Clutch and drive shafts
- Chassis
- Brake system
- Front suspension
- Rear suspension
- Steering
- Body and electrical equipment
- Body repair
- Equipment and devices
NissanBook.ru © 2018–2024 · Mobile version · Articles about Nissan · Sitemap: EN BG BY UA RS HR RO PL SK HU · Feedback · Site search · Bookmark
Almera 1 (N15) · Maxima 4 (A32) · Terrano 1 (petrol) · Patrol 4 (Y60, petrol) · Example 1 (P10, petrol) · Qashqai 1 (J10) · Serena 2 (C24) · Sunny 7 (B13) · Note 1 · Micra 3 (petrol) ·
Almera 1 (N15) · Maxima 4 (A32) · Terrano 1 (petrol) · Patrol 4 (Y60, petrol) · Example 1 (P10, petrol) · Qashqai 1 (J10) · Serena 2 (C24) · Sunny 7 (B13) · Note 1 · Micra 3 (petrol) ·