Carbureted engine
1. Unscrew the panels under the front of the car.
2. Drain the engine oil.
3. Put the front of the car on stands.
4. Remove an average beam of the engine. While doing so, support the engine properly.
5. Remove a reception pipe of the muffler.
6. Unscrew and remove the oil pan. If it is firmly seated, do not insert a screwdriver between the sealing surfaces. Try loosening the connection with a rubber mallet.
7. Thoroughly clean the surfaces of the sump and cylinder block. Carefully scrape off the remnants of the old seal with a scraper. The oil pan is installed with sealant, which is available from Nissan dealers. Sealant is supplied in tubes, the end of which must be cut off to obtain a strip 4.5 mm wide. Apply sealant evenly around the circumference of the oil pan, namely on the inside of the bolt holes. Make sure the bolt holes are not filled with sealant. The sump must be screwed to the cylinder block within 5 minutes of applying the sealant. Tighten the bolts evenly with the appropriate Specifications effort. After tightening the bolts, 30 minutes must elapse before oil can be added or the engine can be started. Install the removed parts in reverse order and fill in the required amount of engine oil after 30 minutes have passed after the pan bolts have been tightened.
8. Start the engine and check that no oil escapes from the sealing surfaces.
Injection engines
Work on removing the oil pan on injection engines is a little more complicated. The illustration below shows the details of the pallet.
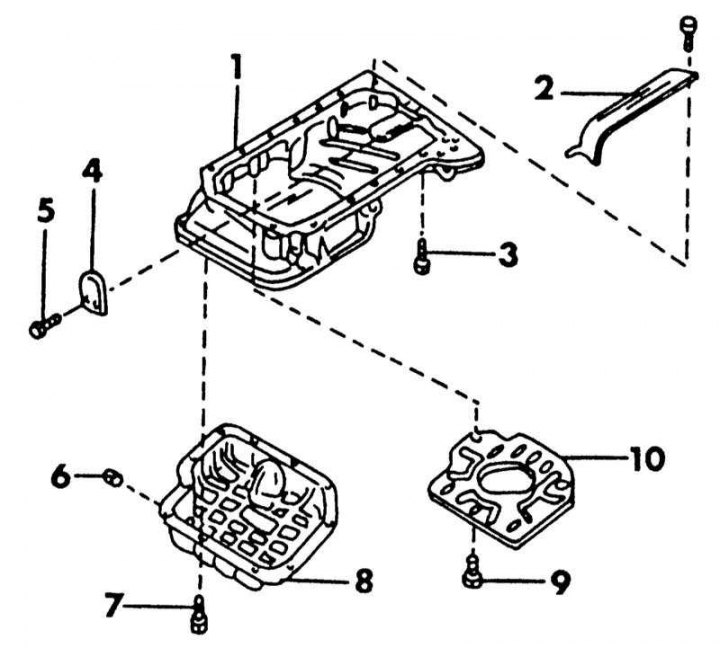
Details of the oil pan of the injection engine
1 - aluminum pallet; 2 - oil conduit plate; 3 - a bolt of the pallet crankcase; 4 - back plate; 5 - bolt, 6.5-7.5 Nm; 6 - oil drain plug, 30-40 Nm; 7 - bolts of the oil pan, 6.5-7.5 N·m; 8 - steel oil pan; 9 - bolt, 6.5-7.5 N·m; 10 - oil conduit plate
1. Unscrew the panels under the front of the car.
2. Drain the engine oil.
3. Loosen the bolts of the steel pallet (8). Loosen the bolts evenly around the perimeter, remove the pallet. Do not insert a screwdriver between surfaces.
4. Let the oil drain completely and unscrew the visible oil plate (10).
5. Place the front of the vehicle on stands, lift the power unit with a crane, and remove the engine center beam. If an automatic transmission is installed, disconnect the shift cable, if air conditioning is installed, loosen it and set it aside.
6. Unscrew the cover from the back.
7. Loosen the aluminum pan bolts. Loosen all bolts evenly. Since the pallet can be overtightened, the loosening sequence must be the opposite of that shown in the illustration below.
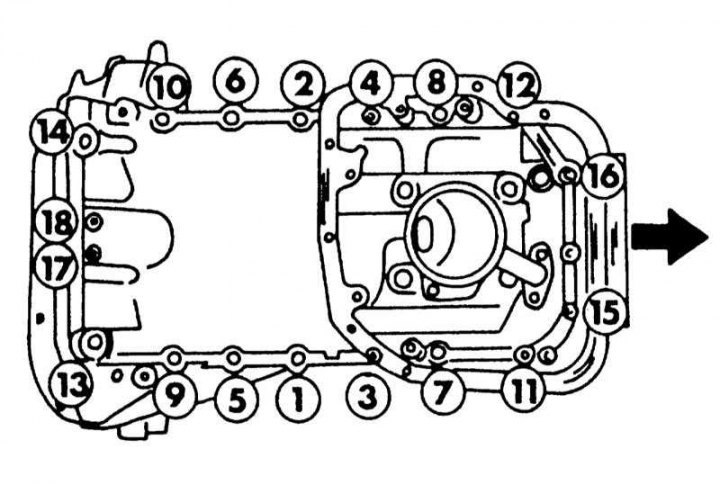
Aluminum pallet tightening sequence. The arrow points to the front of the engine.
8. Now the oil pan should be pressed away from the cylinder block, as it sits firmly enough. To do this, follow the illustration. This illustration shows two bolts holding the engine to the gearbox. Loosen the screws in places (1), and in places (2) screw in and tighten until the pallet moves away from the unit. Then carefully wring out the pallet without damaging the metal. First, of course, both screwed bolts should be removed.
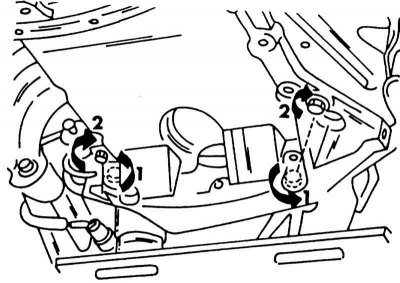
Squeezing out the oil pan.
9. Installation is carried out in the reverse order. Cover the sealing surfaces of the aluminum sump with sealant as described for the carbureted engine.
10. Install the oil pan and tighten bolts 1 to 16 in the sequence shown on illustrations, with a force of 16 - 19 Nm. Tighten bolts 17 and 18 to 6.5 - 7.5 Nm.
11. Again screw and tighten both bolts between the engine and a transmission.
12. Install all removed parts.
13. Screw on the oil transfer plate and tighten the bolts with a force of 6.5 - 7.5 Nm.
14. Cover the steel pan with sealant as described for the carburetor engine. Tighten the bolts evenly and crosswise to 6.5 - 7.5 Nm.