Removing
1. Relieve the pressure in the supply system (see chapter Power and exhaust systems).
2. Disconnect the negative cable from the battery.
Attention! If the stereo system installed in the car is equipped with a security code, before disconnecting the battery, make sure that you have the correct combination to activate the audio system!
3. Mark and disconnect spark plug wires.
4. Remove the ignition distributor (see chapter Engine electrical equipment).
5. Remove the upper section of the inlet pipeline (injection chamber) (see Section Removal and installation of the inlet pipeline).
6. Release and slide the mounting clamp, then disconnect the ventilation hose from the cylinder head cover (breather pipe).
7. Disconnect all other hoses and wiring harnesses that interfere with the removal of the cover.
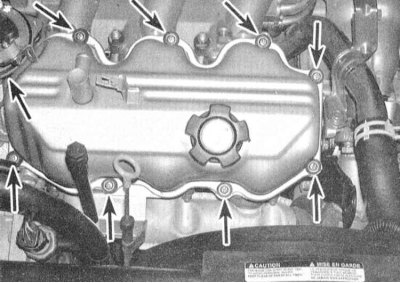
8. Turn out fixing bolts and remove the washers established under their heads.
9. Remove the cylinder head cover.
Note. If cover "got used to" and does not lend itself to separation from the cylinder head, gently tap it around the perimeter with a hammer through a block of wood. In particularly difficult cases, a layer of dried sealant can be cut with a putty knife - in no case try to pry off the cover with a lever brought under its mating surface, since damage to the latter can lead to the development of leaks.
Installation
1. The mating surfaces of the cylinder heads and their covers must be absolutely clean and dry. Using a scraper, remove all traces of the old sealant and fragments of the destroyed gasket, then wipe the surfaces with a rag soaked in acetone. The presence of traces of oil on the mating surfaces can lead to the development of leaks.
2. If necessary, drive the threads of the mounting bolts with a suitable lerkoy, restoring damaged turns and removing rust and traces of old sealant. Drive the threaded holes in the head with a tap of the appropriate size.
3. Fill the groove in the cover mating surface with RTV sealant, then lay a new gasket over the sealant. Let the sealant dry a little and fix the gasket on the cover.
4. Accurately press a cover to a head of cylinders and screw fixing bolts.
5. Tighten the bolts to the required torque in three or four steps.
6. Further assembly is carried out in the reverse order to the dismantling of the components.
7. Start the engine and check it for signs of leak development.