Removing
1. Remove intake manifold (see chapter "Intake and exhaust system").
2. Remove ignition coils.
Attention.
- Do not hit or drop ignition coils.
- Do not disassemble ignition coils.
3. Remove the right earth cable.
4. Support the underside of the engine with a transmission jack, then remove the engine mounting bracket with the right mounting pad.
5. Remove the fuel line protection.
6. Remove the oil fill cap.
7. Remove rocker cover.
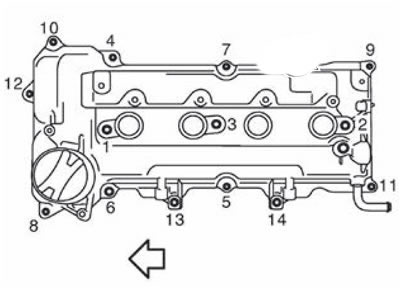
Note. Loosen the mounting bolts in the reverse order to that shown in the figure. The arrow points to the front of the engine.
Note. Positions 13 and 14 in the figure are used to fasten the fuel line protection.
8. Remove the gasket from the rocker cover.
9. Using a scraper, remove all sealant residues from the cylinder head and front cover.
Attention. Be careful not to scratch or damage the contact surfaces when removing sealant residue.
Installation
1. Install the rocker cover as follows:
Install the gasket on the rocker cover.
Note.
- Check rocker arm cover for damage or foreign material.
- Make sure that the gasket is securely inserted into the mounting grooves of the rocker arm cover.
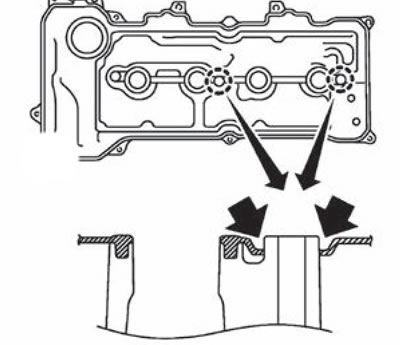
- For the two bolt holes shown in the illustration, place a gasket over the bolt hole bosses in the rocker arm cover. This will prevent the gasket from falling off the cover.
Apply sealant to the places indicated in the figure.
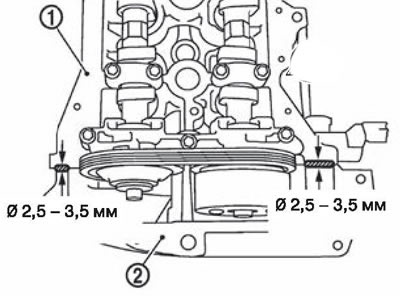
1. Cylinder head.
2. Front cover.
Note. Use genuine NISSAN sealant or equivalent.
2. Install the rocker arm cover on the cylinder head.
Attention. Make sure that the gasket has not fallen off the cover.
3. Tighten the bolts in two steps in the sequence shown in the figure.
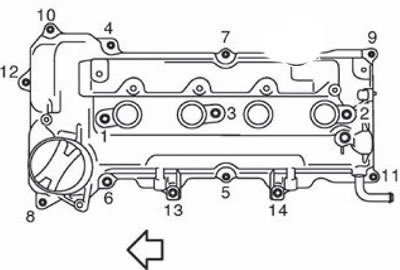
Note. The arrow in the figure shows the front of the engine.
4. Install the remaining parts in the reverse order of removal.