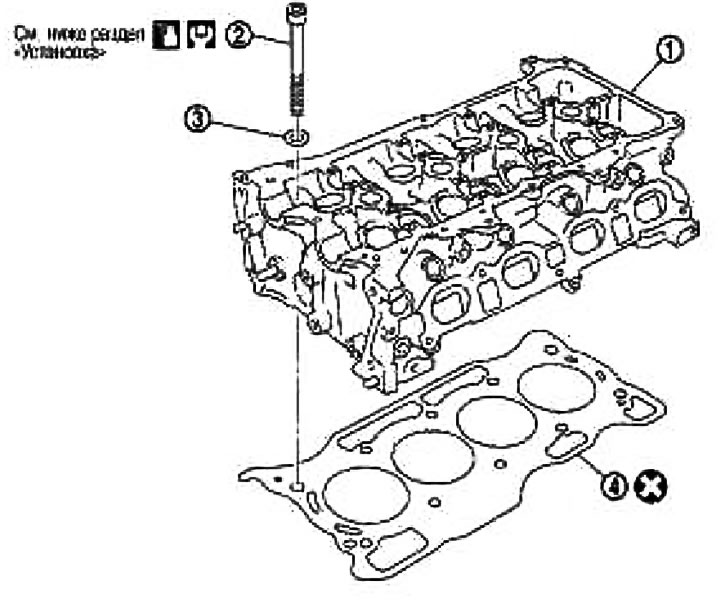
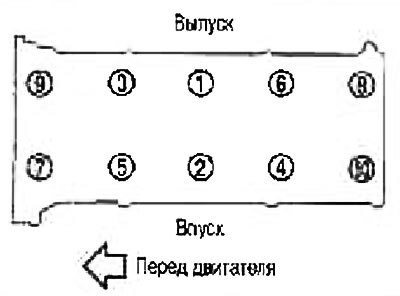
1. Cylinder head assembly; 2. Cylinder head bolt; 3. Washer; 4. Cylinder head gasket
Removing
1. Relieve fuel pressure. See chapter Engine management system.
2. Drain the engine coolant and engine oil. See chapter Lubrication system and engine cooling system.
Caution: Perform this operation when the engine is cold.
3. Remove the following components:
- an exhaust manifold; see section «An exhaust manifold»;
- the top of the intake manifold; see section «upper intake manifold»;
- fuel injectors and fuel tube assembly; see section «Fuel injectors and fuel pipe»;
- exhaust pipe; see chapter Lubrication system and engine cooling system;
- protective pad from the front right fender; see chapter Body;
- drive belts; see section «Drive belts»;
- front cover; see section «Valve train chain»;
- camshaft; see section «camshaft»;
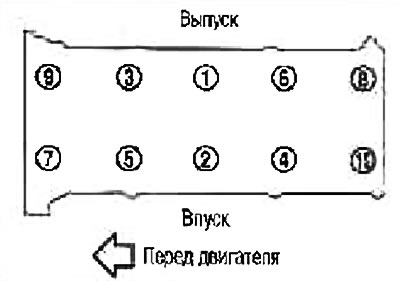
4. Remove the cylinder head assembly by loosening the bolts in the reverse order shown in the figure using a wrench (suitable special tool).
5. Remove the gasket from the cylinder head.
Check after removal
Outer diameter of cylinder head bolts.
The cylinder head bolts are tightened using the plastic zone method. If the difference between «d1» And «d2» exceeds the limit value, replace the bolts with new ones.
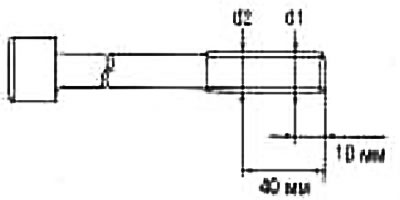
Limit («d1» - «d2»): 0.15mm
If a narrowing of the outer diameter is found at a location other than «d1», label it as a dot «d2».
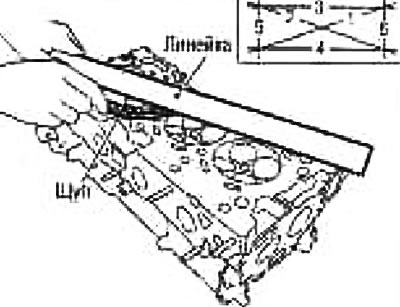
Warping of the cylinder head
Note: When performing this check, you should also check if the cylinder block is warped. See section «Warping of the cylinder block».
1. Wipe off the oil and use a scraper to remove scale, gasket residue, sealant and carbon deposits from the surface of the cylinder head.
Attention: Do not allow gasket residue to enter the oil or water supply channels.
2. Check if the bottom surface of the cylinder head is warped by measuring in six directions.
Standard: 0.1mm
If warpage exceeds the limit, replace the cylinder head.
Installation
1. Put a new gasket on the cylinder head.
2. Install the cylinder head by performing the following operations and tightening the mounting bolts in the order indicated by the numbers in the figure.
If cylinder head bolts are reused, check their outside diameter before installation. See section «Outside diameter of cylinder head bolts».
- A. Apply fresh engine oil to the threads and seating surface of the mounting bolts.
- b. Tighten all bolts. Tightening torque: 66.7 Nm (6.8 kg m)
- With. Fully loosen to 0 Nm (0 kg m)
Attention: In paragraph «With» Loosen the fixing bolts in the reverse order to that shown in the figure.
- d. Tighten all bolts. Tightening torque: 40.0 Nm (4.1 kg m).
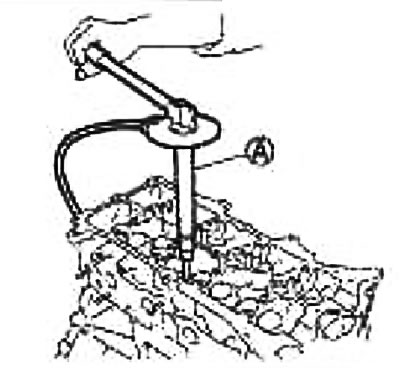
- e. Tighten all bolts 75°clockwise (corner tightening).
Attention: Check the tightening angle with a protractor wrench (special tool: KV10112100) (A). Avoid judging by eye without the use of tools.
- f. Tighten all bolts an additional 75°clockwise (corner tightening).
3. After this operation, installation is carried out in the reverse order of removal.
Check after installation
Leak Check
The following are procedures for checking fluid, engine oil, and exhaust leaks.
Before starting the engine, check the oil/fluid levels including engine coolant and engine oil. If the level is below normal, add and bring to the required level. See chapter General information and maintenance.
Check for fuel leaks as follows:
- Turn the ignition key to position «ON» (without starting the engine). After pressurizing the fuel lines, check for fuel leaks at the joints.
- Start the engine. While increasing the engine speed, check again for fuel leaks at the fuel line joints
Let the engine run and check for unusual noise or vibration.
Note: If the hydraulic pressure inside the timing chain tensioner drops after removal/installation, slack in the guide may cause a thud during and immediately after starting the engine. However, this does not indicate a malfunction. The knocking will stop after the hydraulic pressure rises
Warm up the engine well and check for fuel, exhaust, or oil/fluid leaks, including engine coolant and engine oil.
Bleed the pipes and hoses of the relevant systems, such as the cooling system.
After the engine has cooled down, check the oil and fluid levels again, including engine coolant and engine oil. Top up if necessary and bring to the required level.
Check table
| Component | Before starting the engine | Engine running | After stopping the engine |
| Engine coolant | Level | A leak | Level |
| Engine oil | Level | A leak | Level |
| Other oils and fluids* | Level | A leak | Level |
| Fuel | A leak | A leak | A leak |
| Traffic fumes | - | A leak | - |
* Fluid for manual transmission, automatic transmission, brake fluid, etc