


Table of contents: Fuel pressure relief ↓ Checking fuel pressure ↓
Fuel pressure relief
1. Remove the fuel pump fuse located in the IPDM E/R unit (microprocessor power distribution unit in the engine compartment).
2. Start the engine.
3. After the engine stalls, crank it two or three times and release all fuel pressure.
4. Turn the ignition key to the "OFF" position.
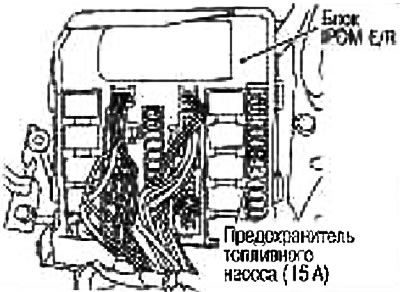
5. After servicing the fuel system, replace the fuel pump fuse.
Checking fuel pressure
Attention:
- Before disconnecting the fuel line, relieve the fuel pressure to avoid danger.
- The method of connecting the fuel hoses during fuel pressure testing should not be used for other purposes.
- When performing maintenance, prevent scratches or foreign particles from entering the connection area so that the quick-release fitting can seal with the internal O-rings.
- Do not perform fuel pressure testing while electrical equipment is running (eg headlights, rear window defroster, air conditioner, etc.). Due to fluctuations in engine load and changes in manifold pressure, the fuel pressure gauge may give unreliable readings.
Note: Place a tray under the disconnected fuel line, as fuel may spill out. It is not possible to completely relieve the fuel pressure, as the E11 series models do not have a fuel drain system.
1. Relieve fuel pressure to zero.
2. To check the fuel pressure, prepare the fuel hose (2) and fuel pipe adapter (4), then connect the fuel pressure gauge.
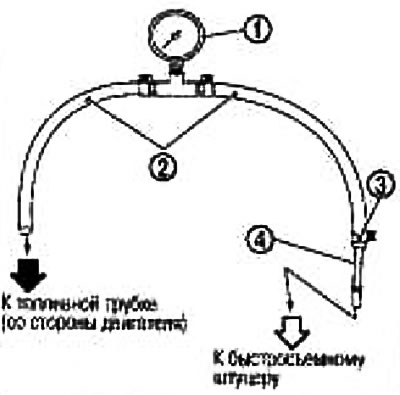
3. Clamp.
Use a suitable fuel hose to check fuel pressure (nISSAN branded fuel hose without quick-release fitting).
To avoid stretching the hose during testing, use a moderately long section.
Do not use the fuel pressure test hose if it is damaged or cracked.
Check the fuel pressure with a pressure gauge.
3. Disconnect the fuel hose. See chapter Mechanical part of the engine.
Do not kink or bend the fuel hose as it is made of plastic.
4. Connect the fuel hose(1) for checking fuel pressure to the fuel pipe (from the engine side) using a clamp (2), as shown in the figure.
Wipe off any oil or dirt from the hose connection area with a rag soaked in gasoline.
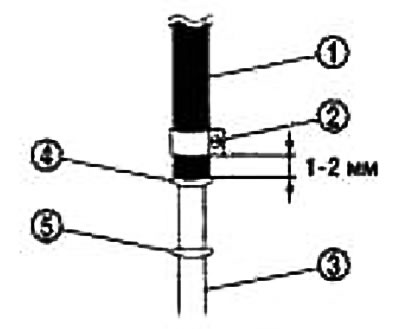
5. Bead No.2
Apply the required amount of gasoline between the top of the fuel pipe (3) and flange No.1 (4).
Push the fuel hose until it touches flange #1 on the fuel pipe.
Use a genuine NISSAN clamp (Part # 16439 N4710 or 16439 40U00).
When reconnecting the fuel line, install new clamps.
Tighten the clamps with a torque screwdriver.
Place the clamp at a distance of 1-2 mm from the end of the hose.
Tightening torque: 1-1.5 Nm (0.1-0.15 kg·m).
Make sure the clamp screw does not touch adjacent components.
5. Connect the fuel line adapter to the quick release fitting.
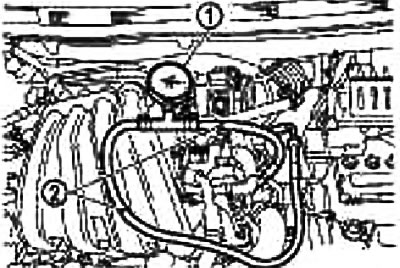
1. Fuel pressure gauge
2. Fuel hose
6. After connecting the fuel hose, pull it with a force of about 90 N (10 kg) and make sure that it does not come off the pipe.
7. Turn the ignition key to the "ON" position and check for fuel leaks.
8. Start the engine and check for fuel leaks.
9. Read the fuel pressure gauge.
Do not test fuel pressure with the engine running. The fuel pressure gauge may give unreliable readings.
When checking the fuel pressure, check for fuel leaks at the joints every 3 minutes.
At idle speed: approx. 350 kPa (3.57 kg/cm²)
10. If the result is unsatisfactory, proceed to the next step.
11. Check the following:
- are the fuel hoses and tubes clogged?;
- is the fuel filter clogged?; fuel pump;
- is the fuel pressure regulator clogged?.
If everything is OK, replace the fuel pressure regulator.
If there are any defects, correct them or replace the component.
(The article was copied from here nissanbook.ru)