


Car front and rear suspension Nissan Note 1

Front Suspension Assembly — On-Car Check and Maintenance
Play, clearance and damage to fasteners and connections Raise the vehicle and check the following: Check for any play, gaps or damage at the attachment points of all...
Play, clearance and damage to fasteners and connections Raise the vehicle and check the following: Check for any play, gaps or damage at the attachment points of all...

Front Suspension Assembly — Checking Front Wheel Alignment Angles
Description Measure the front wheel alignment angles in an unloaded condition, which means full fuel, coolant and engine oil. However, the spare tire, jack and tools...
Description Measure the front wheel alignment angles in an unloaded condition, which means full fuel, coolant and engine oil. However, the spare tire, jack and tools...
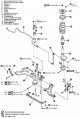
Front Suspension Assembly — Components
1. Strut mount insulator; 2. Bearing of the rack mount; 3. Spring; 4. Bumper; 5. Rack; 6. Steering knuckle; 7. Bracket; 8. Bushing; 9. Connecting rod; 10. Wishbone; 11....
1. Strut mount insulator; 2. Bearing of the rack mount; 3. Spring; 4. Bumper; 5. Rack; 6. Steering knuckle; 7. Bracket; 8. Bushing; 9. Connecting rod; 10. Wishbone; 11....

Front suspension — spring and shock absorber — removal and installation
Removal 1. Raise the vehicle and remove the wheels. 2. Remove the hood grille cover. See chapter Body . 3. Remove the ABS wheel sensor wiring harness from the strut. See...
Removal 1. Raise the vehicle and remove the wheels. 2. Remove the hood grille cover. See chapter Body . 3. Remove the ABS wheel sensor wiring harness from the strut. See...

Front suspension — spring and shock absorber — disassembly and assembly
Disassembly 1. Install the attachment (special tool) onto the stand and secure it in a vice. Caution: To avoid damaging the stand when installing the attachment, wrap...
Disassembly 1. Install the attachment (special tool) onto the stand and secure it in a vice. Caution: To avoid damaging the stand when installing the attachment, wrap...

Front suspension — wishbone — removal and installation
Removal 1. Raise the vehicle and remove the wheels. 2. Remove the nuts and bolts from the wishbone ball joint and remove the wishbone from the steering knuckle. 3....
Removal 1. Raise the vehicle and remove the wheels. 2. Remove the nuts and bolts from the wishbone ball joint and remove the wishbone from the steering knuckle. 3....

Front suspension — anti-roll bar — removal and installation
Removal 1. Raise the vehicle and remove the wheels. 2. Unscrew the stabilizer connecting rod fastening nut and remove the connecting rod. 3. Remove the steering rod from...
Removal 1. Raise the vehicle and remove the wheels. 2. Unscrew the stabilizer connecting rod fastening nut and remove the connecting rod. 3. Remove the steering rod from...

Front suspension — front suspension beam — removal and installation
Removal 1. Raise the vehicle and remove the wheels. 2. Remove the stabilizer connecting rod. 3. Remove the nuts and bolts from the wishbone ball joint and remove the...
Removal 1. Raise the vehicle and remove the wheels. 2. Remove the stabilizer connecting rod. 3. Remove the nuts and bolts from the wishbone ball joint and remove the...

Rear Suspension Assembly — Components
1. Bushing; 2. Bushing; 3. Spacer tube; 4. Bumper cover; 5. Bumper; 6. Shock absorber; 7. Rubber seat of rear suspension spring B. Spring; 9. Rubber seat of rear...
1. Bushing; 2. Bushing; 3. Spacer tube; 4. Bumper cover; 5. Bumper; 6. Shock absorber; 7. Rubber seat of rear suspension spring B. Spring; 9. Rubber seat of rear...
Rear Suspension Assembly — On-Car Check and Maintenance
Check axle and suspension components for play, wear or damage. Rock the rear wheels (right and left) and check for excessive play. Tighten all nuts and bolts to the...
Check axle and suspension components for play, wear or damage. Rock the rear wheels (right and left) and check for excessive play. Tighten all nuts and bolts to the...

Rear Suspension Assembly — Checking Rear Wheel Alignment Angles
Description Measure the rear wheel alignment angles in an unloaded condition. "Unloaded condition" means full of fuel, coolant and engine oil. However, the spare tire,...
Description Measure the rear wheel alignment angles in an unloaded condition. "Unloaded condition" means full of fuel, coolant and engine oil. However, the spare tire,...

Rear suspension — shock absorber — removal and installation
Removal 1. Raise the vehicle and remove the wheels. 2. Using a flat-blade screwdriver, remove the lower luggage compartment trim. Caution: To avoid damaging components,...
Removal 1. Raise the vehicle and remove the wheels. 2. Using a flat-blade screwdriver, remove the lower luggage compartment trim. Caution: To avoid damaging components,...

Rear suspension — spring — removal and installation
Removal 1. Raise the vehicle and remove the wheels. 2. Roll the jack under the trailing arm of the rear suspension beam and support it. Unscrew the bolts from the bottom...
Removal 1. Raise the vehicle and remove the wheels. 2. Roll the jack under the trailing arm of the rear suspension beam and support it. Unscrew the bolts from the bottom...

Rear suspension beam — removal and installation
Removal 1. Raise the vehicle, remove the wheels and release the parking brake. 2. Press the brake pedal and unscrew the rear wheel brake bleeder nipple. See chapter...
Removal 1. Raise the vehicle, remove the wheels and release the parking brake. 2. Press the brake pedal and unscrew the rear wheel brake bleeder nipple. See chapter...
This section is available on: russian, bulgarian, belarusian, ukrainian, serbian, croatian, romanian, polish, slovak, hungarian
Similar information for other Nissan models
➜ Chassis: Car suspension Nissan Sunny 7 (1990-1998)
➜ Chassis: Car suspension Nissan Bluebird T12 (1986-1991)
➜ Chassis: Car suspension Nissan Terrano 1 (1986-1995, petrol)
➜ Chassis: Car suspension Nissan Qashqai 1 (2006-2013)
➜ Chassis: Car suspension Nissan Maxima 4 (1994-1999)
Link in different formats to this section
TEXTHTMLBB Code
- User manual
- Control devices
- Preparing to move
- Starting engine and driving
- Maintenance
- Technical information
- Power unit
- Engine repair CR
- Engine repair HR
- Engine lubrication system
- Cooling system (CR)
- Cooling system (HR)
- Fuel and exhaust system
- Engine management (CR)
- Engine management (HR)
- Transmission
- Clutch
- Mechanical gearbox
- Automatic gearbox
- Drive shafts and axles
- Chassis
- Car suspension
- Brake system
- Steering
- Body
- Airbags (SRS)
- Doors, hood and locks
- Glasses and mirrors
- Exterior (external elements)
- Interior (internal elements)
- Air conditioning automatic
- Electrical equipment
- Equipment and devices
- Launch and charge system
- Headlights and lighting
- Windshield wipers and washers
- General information
- Introduction to guide
- Governing bodies
- Starting engine and driving
- Maintenance
- Power unit
- Engine repair
- Cooling system
- Heating and ventilation
- Power and exhaust system
- Ignition system
- Charge and launch systems
- Transmission
- Mechanical gearbox
- Automatic gearbox
- Clutch
- Drive shafts and hubs
- Chassis
- Brake system
- Car suspension
- Steering
- Body
- Exterior (external elements)
- Interior (internal elements)
- Electrical equipment
- Equipment and devices
- Electrical circuits
Cookies are used to improve the site's performance. 💻 Continue by agreeing to the terms.