


Interior (internal elements) of the car body Nissan Note 1


Floor finishing — removal and installation
1. Floor covering; 2. Steering column shaft cover; 3. Front floor trim, left; 4. Front floor trim, right; 5. Front center floor trim, left; 6. Front center floor trim,...
1. Floor covering; 2. Steering column shaft cover; 3. Front floor trim, left; 4. Front floor trim, right; 5. Front center floor trim, left; 6. Front center floor trim,...

Ceiling — removal and installation
1. Ceiling; 2. Handrail; 3. Interior light; 4. Interior wiring; 5. Sun visor holder; 6. Electrical wiring; 7. Interior light; 8. Sun visor; 9. Plug; 10. Handrail; 11....
1. Ceiling; 2. Handrail; 3. Interior light; 4. Interior wiring; 5. Sun visor holder; 6. Electrical wiring; 7. Interior light; 8. Sun visor; 9. Plug; 10. Handrail; 11....

Trunk Floor Trim — Removal and Installation
1. Cover in the floor of the luggage compartment (rear); 2. Cover in the floor of the luggage compartment (front); 3. Rear luggage compartment opening trim; 4. Luggage...
1. Cover in the floor of the luggage compartment (rear); 2. Cover in the floor of the luggage compartment (front); 3. Rear luggage compartment opening trim; 4. Luggage...

Heated seat — description
When working on the seat, be careful not to scratch the heater. When replacing the heater, it is necessary to separate the seat trim and padding. Do not clean the finish...
When working on the seat, be careful not to scratch the heater. When replacing the heater, it is necessary to separate the seat trim and padding. Do not clean the finish...


Front Seats — Component Locations
Caution: To avoid damage to components, cover them with cloths when removing and installing seats. 1. Headrest; 2. Headrest retainer (to unlock); 3. Headrest retainer...
Caution: To avoid damage to components, cover them with cloths when removing and installing seats. 1. Headrest; 2. Headrest retainer (to unlock); 3. Headrest retainer...

Front seats — removal and installation
Removal Caution: Before carrying out work, disconnect both cables from the battery and wait at least 3 minutes. 1. Disconnect the connectors from the side airbag module,...
Removal Caution: Before carrying out work, disconnect both cables from the battery and wait at least 3 minutes. 1. Disconnect the connectors from the side airbag module,...

Front seats — disassembling and assembling the seat back
Seat back trim and padding Disassembly 1. Unfasten the seat back fastener (on models with side airbag). 2. Remove the holder. 3. Roll up the seat back trim, unscrew the...
Seat back trim and padding Disassembly 1. Unfasten the seat back fastener (on models with side airbag). 2. Remove the holder. 3. Roll up the seat back trim, unscrew the...

Front seats — seat cushion disassembly and assembly
Seat cushion trim and padding Disassembly 1. Before disassembling, mark the location of the connectors and the wiring. 2. Remove the seat lift lever cover, seat lift...
Seat cushion trim and padding Disassembly 1. Before disassembling, mark the location of the connectors and the wiring. 2. Remove the seat lift lever cover, seat lift...
Rear seats — removal and installation
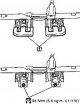
Removal 1. Move the rear seat forward. 2. Remove the cover from the seat guide (right and left) (1). 3. Remove the rear sliding seat mounting bolts from the floor...
Removal 1. Move the rear seat forward. 2. Remove the cover from the seat guide (right and left) (1). 3. Remove the rear sliding seat mounting bolts from the floor...

Rear seats — disassembly and assembly
1. Headrest; 2. Right seat back tilt cable; 3. Tilt cable clamp; 4. Right seat back tilt lever; 5. Right seat back frame; 6. Headrest retainer; 7. Left seat back tilt...
1. Headrest; 2. Right seat back tilt cable; 3. Tilt cable clamp; 4. Right seat back tilt lever; 5. Right seat back frame; 6. Headrest retainer; 7. Left seat back tilt...
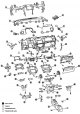
Instrument cluster assembly — component layout
1. Steering column beam; 2. Upper section of the instrument panel; 3. Passenger airbag module; 4. Side ventilation grille (left); 5. Driver's side instrument panel trim;...
1. Steering column beam; 2. Upper section of the instrument panel; 3. Passenger airbag module; 4. Side ventilation grille (left); 5. Driver's side instrument panel trim;...

Instrument cluster assembly — removal and installation
Operation Sequence Table Component arrangement Dashboard Dashboard trim (from the passenger side) Dashboard trim (from the driver's side) Upper section of the instrument...
Operation Sequence Table Component arrangement Dashboard Dashboard trim (from the passenger side) Dashboard trim (from the driver's side) Upper section of the instrument...

Removal and installation the instrument panel trim
Removal From the driver's side 1. Remove the upper steering column cover. 2. Remove the lower steering column cover. 3. Remove the instrument cluster cover A. 4. Remove...
Removal From the driver's side 1. Remove the upper steering column cover. 2. Remove the lower steering column cover. 3. Remove the instrument cluster cover A. 4. Remove...

Glove Box Assembly — Removal and Installation
Removal 1. Remove the glove box assembly. Refer to "Glove Box Body Assembly". Installation Installation is performed in the reverse order of removal.
Removal 1. Remove the glove box assembly. Refer to "Glove Box Body Assembly". Installation Installation is performed in the reverse order of removal.

Glove Box Assembly — Disassembly and Assembly
1. Spring assembly; 2. Glove box body; 3. Glove box lid; 4. Air conditioner inlet pipe Disassembly 1. Loosen the spring assembly screw. 2. Press the hooks of the glove...
1. Spring assembly; 2. Glove box body; 3. Glove box lid; 4. Air conditioner inlet pipe Disassembly 1. Loosen the spring assembly screw. 2. Press the hooks of the glove...

Center console assembly — removal and installation
Removal 1. Remove the handle from the gear shift lever (only on models with manual transmission). See chapter Manual transmission . 2. Shift the selector lever to...
Removal 1. Remove the handle from the gear shift lever (only on models with manual transmission). See chapter Manual transmission . 2. Shift the selector lever to...

Center console assembly — disassembly and assembly
1. Control lever trim; 2. Coin tray; 3. Console mask; 4. Button holder; 5. Cup holder; 6. Electrical outlet; 7. Finishing the electrical outlet; 8. Center console
1. Control lever trim; 2. Coin tray; 3. Console mask; 4. Button holder; 5. Cup holder; 6. Electrical outlet; 7. Finishing the electrical outlet; 8. Center console
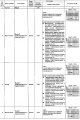
Windshield wipers and washers — standard voltage values at the contacts of the BCM unit and the IPDM E/R unit
Standard voltage values at the contacts of the VSM block Standard voltage values at the contacts of the IPDM E/R unit
Standard voltage values at the contacts of the VSM block Standard voltage values at the contacts of the IPDM E/R unit
This section is available on: russian, bulgarian, belarusian, ukrainian, serbian, croatian, romanian, polish, slovak, hungarian
Similar information for other Nissan models
➜ Body: Interior (internal elements) Nissan X-Trail 2 (2007-2013, petrol)
➜ Body: Interior (internal elements) Nissan Maxima 4 (1994-1999)
➜ Body: Interior (internal elements) Nissan Qashqai 1 (2006-2013)
➜ Body: Interior (internal elements) Nissan Serena 2 (1999-2005)
➜ Body: Interior (internal elements) Nissan Patrol 4 (1987-1997, petrol)
➜ Body: Interior (internal elements) Nissan Bluebird T12 (1986-1991)
Link in different formats to this section
TEXTHTMLBB Code
- User manual
- Control devices
- Preparing to move
- Starting engine and driving
- Maintenance
- Technical information
- Power unit
- Engine repair CR
- Engine repair HR
- Engine lubrication system
- Cooling system (CR)
- Cooling system (HR)
- Fuel and exhaust system
- Engine management (CR)
- Engine management (HR)
- Transmission
- Clutch
- Mechanical gearbox
- Automatic gearbox
- Drive shafts and axles
- Chassis
- Car suspension
- Brake system
- Steering
- Body
- Airbags (SRS)
- Doors, hood and locks
- Glasses and mirrors
- Exterior (external elements)
- Interior (internal elements)
- Air conditioning automatic
- Electrical equipment
- Equipment and devices
- Launch and charge system
- Headlights and lighting
- Windshield wipers and washers
- General information
- Introduction to guide
- Governing bodies
- Starting engine and driving
- Maintenance
- Power unit
- Engine repair
- Cooling system
- Heating and ventilation
- Power and exhaust system
- Ignition system
- Charge and launch systems
- Transmission
- Mechanical gearbox
- Automatic gearbox
- Clutch
- Drive shafts and hubs
- Chassis
- Brake system
- Car suspension
- Steering
- Body
- Exterior (external elements)
- Interior (internal elements)
- Electrical equipment
- Equipment and devices
- Electrical circuits
Cookies are used to improve the site's performance. 💻 Continue by agreeing to the terms.