


Table of contents: Removal ↓ Installation ↓
Removal
1. Remove the upper intake manifold. See section "Upper part of the intake manifold".
2. Remove the ignition coil. See section "Ignition coil".
3. Remove the right engine mount strut. See section "Engine assembly".
Note: There is no need to support the engine with a jack.
4. Remove the protective cover from the fuel pipe. See section "Fuel injectors and fuel line".
5. Disconnect the PCV hose from the valve cover.
6. Remove the PCV valve if necessary.
7. Loosen the mounting bolts in the reverse order to that shown in the illustration on the next page.
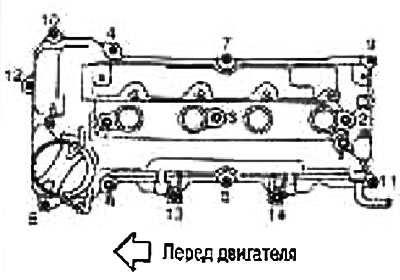
Note: Bolts No.13 and 14 shown in the figure are used to secure the fuel line protector.
8. Remove the gasket from the valve cover.
9. Remove any remaining old sealant from the cylinder head and front cover.
Installation
1. Install the valve cover as follows:
- a. Install the gasket into the valve cover
Check for damage or foreign particles.
Make sure the gasket is seated tightly in the valve cover mounting groove.
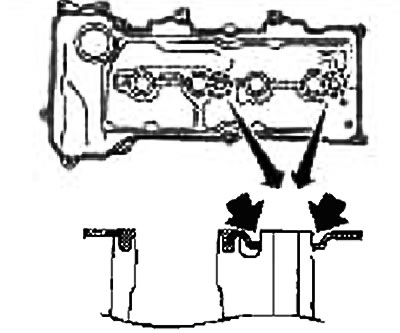
To prevent the gasket from falling out, press it into the lugs of the two valve cover bolt holes.
- b. Apply sealant to the areas shown in the figure
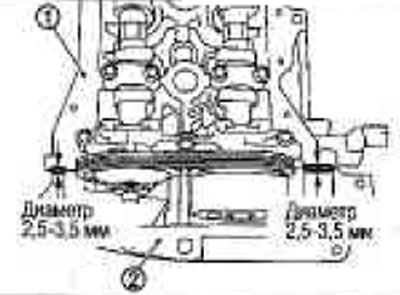
1. Cylinder head
2. Front cover
Use brand name sealant or equivalent.
- c. Install the valve cover onto the cylinder head.
Caution: Check that the valve cover gasket has not fallen out of the groove.
- d. Tighten the bolts in two passes in the order shown by the numbers in the figure.
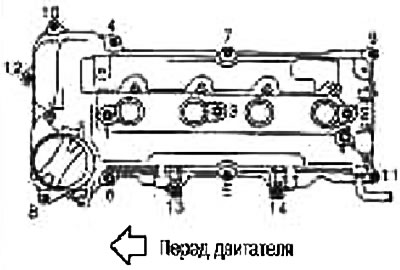
Note: Bolts #13 and #14 shown in the illustration are used to secure the fuel pipe protector. See Section "Components".
2. After this operation, installation is carried out in the reverse order of removal.