Attention! Wait until the engine has completely cooled down before starting work.
Removing
1. Empty the cooling system, including the engine block, (see chapter Settings and ongoing maintenance). Remove timing belt, timing gears and rear belt cover (see Section Removing and installing timing belt and timing gears). Also turn out bolts of fastening of tubes of a cooling path to a back part of each of heads of cylinders (transmission side) on the end plates of the camshafts.
2. Remove the inlet pipeline (see Section Removal and installation of the inlet pipeline) and move aside the injection injectors with the wiring connected to them.
3. Remove rocker assemblies (see Section Removal, condition check and installation of rocker arm assembly) and valve lifters (see Section Removal and installation of camshafts and valve lifters).
4. Remove exhaust manifolds (see Section Removal and installation of exhaust manifolds).
5. Mark and disconnect all hoses and wires passing from the side of the power unit facing the timing drive.
Front head (from the side of the radiator)
1. Turn out the spark plugs, remove the distributor and coil (see chapter Engine electrical equipment).
2. Remove the air conditioning compressor from its bracket and move it aside without disconnecting the refrigeration lines (see chapter Cooling, heating systems). Tie up the compressor with wire so that the refrigeration hoses are not under tension.
Note. Access to the upper compressor mounting bolts is opened only after the assembly has been moved to the side.
3. Remove compressor and alternator bracket.
4. Remove the bracket for attaching the dipstick guide tube to the cylinder head.
Rear head (from the bulkhead of the engine compartment)
Disconnect the heating path hoses and their brackets from the side of the cylinder head facing the transmission.
Both heads

1. In several steps (1/4 turn per approach) loosen the head bolts just enough to be able to turn them out by hand. Proceed in reverse order shown in the illustration, starting with the small bolt located on the outside of the head.
2. Remove the washers under the bolt heads. All bolts, except for the small one mentioned above, must be replaced without fail.
Note. Washers can be reused.
3. Remove the cylinder head from the engine block. If necessary, tap them with a hammer through a wooden block. If there is a need for dressing "stuck" head lever, try not to damage the mating surface.
Installation
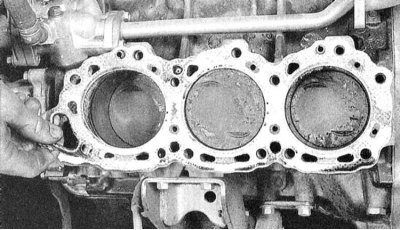
1. Remove the old cylinder head gaskets. The mating surfaces of the heads and block must be absolutely clean and dry.
2. After scraping off the rest of the gasket material and carbon deposits, wipe the surfaces with a rag soaked in acetone. The presence of traces of oil on the mating surfaces at the time of installation of the head can lead to a violation of the tightness of the gasket fit and, as a result, the development of leaks. When processing the block, plug the cylinder bores with rags to prevent small debris and various foreign objects from getting into them (as a last resort, vacuum the cylinders thoroughly).
3. Check the mating surfaces of the heads and block for deep scratches, scuff marks and other damage. Light defects can be removed with fine-grained sandpaper. In more severe cases, the only alternative is to remake the components or replace them.
4. With a tap of the appropriate size, drive the threaded holes for the head mounting bolts. When finished, blow out the holes with compressed air. Alternately clamping the bolts in a vice by the head, go through their threads with a lerka - the presence of old sealant, dirt and corrosion products in the threads leads to a discrepancy between the actual tightening force of the fasteners and the indications of the torque wrench indicator.
Note. Remember to wear protective goggles when working with compressed air!

5. Install new gaskets by sliding them over the drive pins in the block.
6. Taking care not to dislodge the gaskets, carefully place the heads on the block.
7. Lubricate the threads and bottom surfaces of the heads of the new mounting bolts with clean engine oil. Screw the fasteners into place and tighten the bolts by hand.
Note. Don't forget to put washers under the bolt heads. The washers are laid with the equipped chamfer side up and flat - to the head.
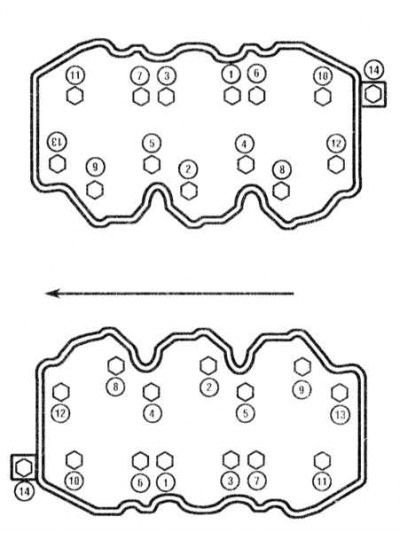
8. Acting in a strictly defined order, tighten the cylinder head bolts with the required force (everything but the small outer ones).
Note. Bolts 4, 5, 12 and 13 are longer than the others!
9. Tighten the small bolts (one on the outside of each of the heads) with a force of 9÷12 Nm.
10. Further assembly is carried out in the reverse order to the dismantling of the components.
11. Don't forget to fill the cooling system and change the engine oil and oil filter (see chapter Settings and ongoing maintenance).
12. Start the engine and check for signs of oil and coolant leaks. Evaluate the correct setting of the ignition timing (see chapter Settings and ongoing maintenance).