


Table of contents: Examination ↓ Replacement ↓ Front and rear engine mounts (right) ↓ Front and rear transmission mounts…↓ Front left support ↓ Rear left support ↓ The final stage of tightening the…↓
Note: Powertrain suspension mounts rarely require attention, but damaged mounts should be replaced without delay to avoid increased stress and premature wear of transmission line components.
On the models under consideration, the power unit suspension is implemented using four rubber-metal supports. The engine block is attached to the supporting cross beam laid underneath using the right front and rear supports. The left front and rear supports attach the transmission part of the unit to the car frame.
Examination
1. To check, it is necessary to slightly lift the engine, completely unloading the supports.
2. Jack up the vehicle and place it on supports. Hang the unit from above on a winch or beam.
3. Check the support cushions for cracks, signs of rubber hardening and delamination from the central metal bushings.
4. Estimate the amount of play between the support assemblies and the power unit/vehicle frame (use a crowbar or a large screwdriver as a lever). If any slack is detected, lower the unit and tighten the support fasteners.
5. To avoid damage to the rubber, the cushions must be treated with a special protective compound.
Replacement
Disconnect the negative cable from the battery.
Warning! If the car stereo system is equipped with a security code, make sure you have the correct combination to activate the audio system before disconnecting the battery! Apply the parking brake, jack up the front of the car and support it. Remove the crankcase guard.
Front and rear engine mounts (right)
1. Hang the unit from above.
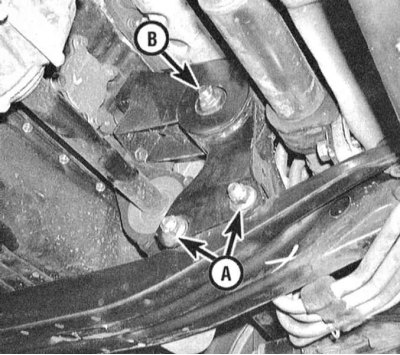
2. Unscrew the through bolts securing the supports to the cross beam.
3. Remove the mounting bolts and remove the cross member from the vehicle chassis.
4. Unscrew the through bolts securing the supports to the brackets on the engine block.
5. Installation is carried out in reverse order.
Note: Final tightening of the support fasteners to the required force should be performed only after the power unit has been lowered to its normal position. Proceed to the final stage of fastener tightening procedures.
Front and rear transmission mounts (left)
The transmission (left) side of the power unit is also secured by means of two supports - front and rear.
Front left support
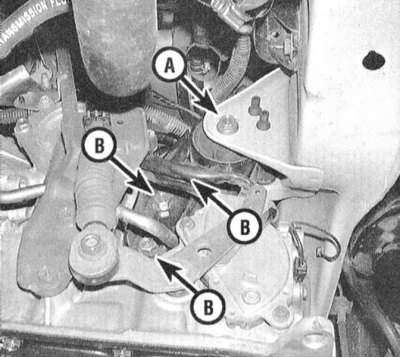
1. Support the transmission under the dome with a jack. Unscrew the through bolt securing the support to the chassis and the three bolts securing it to the transmission. Remove the support assembly.
2. Installation is carried out in reverse order.
Note: The final tightening of the support fasteners to the required force should be performed only after the power unit has been lowered to the standard position. Proceed to the final stage of tightening the fasteners.
Rear left support
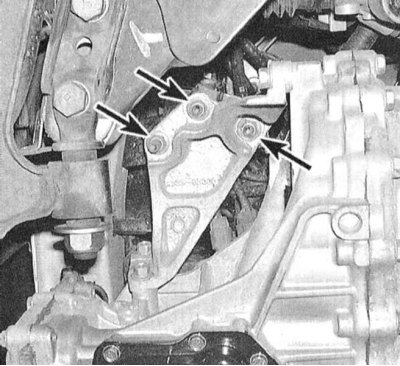
1. Working under the vehicle, unscrew the nuts securing the support bracket to the transmission housing.
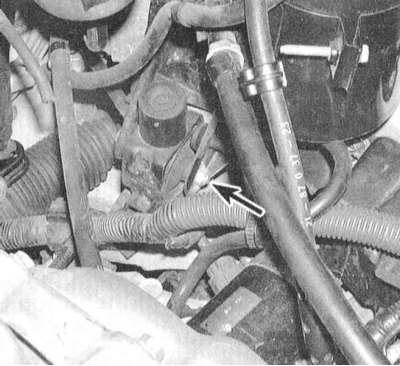
2. The through bolt securing the support to the chassis bracket is released from above - first remove the air cleaner assembly with the intake hose.
3. Lower the transmission enough to remove the transmission bracket from the mounting studs, then remove the support.
4. Installation is carried out in reverse order.
Note: The final tightening of the support fasteners to the required force should be performed only after the power unit has been lowered to the standard position. Proceed to the final stage of tightening the fasteners.
The final stage of tightening the fasteners of all supports
In order to maximally extend the service life of rubber-metal bearings and reduce the level of noise and vibration, the final tightening of the bearing fasteners with the required force should be carried out after lowering the power unit to its standard position (the car should be parked on a level horizontal surface).
Note. The threaded part of the fastener should be lubricated with a special sealant for fixing threaded connections. Make sure that the rubber bushings are not twisted or displaced from their seats. If more than one support was replaced, as well as when installing the power unit, tightening the support fasteners should be done in the following order:
- a) Cross beam mounting bolts;
- b) Right rear support;
- c) Left front support;
- d) Right front support;
- e) Left rear support.