


Checking the status
Drive belts, sometimes called V-belts, are located at the front of the engine and play an important role in the operation of the vehicle and its individual components. Due to the nature of the material and operating conditions, drive belts wear out after a while, and therefore their condition should be checked periodically and the tension adjusted to avoid serious engine damage.
The number of belts used on a particular vehicle depends on the components and systems installed on it. Drive belts are used to drive the alternator, steering pump, water pump, and air conditioning compressor. Depending on the arrangement of the pulleys, one belt can drive several components at once illustrations the location of the injection engine belts is shown illustrations shows how both belts are routed on a carburetor engine if power steering is installed (servo control). If the booster is not installed, only one belt is used. If the air conditioner shown in illustrations, the belt between the generator and the crankshaft also drives the compressor. If the belt is pressed more than specified, it is necessary to make adjustments.
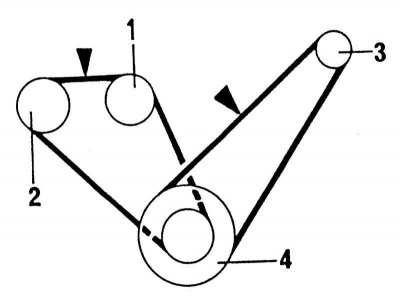
Location of drive belts on an injection engine. Check the tension at the points indicated by arrows
1 - water pump belt pulley; 2 - Power steering pump belt pulley; 3 - generator belt pulley; 4 - crankshaft belt pulley
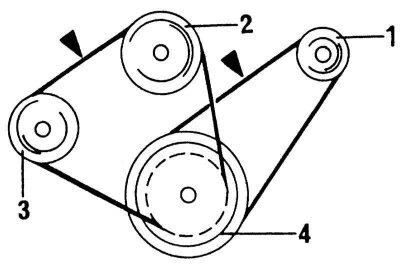
Location of drive belts on a carburetor engine with power steering. Check the tension at the points indicated by the arrows
1 - generator belt pulley; 2 - water pump belt pulley; 3 - Power steering pump belt pulley; 4 - crankshaft belt pulley
1. Turn off the engine, open the hood and locate the various drive belts at the front of the engine. Check the belt tension only when the engine is cold. If the engine is hot, wait at least 30 minutes before checking the tension.
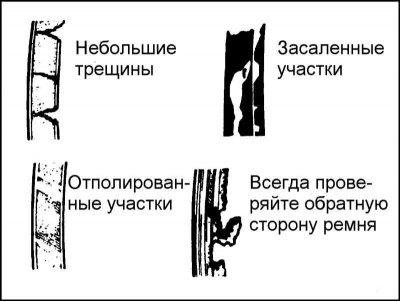
Some of the most common drive belt defects (check the condition of the belts very carefully to avoid their premature failure).
2. With fingers (and using a flashlight if necessary) walk the entire length of each belt, feeling for cracks and delamination. Also check for any frayed or polished areas. Each belt should be inspected on both sides, which means twisting it to check the condition of the reverse side.
3. The belt tension is checked by pressing firmly with your thumb and determining the degree of deflection. The belt tension is checked at the point indicated by the arrow in the illustration, midway between the pulleys. Measure the deflection with a ruler. The rule of thumb is that if the distance between pulley centers is between 180 and 280 mm, the deflection should be 6 mm. If the distance between pulley centers is between 300 and 400 mm, the deflection should be 13 mm. If the tension differs from that given in Specifications, make adjustments.
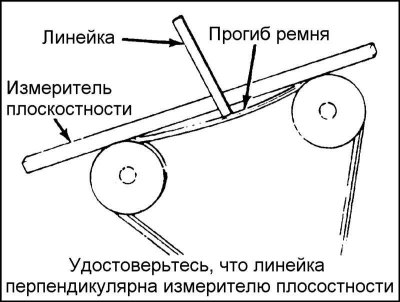
Measuring the amount of deflection of a drive belt using a ruler and a flatness gauge.
4. Make sure the ruler is perpendicular to the flatness gauge
Adjustment
If the belt tension needs to be adjusted upward or downward, this is done with the tensioner. Although the belts are arranged differently, the adjustment is done in the same way. Loosen the locking bolt on the side of the tensioner and turn the corresponding adjusting bolt until the tension is the desired value. Tighten the bolt again and check the tension.
Replacement
To replace the belt, follow the adjustment instructions above, but remove the belt from the pulleys.
In some cases, you will have to remove more than one belt due to the way they are located at the front of the engine. For this reason, and because belts tend to fail at the same time, it is best to replace them at the same time. Mark each belt and its corresponding groove on the pulley to ensure that the new belts are installed correctly.
When purchasing new belts, it is convenient to take the old ones with you so that you can directly compare them in length, width and construction.
Check the tension of new belts after driving several hundred kilometers.