- vehicles without power steering or air conditioning have one belt (generator drive and coolant pump);
- vehicles with power steering have two belts (one for alternator drive, the other for power steering pump and coolant pump);
- on vehicles with power steering and air conditioning, there are three belts (the purpose of the two belts is the same as for cars with power steering and one belt for driving the air conditioning compressor).
1. Put the car on the handbrake, raise the front of the car and place it on stands. Remove the right front wheel.
2. Working under the front of the car, remove the screws and plastic shield under the fender to access the crankshaft pulley. To expand the working space, you can also additionally remove the engine mudguard by unscrewing the screws.
3. Turn the crankshaft with a socket head on the pulley bolt so that the belts can be inspected (or belt) along the entire length. Check for cracks, signs of burning or mechanical damage on the belts. Also check the belt for glossy areas and delamination. If damage or signs of wear are found, replace the belt.
4. If the condition of the belt is satisfactory, then check the belt tension using one of the methods described below (depending on the type and configuration of the engine).
A/C Compressor Belt
Removing
1. Working under the front of the car, remove the screws and plastic shield under the fender to access the crankshaft pulley. To expand the working space, you can also additionally remove the engine mudguard by unscrewing the screws.
2. Turn the crankshaft with a socket head on the pulley bolt so that the belts can be inspected (or belt) along the entire length. Check for cracks, signs of burning or mechanical damage on the belts. Also check the belt for glossy areas and delamination. If damage or signs of wear are found, replace the belt.
3. Disconnect the battery from the ground.
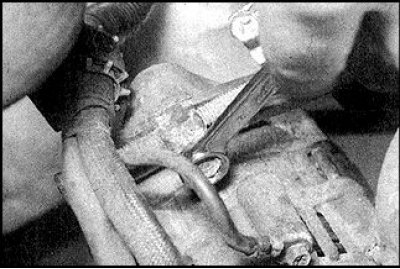
4. Loosen the nut securing the belt tensioner to the engine.
5. Unscrew the adjusting bolt, move the tensioner pulley away from the belt until it is completely loosened and remove the belt from the pulleys.
Installation
1. If a new belt is installed, first make sure that its type exactly matches the type being replaced.
2. Put the belt on the pulleys.
3. Turn the adjusting bolt to tension the belt.
Tension adjustment
1. Working under the front of the car, remove the screws and plastic shield under the fender to access the crankshaft pulley. To expand the working space, you can also additionally remove the engine mudguard by unscrewing the screws.
2. Turn the crankshaft with a socket head on the pulley bolt so that the belts can be inspected (or belt) along the entire length. Check for cracks, signs of burning or mechanical damage on the belts. Also check the belt for glossy areas and delamination. If damage or signs of wear are found, replace the belt.
3. Proper belt tension prolongs belt life. Avoid over-tensioning the belt as this will increase wear on the alternator bearings.
4. Belt tension is checked by the amount of deflection in the middle between the two pulleys at the top of the belt drive circuit. Under the action of a given force, the belt deflection should be within the normal range.
5. To adjust the tension, loosen the tensioner roller nut and turn the adjusting bolt until the correct tension is obtained. After adjustment, turn the crankshaft two turns and check the belt tension again.
6. When finished, tighten the tensioner pulley nut to the specified torque and connect the battery to ground.
7. Install the removed shields, wheel and lower the car.
Power steering pump drive belt
Removing
1. Working under the front of the car, remove the screws and plastic shield under the fender to access the crankshaft pulley. To expand the working space, you can also additionally remove the engine mudguard by unscrewing the screws.
2. Turn the crankshaft with a socket head on the pulley bolt so that the belts can be inspected (or belt) along the entire length. Check for cracks, signs of burning or mechanical damage on the belts. Also check the belt for glossy areas and delamination. If damage or signs of wear are found, replace the belt.
3. Disconnect the battery from the ground. On vehicles with air conditioning, remove the A/C compressor drive belt.
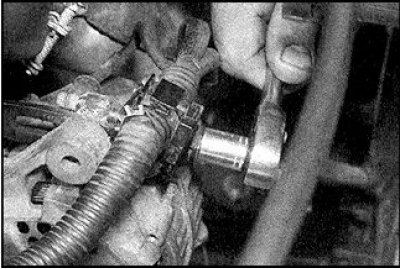
4. Loosen the nuts (or bolts) power steering pump bracket.
5. Loosen the belt by unscrewing the adjusting bolt and remove the belt from the pulleys.
Installation
1. Put the belt on the pulleys. If a new belt is installed, first make sure that its type exactly matches the type being replaced. Turn the adjusting bolt to tension the belt.
2. Install and adjust the A/C compressor drive belt.
Tension adjustment
1. Working under the front of the car, remove the screws and plastic shield under the fender to access the crankshaft pulley. To expand the working space, you can also additionally remove the engine mudguard by unscrewing the screws.
2. Turn the crankshaft with a socket head on the pulley bolt so that the belts can be inspected (or belt) along the entire length. Check for cracks, signs of burning or mechanical damage on the belts. Also check the belt for glossy areas and delamination. If damage or signs of wear are found, replace the belt.
3. Avoid over-tensioning the belt as this will increase wear on the alternator bearings.
4. Belt tension is checked by the amount of deflection in the middle between the two pulleys at the top of the belt drive circuit. Under the action of a given force, the belt deflection should be within the normal range.
5. Loosen the top and bottom nuts to adjust the tension (or bolts) pump bracket, then turn the adjusting bolt until the correct tension is obtained. After adjustment, turn the crankshaft two turns and check the belt tension again. Tighten all nuts (and bolts) pump mountings.
6. Install the removed shields, wheel and lower the car.
Alternator drive belt
Removing
1. Working under the front of the car, remove the screws and plastic shield under the fender to access the crankshaft pulley. To expand the working space, you can also additionally remove the engine mudguard by unscrewing the screws.
2. Turn the crankshaft with a socket head on the pulley bolt so that the belts can be inspected (or belt) along the entire length. Check for cracks, signs of burning or mechanical damage on the belts. Also check the belt for glossy areas and delamination. If damage or signs of wear are found, replace the belt.
3. Disconnect the battery from the ground. On vehicles with air conditioning, remove the A/C compressor drive belt. On vehicles with power steering, remove the power steering pump drive belt.
 |  |
4. Loosen the top and bottom nuts (or bolts) generator mounts.
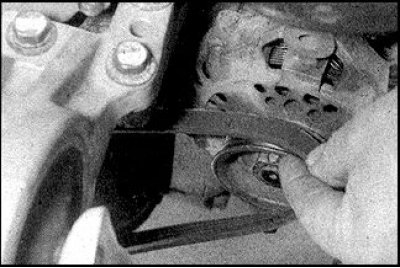
5. Loosen the belt by turning the adjusting bolt, remove the belt from the pulleys.
Installation
1. If a new belt is installed, first make sure that its type exactly matches the type being replaced.
2. Put the belt on the pulleys.
3. Turn the adjusting bolt to tension the belt.
4. Install and adjust the A/C compressor and power steering belts.
Tension adjustment
1. Working under the front of the car, remove the screws and plastic shield under the fender to access the crankshaft pulley. To expand the working space, you can also additionally remove the engine mudguard by unscrewing the screws.
2. Turn the crankshaft with a socket head on the pulley bolt so that the belts can be inspected (or belt) along the entire length. Check for cracks, signs of burning or mechanical damage on the belts. Also check the belt for glossy areas and delamination. If damage or signs of wear are found, replace the belt.
3. Avoid over-tensioning the belt as this will increase wear on the alternator bearings.
4. Belt tension is checked by the amount of deflection in the middle between the two pulleys at the top of the belt drive circuit. Under the action of a given force, the deflection of the belt must be within normal limits (see subsection 2.1).
5. When adjusting the tension, the top nut (or bolt) alternator must be slightly tightened and the lower nut (or bolt) released. Turn the adjusting bolt to adjust the tension. After adjustment, turn the crankshaft two turns and check the belt tension again. Tighten all nuts (and bolts) generator mounts.
6. Install the removed shields, wheel and lower the car.