


Brake system of the car Nissan Sunny 7 (B13)

Brake system — general information
The brakes have a dual-circuit hydraulic drive, each circuit controlling the brakes of the diagonal wheels. Braking of the front wheels is provided by a single-piston...
The brakes have a dual-circuit hydraulic drive, each circuit controlling the brakes of the diagonal wheels. Braking of the front wheels is provided by a single-piston...
Technical data of the brake system
Brake type: dual-circuit with vacuum booster, some cars are equipped with anti-lock braking system (ABS) with rear disc brakes. Cars without ABS have rear drum brakes....
Brake type: dual-circuit with vacuum booster, some cars are equipped with anti-lock braking system (ABS) with rear disc brakes. Cars without ABS have rear drum brakes....

Hydraulic brake drive — bleeding
To ensure efficient operation of the brakes, it is necessary to remove air from the hydraulic drive. When removing air, do not add used fluid. 1. If liquids other than...
To ensure efficient operation of the brakes, it is necessary to remove air from the hydraulic drive. When removing air, do not add used fluid. 1. If liquids other than...
Tubes and Hoses — Replacement
When replacing pipelines, immediately plug the connection being dismantled. 1. When disconnecting the hose, first unscrew the fitting, then remove the bracket securing...
When replacing pipelines, immediately plug the connection being dismantled. 1. When disconnecting the hose, first unscrew the fitting, then remove the bracket securing...

Front brake pads — replacement
Attention! The pads are changed only as a set for one axle. When cleaning the pads, remove dust and dirt by wiping with a rag soaked in alcohol; blowing is prohibited....
Attention! The pads are changed only as a set for one axle. When cleaning the pads, remove dust and dirt by wiping with a rag soaked in alcohol; blowing is prohibited....

Rear brake pads — replacement
1. Raise the rear of the vehicle and support it on stands. 2. Remove the rear wheels. 3. Disconnect the handbrake cable first from the bracket, then from the caliper...
1. Raise the rear of the vehicle and support it on stands. 2. Remove the rear wheels. 3. Disconnect the handbrake cable first from the bracket, then from the caliper...

Rear Drum Brake Pads — Replacement
1. Remove the drums. 2. Clean the brake shield and drums. 3. Pay attention to the location of the rear and front pads, springs and the gap adjuster between the pads and...
1. Remove the drums. 2. Clean the brake shield and drums. 3. Pay attention to the location of the rear and front pads, springs and the gap adjuster between the pads and...
Brake disc — removal, inspection and installation
Front brake discs Discs are changed only in pairs and with a set of pads. Examination 1. Raise the front of the vehicle and support it on stands. 2. Remove the wheels....
Front brake discs Discs are changed only in pairs and with a set of pads. Examination 1. Raise the front of the vehicle and support it on stands. 2. Remove the wheels....

Brake drums — removal, inspection and installation
Removal 1. Raise the rear of the vehicle and support it on stands. 2. Remove the wheel. 3. Release the handbrake. 4. If the drum cannot be removed, then bring the pads...
Removal 1. Raise the rear of the vehicle and support it on stands. 2. Remove the wheel. 3. Release the handbrake. 4. If the drum cannot be removed, then bring the pads...

Front Brake Caliper — Removal and Installation
Removal 1. Raise the front of the vehicle and support it on stands. 2. Remove the wheel. 3. To reduce fluid loss, tightly close the tank cap using plastic film, or pinch...
Removal 1. Raise the front of the vehicle and support it on stands. 2. Remove the wheel. 3. To reduce fluid loss, tightly close the tank cap using plastic film, or pinch...
Rear Brake Caliper — Removal and Installation
Removal 1. Raise the rear of the vehicle and support it on stands. 2. Remove the wheel. 3. Release the handbrake cable housing and disconnect the cable from the lever on...
Removal 1. Raise the rear of the vehicle and support it on stands. 2. Remove the wheel. 3. Release the handbrake cable housing and disconnect the cable from the lever on...

Wheel cylinder — removal and installation
Wheel cylinder parts for drum brakes 1. Case; 2. Piston head; 3. Piston; 4. Piston cuff; 5. Cylinder; 6. Air bleed nipple; 7. Cap Wheel cylinder nipple and bolts A....
Wheel cylinder parts for drum brakes 1. Case; 2. Piston head; 3. Piston; 4. Piston cuff; 5. Cylinder; 6. Air bleed nipple; 7. Cap Wheel cylinder nipple and bolts A....

Master Brake Cylinder — Removal and Installation
Removal 1. Unscrew the plug and remove the liquid from the feed tank (or pump it out by unscrewing the nipple on the wheel). 2. Disconnect the wires from the fluid level...
Removal 1. Unscrew the plug and remove the liquid from the feed tank (or pump it out by unscrewing the nipple on the wheel). 2. Disconnect the wires from the fluid level...
Brake pedal — adjustment, removal and installation
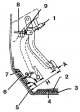
Measuring pedal height 1. Brake light switch; 2. Rug; 3. Waterproofing layer; 4, 6. Anti-noise coating of the partition; 5. Gender; 7. Rug; 8. Pusher; 9. Lock nut; A....
Measuring pedal height 1. Brake light switch; 2. Rug; 3. Waterproofing layer; 4, 6. Anti-noise coating of the partition; 5. Gender; 7. Rug; 8. Pusher; 9. Lock nut; A....
Vacuum brake booster — removal and installation
Removal 1. Disconnect the battery from ground. 2. On carburetor engines, the booster can be removed without removing the intake manifold or master cylinder. 3. On...
Removal 1. Disconnect the battery from ground. 2. On carburetor engines, the booster can be removed without removing the intake manifold or master cylinder. 3. On...
Brake Booster and Check Valve — Removal and Installation
Brake booster with integrated valve The valve is inserted into the front part of the amplifier body. Removal 1. Loosen the clamp and disconnect the hose from the valve....
Brake booster with integrated valve The valve is inserted into the front part of the amplifier body. Removal 1. Loosen the clamp and disconnect the hose from the valve....
Handbrake lever — removal and installation
Removal 1. Disconnect the battery from ground. 2. Remove the center section of the front panel (see subsection 13.25 ). 3. Release the handbrake completely. 4....
Removal 1. Disconnect the battery from ground. 2. Remove the center section of the front panel (see subsection 13.25 ). 3. Release the handbrake completely. 4....

Handbrake cables — removal and installation
Rear brake cables There are 2 cables provided – left and right. Removal 1. Raise the front of the vehicle and support it on stands. 2. Release the handbrake. 3. On rear...
Rear brake cables There are 2 cables provided – left and right. Removal 1. Raise the front of the vehicle and support it on stands. 2. Release the handbrake. 3. On rear...

Adjusting the handbrake
1. Check the gaps between the pads and the disc (drum) by pressing the pedal several times. 2. Raise the rear of the vehicle and remove the wheels. 3. If the rear brakes...
1. Check the gaps between the pads and the disc (drum) by pressing the pedal several times. 2. Raise the rear of the vehicle and remove the wheels. 3. If the rear brakes...
Brake light switch — removal and installation
The switch plunger is driven by a ratchet. The switch is self-adjusting, to cock the switch, pull the plunger out fully. Removal 1. Disconnect the battery from ground....
The switch plunger is driven by a ratchet. The switch is self-adjusting, to cock the switch, pull the plunger out fully. Removal 1. Disconnect the battery from ground....
Handbrake light switch — removal and installation
Removal 1. Disconnect the battery from ground. 2. Remove the center section of the front panel. 3. Disconnect the connector. 4. Loosen the screws and remove the switch...
Removal 1. Disconnect the battery from ground. 2. Remove the center section of the front panel. 3. Disconnect the connector. 4. Loosen the screws and remove the switch...
Anti-lock braking system (ABS)
The system is controlled by the ECU processor unit. If the system fails, the control lamp on the instrument panel lights up, and the brakes operate normally. Diagnostics...
The system is controlled by the ECU processor unit. If the system fails, the control lamp on the instrument panel lights up, and the brakes operate normally. Diagnostics...
This section is available on: russian, bulgarian, belarusian, ukrainian, serbian, croatian, romanian, polish, slovak, hungarian
Similar information for other Nissan models
➜ Chassis: Brake system Nissan Micra 3 (2002-2010, petrol)
➜ Chassis: Brake system Nissan Almera 1 (1995-2000)
➜ Chassis: Brake system Nissan Patrol 4 (1987-1997, petrol)
➜ Chassis: Brake system Nissan Primera 1 (1990-1996, petrol)
➜ Chassis: Brake system Nissan Maxima 4 (1994-1999)
➜ Chassis: Brake system Nissan Serena 2 (1999-2005)
Link in different formats to this section
TEXTHTMLBB Code
- General information
- User manual
- Faults en route
- Maintenance
- Power unit
- Petrol engines (1.4 and 1.6)
- Engine overhaul (1.4 and 1.6)
- Petrol engines (2.0)
- Engine overhaul (2.0)
- Diesel engine
- Cooling system
- Heating and ventilation
- Power system (carburetor)
- Power system (injector)
- Fuel injection system
- Single point injection
- Multi-point injection
- Decreased toxicity
- Engine electrical equipment
- Transmission
- Clutch
- Mechanical gearbox
- Automatic gearbox
- Drive shafts
- Chassis
- Brake system
- Car suspension
- Steering
- Body
- Body repair
- Body elements
- Doors, locks and windows
- Electrical equipment
- Equipment and devices
- Electrical circuits
Cookies are used to improve the site's performance. 💻 Continue by agreeing to the terms.