


Table of contents: Upper section of the intake manifold…↓ Lower section of the intake manifold ↓
Before removing the intake manifold, disconnect the wiring and hoses from the listed components.
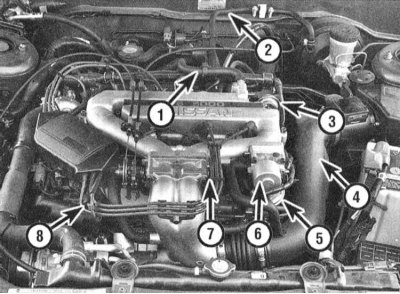
1 - PCV valve; 2 - Brake booster; 3 - Power valve actuator; 4 - Air intake duct; 5 - EGR valve with socket; 6 - Assembling the IAC/Air Shut-Off Valve; 7 - TPS/Throttle Closed Position Switch; 8 - Ignition distributor cap with high voltage wires
Attention! Proceed with the procedure only after the power unit has completely cooled down.
Upper section of the intake manifold (pressure chamber)
1. Release the pressure in the fuel system (see Chapter Power and exhaust systems), then disconnect the negative cable from the battery.
Warning! If the car stereo system is equipped with a security code, make sure you have the correct combination to activate the audio system before disconnecting the battery!
2. Drain the coolant from the radiator and engine block, empty the cooling system, (see Chapter Settings and ongoing maintenance).
3. Remove the air intake duct (see Chapter Power and exhaust systems), then disconnect the rod, hoses and wiring from the throttle body.
4. Disconnect the high-voltage wires from the spark plugs and release them from the intermediate clips on the supercharger housing. Remove the distributor cap and move it to the side without disconnecting the high-voltage wires.
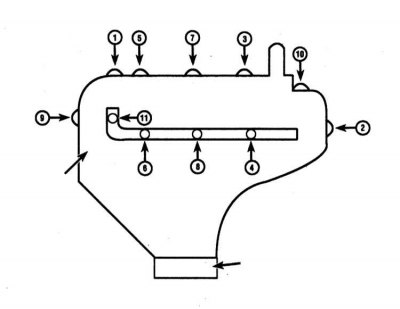
5. Loosen the upper intake manifold mounting bolts in the reverse order to that shown in the illustration. Remove the upper plenum chamber with the throttle body attached to it. Disconnect the ground busbar connected to the lower portion of the plenum chamber. Loosen the lower plenum mounting bolts working from the center outward.
6. Before installing the upper section, carefully clean the mating surfaces of the pipeline, the upper and lower parts of the discharge chamber. After completely removing traces of the old gasket and sealant from the surfaces, wipe them with a rag soaked in solvent.
7. Place a new gasket on the intake manifold studs, then place the lower part of the plenum chamber on top and, moving from the edges to the center, tighten the mounting bolts to the required torque.
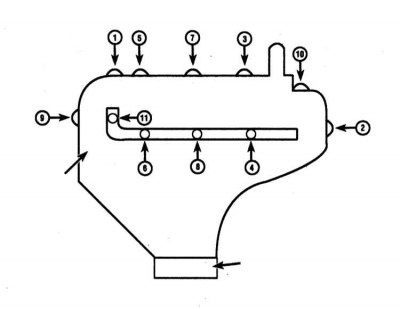
8. Place the sealing gasket on the lower chamber and install the upper chamber. Tighten the upper chamber mounting bolts in a strictly defined order with the required force.
Lower section of the intake manifold
1. Remove the top section of the pipeline.
2. Disconnect the electrical wiring from the coolant temperature sensor-switch, CTS, power valve operation control solenoid, EGR solenoid valve, and EGR temperature sensor.
3. Mark and disconnect all vacuum hoses that interfere with dismantling the lower section of the pipeline.
4. Remove the fuel line with the injection injectors from the pipeline (see Chapter Power and exhaust systems).
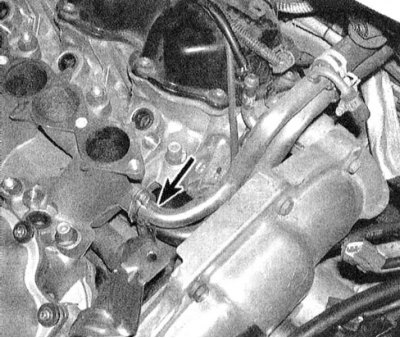
5. Remove the mounting bolts and disconnect the coolant tubes from the end of the pipeline facing the transmission.
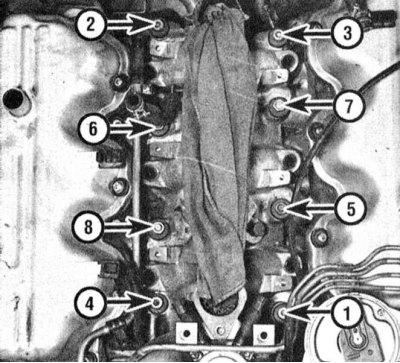
6. Proceed in the reverse order to that shown in the illustration, in several steps (1/4 turn per set) loosen the pipeline mounting bolts/nuts.
7. If the pipeline is "stuck" and cannot be separated from the cylinder heads, tap it with a hammer through a wooden block.
Caution! Never use a lever to pry the pipeline under the mating surface.
8. Carefully clean the mating surfaces of the pipeline and cylinder heads, completely removing traces of the old gasket and sealant material and then wiping with a rag soaked in acetone.
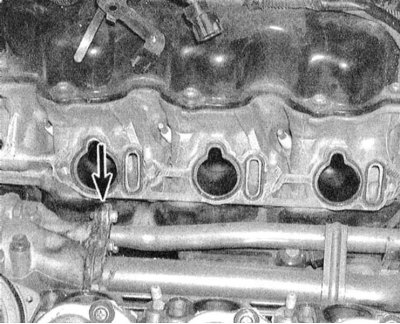
9. Before installing new seals and piping, check the condition of the cooling tract tubes underneath. Install the gaskets and piping, making sure that the components are correctly positioned on the guide pins. Screw on the mounting nuts.
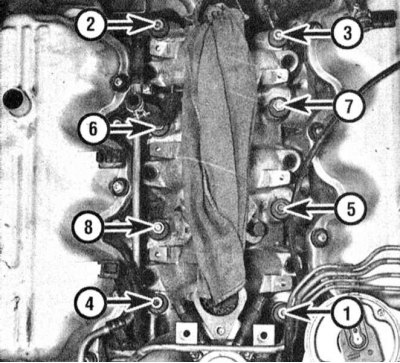
10. Tighten the pipeline fasteners to the required force in a strictly defined order in three stages.
Note: Nut tightening forces are different from bolt tightening forces.
11. Further installation is carried out in the reverse order of dismantling the components. Do not forget to fill the cooling system and change the engine oil (see Chapter Settings and ongoing maintenance).
12. Start the engine and check it for signs of fuel leaks, coolant leaks and vacuum losses.