


Table of contents: Removal and installation ↓ Check after removal ↓
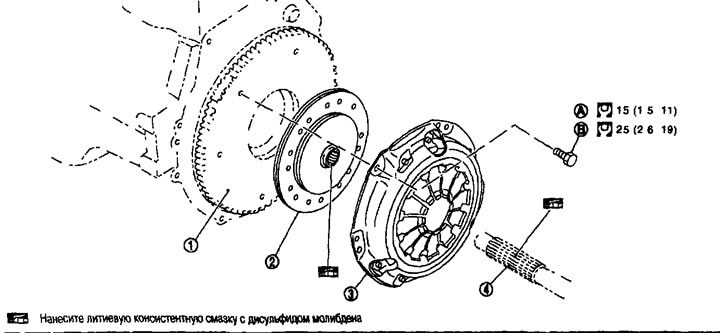
Engines MR20DE, QR25DE 1. Flywheel; 2. Clutch slave disc; 3. Clutch housing; 4. Drive shaft; A. First pass; B. Final pass.
Attention:
- When removing a manual transmission from a vehicle, always replace the concentric slave cylinder (CSC). To remove the manual transmission, the CSC insert is moved to its original position. Dust on the sliding components of the clutch driven plate can damage the CSC seal and cause a clutch fluid leak.
- Avoid getting grease on the surface of the clutch driven disc, pressure plate and flywheel.
- When installing, make sure that the grease applied to the drive shaft does not come into contact with the driven clutch disc.
- Do not clean the clutch disc with solvent.
Removal and installation
Caution: Always replace the concentric slave cylinder (CSC) when removing a manual transmission from a vehicle. To remove the manual transmission, the CSC insert is returned to its original position. Dust on the sliding components of the clutch driven plate can damage the CSC seal and cause clutch fluid leakage.
Removal
1. Remove the manual transmission assembly from the vehicle. See below.
2. Loosen the clutch housing mounting bolts.
3. Remove the clutch housing and clutch driven disc.
Caution: Do not drop the clutch disc.
Installation
1. Clean the splines of the clutch driven disc and drive shaft, removing grease and dust.
2. Apply the recommended grease to the splines of the clutch driven disc and drive shaft.
Caution: Apply grease to the specified points. Otherwise, knocking, incomplete disengagement or damage to the clutch may occur. Excessive grease may cause slippage or shaking, and if it comes into contact with the CSC seal, it may cause clutch fluid leakage. Wipe off excess grease. Remove grease that has come out of the components.
3. Install the driven disc using a suitable clutch centering mandrel.
4. Install the clutch cover. Tighten the clutch cover mounting bolts by hand.
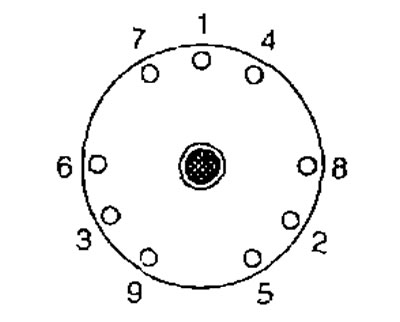
5. Tighten the clutch housing mounting bolts evenly in two passes to the required torque in the order shown by the numbers in the figure.
6. Install the manual transmission assembly on the vehicle. See below.
The article was copied from here [www.NissanBook.ru]
Check after removal
Clutch slave disc
- Measure the runout around the perimeter relative to the center splines of the driven clutch disc.
- If it differs from the norm, replace the driven clutch disc.
Limit runout/diameter of the measured section: See below. "Technical data and specifications".
- Check the free play in the splines of the driven clutch disc and in the splines of the secondary shaft drive gear along the perimeter of the disc. If it differs from the norm, replace the driven clutch disc.
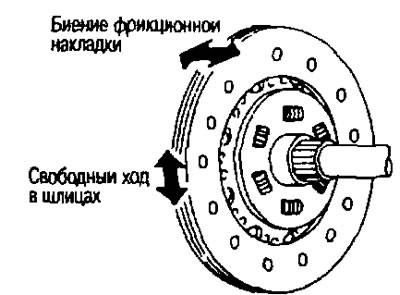
Maximum allowable free play in splines (on the outer edge of the disk): See below p. "Technical data and specifications".
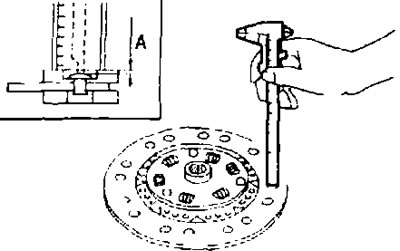
- Using a caliper, measure the distance "A" from the rivet head to the surface of the friction lining of the disc. If it exceeds the permissible wear, replace the driven clutch disc.
Distance from rivet head to friction lining: See below "Technical data and specifications".
Clutch housing
- Check the unevenness of the diaphragm spring peaks with the lever inserted. If it is different from the norm, adjust the lever height using the diaphragm adjustment key (special tool ST20050240).
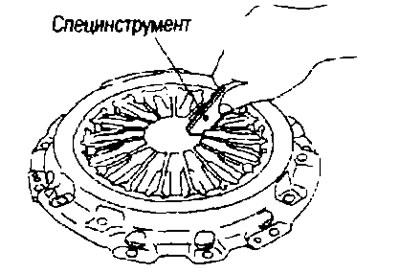
Unevenness of the diaphragm spring peaks: See below. "Technical data and specifications".
- Check the clutch housing thrust ring for wear or damage. Replace the clutch housing assembly if necessary.
Note:
- A worn thrust ring will make a ticking sound when the rivet is tapped with a hammer.
- A broken thrust ring will make a clinking sound when the housing is shaken.
- If traces of burning or discoloration are found on the contact surface between the clutch housing pressure plate and the driven clutch disk, remove them with emery cloth. If the surface is damaged or deformed, replace the clutch housing.