Left tailgate
Removing
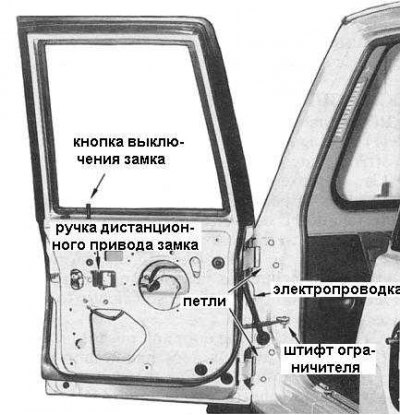
1. Give the screw of fastening of facing of the internal handle of the remote drive of the lock to a door. Remove the cover.
2. Using a small flathead screwdriver, carefully pry off the trim strips from the inside handle. Loosen the fixing screws and remove the handle from the door.
3. Insert a flat wide blade of a thin screwdriver between the interior trim panel and the door frame as close as possible to one of the retainers. Alternately releasing the clips, remove the trim panel.
Note. When removing the door trim panel, leave the plastic tabs attached to the back of the panel. If the clips are left in the inner door panel, they may be damaged. In case of problems, use a suitable cutter, the blade of which must be inserted between the trim panel and the door frame to cut the retainer. Be careful not to damage the finish and paintwork of the door.
4. Give screws of fastening of a loudspeaker, disconnect electroconducting and remove a loudspeaker from the panel of a door.
5. Carefully peel off the plastic sealing film from the inner door panel and set it aside. The left tailgate with the trim panel and sealing film removed is shown in the accompanying illustration.
6. Disconnect the actuating rod of the off button from the lock by releasing it from the plastic retainer. Remove the stem from the door. The tailgate lock actuator components are shown in the accompanying illustration.
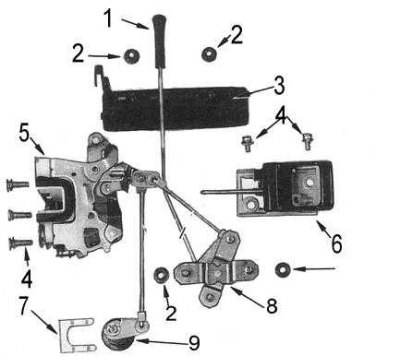
1 - lock off button; 2 - nut; 3 - external handle; 4 - screws; 5 - lock; 6 - remote lock handle; 7 - latch; 8 - heel; 9 - lock cylinder
7. Give nuts of fastening to the internal panel of a door of a heel of the lock.
8. On models with central locking, disconnect the actuating rod of the drive motor from the lock mechanism.
9. Disconnect the actuating rod from the lock cylinder lever.
10. Grasp the edge of the lock cylinder retainer turned up with pliers and remove the retainer from the groove in the lock body.
11. Remove the lock cylinder together with the seal from the door.
12. Give fixing nuts and remove the external handle from a door.
13. Give fixing screws and remove the mechanism of the lock with a heel from a door.
Installation
Installation is in the reverse order.
1. If necessary, lubricate the lock mechanism with universal grease before installation.
2. Track correctness of placement on a door of a sealing film. A torn or otherwise damaged film should be replaced.
3. Check up a condition of clamps of the panel of finishing. Replace defective ones.
4. Install the trim panel on the door, snapping its fasteners firmly into place.
Right tailgate
Removing
1. Insert a flat wide blade of a thin screwdriver between the interior trim panel and the door frame as close as possible to one of the retainers. Alternately releasing the clips, remove the trim panel.
Note. When removing the door trim panel, leave the plastic tabs attached to the back of the panel. If the clips are left in the inner door panel, they may be damaged. In case of problems, use a suitable cutter, the blade of which must be inserted between the trim panel and the door frame to cut the retainer. Be careful not to damage the finish and paintwork of the door.
2. Give screws of fastening of a loudspeaker, disconnect electroconducting and remove a loudspeaker from the panel of a door.
3. Carefully peel off the plastic sealing film from the inner door panel and set it aside. The left tailgate with the trim panel and sealing film removed is shown in the accompanying illustration.
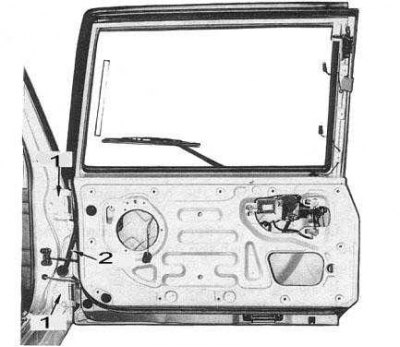
1 - loop; 2 - wiring
4. Give fixing screws and remove a finishing slip from a door rack.
5. Give the screw of fastening of the handle of a drive of a heel of the lock. Remove the handle.
6. If necessary, use an impact screwdriver to loosen the lock foot screws. Take the heel off the door. The components of the drive and the lock mechanism of the right wing of the lock door are shown in the accompanying illustration.
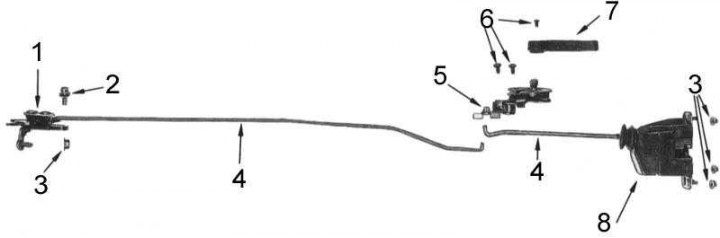
1 - top lock; 2 - bolt; 3 - nut; 4 - executive rod; 5 - the heel of the castle; 6 - screws; 7 - handle; 8 - bottom lock
7. Give a nut and a bolt of the top lock and remove assembly of the lock with an executive rod from a door.
8. Give fixing nuts and remove from the lower lock from the bottom edge of a door.
Installation
Installation is in the reverse order.
1. If necessary, lubricate the lock mechanism with multipurpose grease before installation.
2. Track correctness of placement on a door of a sealing film. A torn or otherwise damaged film should be replaced.
3. Check up a condition of clamps of the panel of finishing. Replace defective ones.
4. Install the trim panel on the door, snapping its fasteners firmly into place.
Removal and installation of tailgate doors
Removing
1. Circle the door hinges with a marker.
Note. If the right door leaf is being removed, the spare wheel assembly must first be removed to lighten the weight of the door.
2. Give screws of fastening of the back combined lantern, partially take the lantern block from a lateral part of the panel of a leaf of a door which is subject to removal.
3. Disconnect the electrical connectors and remove the electrical wiring through the rubber lined hole in the door pillar.
4. When removing the right wing, it is also necessary to disconnect the windshield washer fluid supply hose.
5. Remove the door limiter pin by knocking it out of the bracket upwards with a drift and hammer.
6. Ask the assistant to hold a door and give bolts of fastening of a loop to a body.
Installation
Installation is in the reverse order.
1. Lubricate the door hinges with sealant before installation.
2. Before closing the door to check the correct position, make sure that the hinges are installed in accordance with the landing marks applied during the dismantling process.
3. Using a punch and hammer, install the door stop pin.
4. Connect the electrical wiring and check the correct functioning of all components of the door before installing the rear combination lamp.
5. Carefully close the door and check that it is correctly positioned in relation to the vehicle body panels. If necessary, make adjustments by loosening the hinge bolts and adjusting the position of the door accordingly.