


Table of contents: Checking the operation of the support ↓ Caliper overhaul ↓
Note: Before you start, please read the Note at the beginning Chapters 12.
Checking the operation of the support
1. If damage occurs in the brake system (the car pulls to the side when braking), the front brake calipers can be checked as follows.
2. Place the car on a level surface, apply the handbrake and lock the rear wheels. Loosen the wheel nuts, jack up the front of the car and support it on axle stands. Remove the wheel.
3. Remove the brake pads, then apply a spring balance to one of the wheel struts and measure the hub bearing torque. This measurement should be within the specified range, record the measurement as force "A".
4. Install the brake pads and caliper housing, press the brake pedal several times until the pads are installed, then press the brake pedal and hold the pressure for 5 seconds. Release the pedal, rotate the brake disc 10 full revolutions and measure the hub bearing torque again; record the measurement as force "B".
5. Subtract "A" from "B". If the result exceeds 103N, remove the caliper as described below to check the caliper guide pins for wear. Replace them (and rubber dust caps), if they are worn or damaged, or clean and lubricate them. Also check the brake pads.
6. Repeat the measurements as described above. If the calculated brake drag has not decreased, then the caliper piston is sticking or the piston seal is bad.
Caliper overhaul
7. Place the car on a level surface, apply the handbrake and lock the rear wheels. Loosen the wheel nuts, jack up the front of the car and support it on axle stands. Remove the wheel.
8. To limit fluid loss, remove the master cylinder reservoir cap and cover it with plastic or clamp the flexible hose with a G-clamp or similar tool.
9. Clean the area around the connection (photo), unscrew the banjo bolt of the flexible hose connection ('C' in Figure 9.15). Remove the two sealing gaskets.
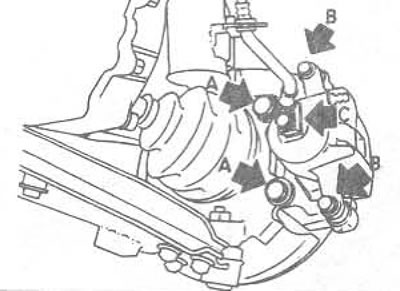
Figure 9.15. Front brake caliper mountings: A Bolts for fastening the caliper to the hub mounting element; In Guide Pin Bolts; With Banjo Bolt Flexible Hose Connection
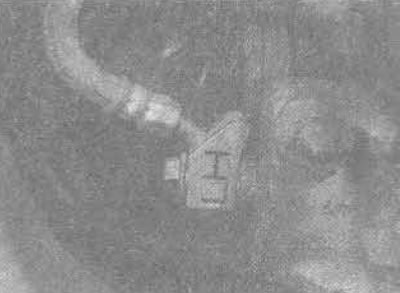
14.9 Clean the front flexible hose connection from the front brake caliper - LH on the connection identifies the left caliper hose
10. Loosen both caliper guide pin bolts, remove the lower guide pin bolt, and turn the caliper body upward.
11. Remove the brake pads, linings and anti-rattle springs.
12. Unscrew the upper guide pin, disconnect the caliper body from the suspension. Remove the guide pins. Remove the rubber dust cap from each guide pin.
13. Unscrew the caliper hanger from the hub mounting element.
14. Place a small block in the caliper jaws and remove the piston including the dust seal.
15. Remove the dust seal from the piston, remove the piston seal from inside the caliper cylinder.
16. The caliper is assembled in reverse order.
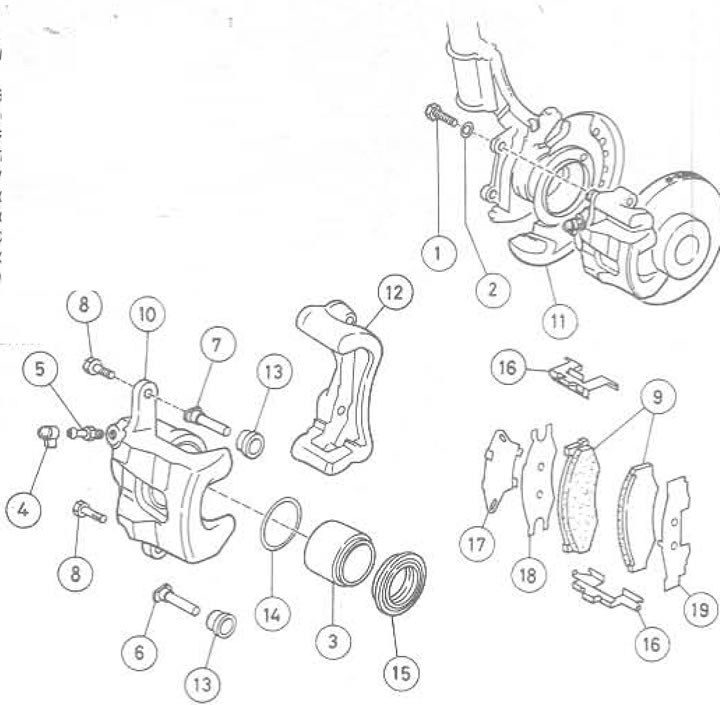
Figure 9.16. View of the front brake caliper: 1. Bolt; 2. Washer; 3. Piston; 4. Dust cap; 5. Branch pipe; 6. Lower guide pin; 7. Upper guide pin; 8. Guide pin bolt; 9. Brake pads; 10. Caliper housing; 11. Brake disc shield; 12. Caliper suspension; 13. Rubber dust cap; 14. Piston seal; 15. Dust seal; 16. Anti-rattle spring; 17. Gasket; 18. Gasket; 19. Gasket
17. Place the caliper body on the suspension, install the brake pads, install the guide pin bolts, tighten them to the tightening torque specified in the Specifications.
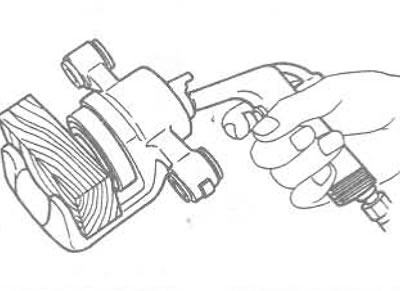
Figure 9.17. Blowing out the caliper piston with compressed air
18. Check the fluid level in the master cylinder reservoir, top up if necessary. Install the wheel and lower the car.
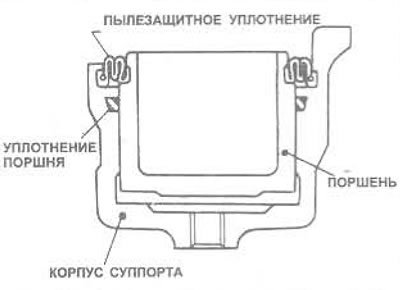
Figure 9.18. Correct installation of the caliper piston seal and dust seal
19. Repeat the above procedure on the opposite caliper - always work on both calipers at the same time.